P0345 Code: Tackling Camshaft Position Sensor Faults Problems
P0345 Code: Tackling Camshaft Position Sensor Faults Problems
Have you ever encountered the dreaded Check Engine Light with code P0345? You’re in the right place!
In this guide, we’ll explore everything you need to know about this code, including its meaning, symptoms, and causes. But that’s not all – we’ll also provide you with the knowledge and expertise to diagnose and fix the problem like a pro.
So, let’s get started!
P0345 Code: Quick Overview
But first, let’s take a look at the P0345 code overview!
Definition: Camshaft Position Sensor A Circuit Malfunction (Bank 2)
Severity: High
DIY Skill Level: Advanced
Continue To Drive?: No
Estimated Repair Cost: $50 – $200
What Does the P0345 Code Mean?
The P0345 diagnostic trouble code (DTC) indicates a camshaft position sensor A circuit malfunction in Bank 2. This code is commonly found in Nissan, Ford, Infiniti, and Lexus car models.
In modern vehicles, the engine’s camshaft plays a crucial role in the precise timing of the intake and exhaust valves. The camshaft position sensor, located near the camshaft, monitors the position and speed of the camshaft. This sensor sends the recorded information to the engine control module (ECM), which uses it to determine the optimal fuel injection and ignition timing.
When the camshaft position sensor A circuit in Bank 2 malfunctions, the ECM doesn’t receive the expected signals from the sensor. As a result, the code P0345 will be set.
This code is often associated with other DTCs like P0340 (Camshaft Position Sensor A Circuit Malfunction Bank 1), P0344 (Camshaft Position Sensor Circuit Intermittent), and P0349 (Camshaft Position Sensor A Circuit Intermittent Bank 2). These codes may share similar causes and symptoms, making it important to diagnose and address them collectively for a comprehensive repair.
Read more: P0340 – Camshaft Position Sensor “A” Circuit
How Serious is the P0345 Code?
The P0345 code is considered a high severity level as it can lead to significant issues, including potential no-start situations that may leave you stranded. While it may not cause immediate breakdown or safety hazards, it is crucial to address the issue promptly to avoid potential engine performance problems and further complications.
Continuing to drive with the P0345 code can be risky as it may lead to serious issues such as stalling, misfires, or poor acceleration. To ensure safe driving conditions and prevent potential engine damage, it is strongly recommended to diagnose and repair this problem as soon as possible.
Symptoms of the P0345 Code
You can observe various symptoms when the P0345 trouble code appears, including:
- Check Engine Light, traction control, and/or “Check VSC” light illuminated
- Engine misfires or runs roughly
- Decreased engine power and performance
- Hesitation or stumbling during acceleration
- Engine stalling or difficulty starting
- Poor fuel efficiency
What Causes The P0345 Code?
Possible causes of P0345 may include:
- Faulty/Contamination camshaft position sensor
- Wiring or connector issues in the sensor circuit
- Sensor alignment or synchronization problems
- Timing belt/chain problems affecting the camshaft’s position
- Bad crankshaft position sensor
- Electrical problems such as a short or open circuit
- ECM or PCM software issues
How To Diagnose And Fix The Code P0345
Now, it’s time to explore the diagnosis and repair process. In this section, we’ll guide you through the necessary tools and parts, outline a step-by-step procedure, and discuss the level of DIY repairs you can undertake. By following this guide, you can save money on repairs and better understand your vehicle’s problem.
Essential Tools and Parts
To diagnose and repair the P0345 trouble code, you may need the following tools and parts:
- OBD-II scanner or code reader
- Multimeter
- Basic hand tools (screwdrivers, wrenches, sockets)
- Camshaft position sensor
- Crankshaft position sensor
- Wiring connectors and terminals
- Electrical tape or heat shrink tubing for wire repairs
- MAF sensor cleaner spray
Step-by-Step Procedure
- Connect the OBD-II scanner or code reader to the vehicle’s diagnostic port to retrieve the stored trouble code.
- Inspect the wiring and connectors related to the camshaft position sensor in Bank 2 for any visible damage or loose connections.
- Check the camshaft position sensor for any dirt or corrosion. Clean it if needed.
- If no apparent issues are found, use a multimeter to test the resistance and voltage of the sensor and its circuit. Compare the readings obtained to the manufacturer’s specifications.
- If the sensor is faulty, replace it with a new one, ensuring proper alignment and secure connection.
- Test the crankshaft position sensor voltage if the camshaft sensor works properly. If the reading is different from the manufacturer’s specifications, replace it.
- Perform a PCM test if the above steps cannot help you fix the P0345 code.
- Clear the trouble code and test drive to ensure the issue has been resolved.
Notes:
- Before replacing the camshaft position sensor, keep the engine cool to avoid potential burns.
- Take caution when working with electrical connections and wiring to prevent short circuits or damage.
- Refer to the vehicle’s service manual or online resources for specific instructions and component locations.
DIY Repair Level and Estimated Costs
The repair level for diagnosing and resolving the P0345 code can vary depending on an individual’s mechanical expertise. While some DIY enthusiasts with experience in automotive repairs may successfully tackle this task, it is recommended to seek professional assistance if uncertain.
Here is a table providing a general overview of the estimated costs:
| Repair Task | Estimated Cost Range |
| Camshaft position sensor repair/replacement | $50 – $250 |
| Wiring connectors and terminals | $50 – $100 |
| Professional Diagnostic Fee | $50 – $150 |
Please note that these costs are approximate and can vary significantly. It’s always recommended to consult with a trusted mechanic or automotive service center to obtain accurate cost estimates based on your specific vehicle and location. Their expertise and guidance can ensure a proper diagnosis and cost-effective resolution of the P0345 code.
Final Thoughts
You’re now gaining a comprehensive understanding of the P0345 trouble code and its implications for your vehicle’s performance! With this knowledge, you can now tackle the challenges of dealing with a camshaft position sensor A circuit malfunction in Bank 2.
Remember, timely diagnosis and repair are crucial to maintaining your vehicle’s optimal performance and avoiding further complications. If you’re confident in your DIY skills, go ahead and address the issue using the step-by-step guide provided. However, if you’re unsure or encounter difficulties, don’t hesitate to seek professional assistance from a trusted mechanic.
Additionally, take advantage of our OBD Code List Generator to find specific code lists, or use our OBD code lookup tool for instant reference.
We hope this guide has been helpful to you. Feel free to share your thoughts or ask questions in the comments below. Safe driving and happy repairing!
Reference:
- Camshaft – Wikipedia
- Understanding Camshaft Position Sensor – studentlesson.com
- Variable Valve Timing (VVT) – austincc.edu
C0265 Chevy Code: Your ABS Repair Guide
C0265 Chevy Code: Your ABS Repair Guide
When your Chevy vehicle shows the C0265 code, it can be confusing. While this trouble code might lead many to assume that the entire control module is at fault, the actual culprit lies in a specific component within the Electronic Brake Control Module (EBCM).
This can be a bit of a head-scratcher for Chevy owners. But don’t worry, we’ll help you understand it better. In this article, we’re going to take a closer look at the C0265 code.
If you’ve ever wondered about this code, keep reading to learn more.
C0265 Chevrolet: A Quick Summary
Look at the overview of the C0265 Chevy code.
- Definition: EBCM Motor Relay Circuit Low When On
- Severity: Medium
- DIY Skill Level: Beginner
- Continue To Drive?: Yes
- Estimated Repair Cost: $20 – $200
What Does The C0265 Mean In Chevy Vehicles?
In Chevy and GMC vehicles, this C0265 code is primarily triggered by a faulty connection at the EBCM ground, which is situated inside the module itself, not the whole EBCM. This ground issue affects the proper functioning of the anti-lock braking system (ABS).
The EBCM is a vital component of the ABS in Chevrolet and GMC vehicles. It serves as the brain behind ABS operations, responsible for regulating and optimizing braking performance. Inside the EBCM, a complex system of sensors and circuits constantly monitors wheel speed and makes rapid adjustments to prevent wheel lockup during hard braking, enhancing vehicle stability and control.
U1041 is commonly set along with C0265, this code indicates a potential loss of communication with the brake module. The C0265 code is predominantly found in various Chevrolet models. Some commonly affected models include the Silverado, Tahoe, Suburban, S-10, and Trailblazer.
How Serious Is The C0265 Chevrolet Code?
The severity of the C0265 Chevy code is moderate. While it doesn’t demand an immediate halt to driving, it shouldn’t be ignored. Continuing to drive with this code may reduce ABS effectiveness, potentially compromising safety. Our advice is to address it promptly. While it’s generally safe to continue driving, get it checked and fixed soon to ensure your ABS functions correctly.
Read more: C0265 Chevy Code: Throttle Position Sensor Issues Explained
What Are The Signs Of The C0265 Chevy Code?
Here are some common signs of C0265 in Chevrolet vehicles:
- Illuminated Check engine light, ABS warning light, or Park brake warning light on the dashboard
- Defective traction control system
- Reduced braking performance
- Difficulty accessing the 4WD
What Are The Causes Of The C0265 Code In Chevrolet Vehicles?
The C0265 code can be triggered by several underlying causes. Here are the primary culprits:
- Poor connection at the EBCM ground (specific to each vehicle type):
- Midsize Chevy/GMC vehicles: Ground 304
- Chevy SSR: Ground 400
- Full-size trucks and utility vehicles: Ground 110
- Corrosion or damage to wiring and connectors
Read more: P1345 Chevy: Meaning, Symptoms, Causes and Fixes
How To Diagnose And Repair C0265 Chevrolet Code?
When dealing with the C0265 Chevy code, proper diagnosis and repair are essential. Here’s what you’ll need and a step-by-step guide to tackle this issue.
Diagnostic Tools And Essential Parts
To diagnose and repair the C0265 Chevy code, you may need the following tools and parts:
- OBD scanner
- Soldering iron and solder
- Wiring diagram for your specific vehicle
- Wire brush or sandpaper for cleaning
- Basic hand tools (screwdrivers, pliers)
Step-by-Step Guide
- Code retrieval: Connect a scan tool or OBD-II code reader to retrieve the C0265 and any additional codes.
- Safety first: Ensure the vehicle is on a level surface, the ignition is off, and you’ve disconnected the battery.
- Locate EBCM: Find the EBCM in your vehicle. Refer to your wiring diagram if needed.
- Access EBCM: Carefully open the EBCM unit to access the circuit board inside.
- Identify ground points: Locate the specific ground point causing the issue. Refer to your vehicle’s documentation for the correct ground reference.
- Soldering: Gently solder the problematic ground point. Ensure a strong and secure connection.
- Clean surrounding area: Clean the surrounding area to remove any corrosion or dirt that may have contributed to the problem.
- Reassemble: Close the EBCM unit and reattach it securely.
- Reconnect battery: Reconnect the vehicle’s battery and start the engine to check if the ABS warning light is off.
- Test drive: Take a short test drive to ensure the ABS system is functioning correctly.
C0265 Chevy Code: DIY Repair Level And Estimated Costs
This repair is kind of easy for a DIY-er. It falls into the DIY category for those with moderate soldering skills and access to necessary tools. If you’re unsure about soldering or face difficulties, it’s wise to consult a professional mechanic.
The estimated cost for fixing the C0265 code can vary depending on whether you DIY or have it done by a mechanic. Here is a general cost breakdown:
| Repair Task | Estimated Cost |
| Soldering equipment and materials | $20 – $50 |
| Professional mechanic (if needed) | $100 – $200 |
Remember that prices may vary depending on your location and specific vehicle model.
Read more: P1101 Intake Air Flow System Performance in Chevy Cruze Vehicles
Conclusion
Now, you’ve gained valuable insights into the C0265 Chevy code’s diagnostics and repairs. Armed with this knowledge, you can now tackle this code with confidence, ensuring that your vehicle’s Anti-Lock Brake System operates at its best.
If you found this article helpful, consider sharing it with fellow Chevy and GMC owners who might be facing similar challenges.
Have you encountered the C0265 code before, or do you have additional tips to share? Drop a comment below.
Reference Sources
- General Motors, GM Technical Service Bulletin on ABS Code C0265.
- MyCarDoesWhat.org, Anti-Lock Braking System.
- YourMechanic.com, Symptoms of a Bad or Failing Traction Control Module.
P051B Code: A Comprehensive Guide for Vehicle Owners
P051B Code: A Comprehensive Guide for Vehicle Owners
Welcome, vehicle owners! If you’ve encountered your vehicle’s P051B error code, you’ve arrived at the right place.
In this guide, we’ll explore the details of the P051B code, its meaning, severity, symptoms, causes, and the necessary diagnosis and repair steps. As experienced mechanics with a wealth of knowledge, we’re here to share our expertise and assist you in resolving this issue.
So, let’s dive in!
P051B Code: Quick Overview
Here is an overview of the P051B code. Take a look!
Definition: Crankcase Pressure Sensor Circuit Range/Performance
Severity: High
DIY Skill Level: Intermediate
Continue To Drive?: No
Estimated Repair Cost: $100 – $300
What Does The P051B Mean?
The P051B error code indicates a problem with the Crankcase Pressure Sensor Circuit Range/Performance. This code is commonly found in various car brands, including Ford equipped with EcoBoost engines, Dodge with Cummin engines, etc.
The Crankcase Pressure Sensor is an essential part of the vehicle’s emission control system. It works with the Positive Crankcase Ventilation (PCV) system, which manages the pressure and circulation of gases within the engine crankcase.Under normal operating conditions, the Crankcase Pressure Sensor monitors the pressure levels within the crankcase. If the sensor detects that the pressure deviates from the expected range, it sends a signal to the engine control module (ECM) or powertrain control module (PCM), triggering the P051B error code.
It’s worth noting that the P051B code is often associated with code P04DB, which indicates a problem with the Crankcase Ventilation System Disconnected. These codes are closely related, as a malfunction in the crankcase ventilation system can impact the sensor’s readings, leading to the P051B code being triggered.
Is it Safe to Continue Driving With The P051B?
The P051B code is considered to be of high severity level. Ignoring or continuing to drive with the P051B code can have severe consequences, including engine performance degradation, reduced fuel efficiency, and the risk of further damage to crucial engine components.
It is crucial to address this code promptly to prevent further complications and ensure your vehicle’s safe and optimal operation. We strongly advise against driving with the P051B code present and diagnosis and repair as soon as possible.
Signs of The P051B Code
The following are common symptoms associated with the P051B error code:
- Illuminated Malfunction Indicator Lamp (MIL) or Check Engine Light
- Reduced engine performance or power
- Engine misfires or rough idle
- Decreased fuel efficiency
What Triggers the P051B Code?
The P051B error code can be caused by various factors, including:
- Engine over-filled with oil
- Faulty or malfunctioning crankcase pressure sensor
- Dirty/bad positive crankcase ventilation valve
- Water intrusion in crankcase pressure sensor
- Issues with the wiring or connectors related to the sensor
- Crankcase ventilation system problems: broken hoses, blown valve cover gasket, failed oil fill cap, v.v
- PCM or ECM software or programming issues
How To Diagnose And Fix The P051B Code
In this section, we will provide you with the necessary tools and parts required for diagnosing and repairing the P051B error code. We will then guide you through a step-by-step procedure to address the issue effectively.
Essential Tools and Parts
- OBD-II scanner or code reader
- Basic hand tools (such as wrenches, sockets, and screwdrivers)
- Crankcase pressure sensor (if necessary)
- Positive crankcase ventilation valve
- Vacuum hose/connector
- Electrical connectors and wiring repair kit
Step-by-Step Procedure
- Retrieve Diagnostic Trouble Codes:
Connect an OBD-II scanner or code reader to retrieve the trouble codes and identify the P051B code.
- Check the engine oil:
Use the dipstick to check the engine oil. Make sure it’s not overfilled. Drain the excess oil if needed.
- Visual inspection of the Positive Crankcase Ventilation (PCV) System:
- Inspect the PCV valve, hoses, and connections for any signs of leaks, damage, or restrictions. Ensure that the PCV valve maintenance schedule has been followed.
- Verify that the correct PCV valve part number is being used.
- Check the cleanliness and correct routing of the fresh air tube and related hoses.
- If any concerns are found during the inspection, repair or replace the affected components.
- Check for Leaks:
- Inspect the oil cap, throttle body, PCV hose, vacuum lines and the air intake system for any leaks or damages.
- Repair or replace the faulty parts if needed.
- Inspect the wiring and connectors related to the crankcase pressure sensor:
- Inspect the wiring and connectors related to the crankcase pressure sensor for any visible damage, loose connections, or corrosion.
- If wiring issues are found, repair or replace the damaged wiring and ensure proper connections.
- Test the Crankcase Pressure Sensor:
- Use a multimeter to test the crankcase pressure sensor. Ensure to consult the manufacturer’s specifications for testing procedures.
- If the reading is out of range, replace it with a new one and make sure proper installation.
- Clear code and test drive:
Clear the error codes using the OBD-II scanner and test the vehicle to verify if the P051B code reoccurs.
Note: It is recommended to consult the vehicle’s service manual or seek professional guidance for specific instructions and testing procedures tailored to your vehicle’s make and model.
DIY Repair Level And Estimated Costs
The level of DIYer skill required to address the P051B error code can vary from immediate to advanced. It is important to consider your mechanical skills and experience when deciding whether to tackle the diagnosis and repair yourself.
While some individuals may feel confident in performing the diagnosis and repair themselves, others may prefer to seek assistance from a professional mechanic. It is important to assess your capabilities and comfort level before proceeding with DIY repairs.
Below is a table of estimated costs for repairing the P051B error code:
| Repair Task | Estimated Cost Range |
| Crankcase Pressure Sensor Replacement | $50 – $200 |
| Wiring Repair | $50 – $200 |
| Vacuum Leak Repair | $100 – $300 |
| Professional Diagnostic Fee | $75 – $150 |
Please note that these estimated costs are intended to provide a general idea and can vary depending on the vehicle make and model, location, and labor rates. It’s always recommended to consult local mechanics or obtain quotes from automotive repair shops to get a more accurate estimate tailored to your situation.
Final Thoughts
Now, you have a comprehensive understanding of the P051B error code and how to address it. By recognizing the symptoms, understanding the causes, and following the step-by-step repair procedure, you are equipped to tackle this issue confidently. Remember, it is crucial to address the P051B code promptly to prevent further complications and ensure the safe operation of your vehicle.
If you found this guide helpful, feel free to share it with other car enthusiasts who may benefit from this knowledge. We also encourage you to leave your comments or questions below. Your feedback is valuable, and we’re here to provide further assistance or clarify any doubts you may have.
Keep your vehicle running smoothly and stay informed about other car-related topics. Safe travels!
Reference:
Howstuffworks – How Does a Positive Crankcase Ventilation (PCV) System Work?
P06DD Code: Causes, Diagnosis, and Repair Explained
P06DD Code: Causes, Diagnosis, and Repair Explained
If you’ve encountered the P06DD code in your vehicle, there’s no need to worry. I’ll guide you through the meaning of the P06DD code, discuss possible causes, and offer step-by-step instructions for diagnosing and fixing the problem.
Whether you’re a DIY enthusiast or simply seeking knowledge before visiting a mechanic, this article is here to assist you. Let’s explore the details of the P06DD code and get your vehicle back on the road smoothly.
P06DD Code: A Quick Overview
Take a look at a P06DD code’s quick summary!
- Definition: Engine Oil Pressure Control Circuit Stuck Off
- Severity: Medium
- DIY Skill Level: Intermediate
- Continue To Drive?: No
- Estimated Repair Cost: $20 – $600
What Does The P06DD Code Mean?
The P06DD diagnostic trouble code (DTC) is defined as “Engine Oil Pressure Control Circuit Stuck Off” and refers to a detected issue in the engine oil pressure control system. In this scenario, the engine oil pressure sensor is sending a message to the Powertrain Control Module (PCM), indicating that the oil pressure is below the acceptable level, thereby impacting the normal operation of the oil pump.
The engine oil pump plays a crucial role in ensuring a consistent oil pressure supply. It functions with two pressure stages under regulation, which are governed by an on/off solenoid. The low-pressure mode, with the solenoid on, maintains a pressure of approximately 200 kPa (29 psi). Conversely, the high-pressure mode, with the solenoid off, increases the pressure to around 450 kPa (65 psi).
The minimum required pressure for the engine, under all operating conditions, is typically around 41 kPa (6 psi). When the oil pressure sensor indicates low oil pressure where higher pressure is expected, or if there is damage to the oil pump face, the PCM takes precautionary measures to reduce engine wear. It disables the oil pump drive and generates the P06DD code as an alert.
While the P06DD code can potentially occur in various vehicle makes and models, it is more commonly observed in certain brands. Some of the manufacturers that have reported instances of the P06DD code include: Dodge, Jeep, Chevrolet, Chrysler, etc.
In some cases, the P06DD code may be accompanied by additional diagnostic trouble codes, providing further insights into the underlying issue. Some of the common accompanying codes may include: P0521, P0522, P0523, and P06DE.
Read more: Dodge, Chrysler, and Jeep OBD1 Codes and OBD2 Codes
How Serious Is The P06DD Code?
The severity level of the P06DD code is moderate to high. Ignoring this code and continuing to drive the vehicle can potentially lead to serious engine damage. Insufficient oil pressure can result in poor lubrication, increased friction, and accelerated wear on engine components. Over time, this may cause engine overheating, decreased performance, and even complete engine failure.
If the P06DD code is detected, it is strongly advised not to continue driving the vehicle. Immediate attention from a qualified technician is necessary to diagnose and resolve the underlying issue. Continuing to drive with low oil pressure can have severe consequences and may result in costly repairs. It is crucial to address the problem promptly to ensure the longevity and reliability of the engine.
What Are The Symptoms Of The P06DD Code?
The P06DD code can manifest through the following symptoms:
- Illuminated Check Engine Light
- Low oil pressure warning light or message
- Engine misfires or runs roughly
- Engine overheating
- Loss of power or reduced engine performance
- Noise from the engine
What Are The Causes Of The P06DD Code?
The P06DD code can be caused by various factors, including:
- Engine oil level or quality issues
- Faulty oil pressure sensor
- Malfunctioning oil pump
- Clogged oil passages or filters
- Wiring or connector issues in the oil pressure control circuit
- PCM or software-related problems
How To Diagnose And Repair P06DD Code?
In this section, we will outline the essential tools and parts required for diagnosing and repairing the P06DD code, followed by a step-by-step procedure.
Diagnostic Tools And Essential Parts
To diagnose and repair the P06DD code, you may need the following tools and parts:
- OBD-II scanner or code reader
- Multimeter
- Oil pressure gauge
- Engine oil
- Basic hand tools (wrenches, sockets, etc.)
- Replacement oil pressure sensor (if necessary)
- Replacement oil pump (if necessary)
Step-by-Step Guide
- Retrieve and evaluate trouble codes
Connect the OBD-II scanner or code reader to retrieve the P06DD code and any additional relevant codes.
- Check engine oil level and quality
- Check the engine oil level and ensure it is at the recommended level.
- Inspect the oil quality and consider replacing it if it appears contaminated or degraded.
- Inspect oil pressure sensor and wiring
- Inspect the oil pressure sensor and its wiring for any signs of damage, corrosion, or looseness.
- Ensure proper connection and secure any loose wiring or connectors.
- Test oil pressure sensor
- Using a multimeter, test the oil pressure sensor to determine if it is functioning correctly.
- Follow the manufacturer’s specifications for the sensor’s resistance values and compare them to the measured readings.
- If the sensor goes faulty, consider replacing it.
- Inspect oil passages and filters
- Inspect the oil passages and filters for blockages, restrictions, or debris.
- Clean or replace any clogged filters and ensure proper oil flow through the passages.
- Measure actual oil pressure
- Use an oil pressure gauge to measure the actual oil pressure and compare it to the manufacturer’s specifications.
- Ensure that the measured pressure falls within the acceptable range for the engine.
- If any parts become defective, such as an oil pump, repair or replace it.
- Clear the code and test drive
- Use the OBD-II scanner to clear the P06DD code.
- Take the vehicle for a test drive to ensure the issue is resolved and the code will not reappear.
Note:
- Ensure the engine is cool before performing any diagnostic or repair work.
- Refer to the vehicle’s service manual for specific instructions and torque specifications.
- Take caution when working with hot or pressurized oil to prevent injury.
DIY Repair Level And Estimated Costs
Performing the fixing procedure for the P06DD code may require intermediate DIY skills. Tasks such as using specialized tools, inspecting components, and replacing parts can be complex. If you have intermediate skills and feel comfortable, you can attempt the repair.
Otherwise, it’s advisable to seek assistance from a professional mechanic to ensure proper repairs and avoid complications. Prioritizing safety and the proper functioning of your vehicle is important.
Here’s an estimated cost table for the repair tasks associated with resolving the P06DD code:
| Repair Task | Estimated Cost |
| Wiring issues repair | $100 – $300 |
| Oil top up | $20 – $50 |
| Oil pump replacement | $300 – $800 |
| Oil pressure sensor replacement | $50 – $150 |
| Oil passages and filters replacement | $100 – $300 |
Please note that these estimated costs are rough estimates and can vary depending on various factors such as the location, vehicle make and model, and the specific parts and labor rates charged by mechanics or repair shops.
Conclusion
Ready to address the P06DD code in your vehicle? Equipped with the information provided, you can now approach the diagnosis and repair of this issue with confidence. Don’t hesitate to share this valuable knowledge with fellow car enthusiasts who might be encountering similar challenges.
If you have any questions or success stories to share, we’re here to listen. Feel free to leave your comments below.
Reference Sources
- Welland Power, What is an Oil Pressure Sensor? How to test an oil pressure sensor?
- Professional Auto Repair, What is engine misfiring?
P0A80 Code: Hybrid Battery Insights And Resolutions
P0A80 Code: Hybrid Battery Insights And Resolutions
Welcome to our comprehensive guide on dealing with the P0A80 error code – a common challenge faced by hybrid vehicle owners. As technology propels us into a more sustainable automotive era, understanding and troubleshooting hybrid-specific issues has become essential.
In this article, we’ll clarify the P0A80 code, equipping you with the knowledge and tools needed to diagnose and address potential hybrid battery pack issues. Whether you’re a DIY enthusiast or seeking expert assistance, our step-by-step insights aim to tackle the problem easily.
Let’s dive in!
P0A80 Code: A Quick Overview
Check the summarized details of the P0A80 code presented below!
- Definition: Replace Hybrid Battery Pack
- Severity: High
- DIY Skill Level: Advance
- Continue To Drive?: No
- Estimated Repair Cost: $50 – $2000 (It will be much more costly if you replace the full battery pack)
What Does The P0A80 Code Mean On?
Error code P0A80 indicates a problem with the hybrid battery pack’s balancing or deterioration, specifically in vehicles equipped with nickel-metal hydride (NiMH) battery technology.
P0A80 is often referred to as the “Replace Hybrid Battery Pack” code. It generally means that the battery pack’s modules are not properly balanced in terms of capacity or voltage, leading to reduced performance and efficiency of the hybrid system. This code is commonly seen in older hybrid vehicles as their battery packs age and the cells within them degrade.
This code is like a message from a hybrid car’s computer that something might be off with its battery. Imagine the battery is made of blocks, and each block has cells. If the voltage difference between these blocks is more than 20% which is detected by the battery monitoring system (BMS), the code would be set.
In addition to the P0A80 code, there are often accompanying codes that provide further insight into the specific nature of the problem. These codes help technicians pinpoint the exact issue and provide a more comprehensive diagnosis. Some of the accompanied codes commonly observed with the P0A80 code include P0A7F, P3006, P3012, etc.
The P0A80 code is frequently encountered in various hybrid and electric vehicle models, spanning a range of brands. Some of the notable brands and models that are known to experience this code include:
- Toyota Prius
- Honda Insight
- Ford Fusion Hybrid
- Chevrolet Volt
- Nissan Leaf
- Hybrid Lexus models
How Severe Is Code P0A80?
The P0A80 error code’s severity is high. Because this issue is related to the hybrid battery pack, which plays a vital role in a hybrid vehicle.
Can you drive with the P0A80 code unresolved? – It’s advised to avoid prolonged driving and seek professional assistance promptly. Operating the vehicle with an imbalanced or deteriorated battery pack could escalate the issue, potentially resulting in higher repair costs. To ensure safety and prevent further damage, consult a certified mechanic or dealership as soon as possible to diagnose and address the problem effectively.
What Are The Symptoms Of The P0A80 Codes?
Experiencing certain symptoms can provide crucial insights into the nature of error code P0A80. These indicators may point toward issues within the hybrid battery system that require attention.
Here is the list of the P0A80 code’s symptoms:
- Reduced fuel efficiency
- Poor hybrid system performance
- Warning lights on the dashboard
Read more: Complete Toyota OBD1/OBD2 Codes List [FREE DOWNLOAD]
What Causes the P0A80 Code to be Set?
Understanding the potential causes behind error code P0A80 is essential for effective diagnosis and repair. Several factors can contribute to the triggering of this code, each shedding light on possible sources of the problem within the hybrid battery system.
- Aging battery cells or pack
- Corrosion on the voltage sensor harness/bus bars
- Debris in the HV battery cooling fan
- Voltage difference between battery blocks
- Excessive cell resistance
How To Diagnose And Fix The P0A80 Code?
Efficiently addressing error code P0A80 requires accurate diagnosis and appropriate repairs. Here’s a comprehensive guide to help you navigate the process.
Essential Tools And Parts
To successfully diagnose and repair the P0A80 code, you’ll need the following tools and parts:
- OBD-II scanner
- Multimeter
- Cleaning supplies for sensor harnesses and bus bars
- A source of HV battery diagnostic information
- Replacement battery pack (if required)
Step-by-Step Procedure
- Retrieve codes and freeze frame data
Use the scanner to retrieve stored codes and relevant freeze frame data. Take note of essential information for analysis.
- Visually inspect for any corrosion and defective components
Inspect the HV battery pack and circuitry for signs of corrosion, damage, or open circuits. Clean and repair areas with corrosion. Replace defective components.
- Check the HV battery cooling fan
Check the fan for debris and ensure it’s clean.
- Test hybrid vehicle battery monitoring system (HVBMS) sensors
Follow manufacturer specifications to test HVBMS sensors, such as temperature and voltage sensors. Replace if necessary.
- Check individual cell resistance
Utilize the DVOM to test individual HV battery cells for resistance. Replace cells with unacceptable resistance levels.
- Test busbar and cable
Test resistance in busbar connectors and cables using the DVOM. Replace components with excessive resistance.
- Consider HV battery pack replacement
If extensive inconsistencies persist, consider replacing the entire HV battery pack for a more reliable fix.
- Reassess
Clear the code and test drive procedure after making repairs to ensure the issue is resolved.
Note:
- Remember to disconnect the vehicle’s 12V battery before starting any work.
- For the replacement of the battery pack, it’s strongly recommended to entrust this task to a skilled mechanic with experience in hybrid vehicles to ensure a safe and proper installation.
- If your car’s odometer is over 100,000 miles, a worn battery pack could be the culprit. In case the mileage is below 100,000, the issue might involve wiring or other components. Recognizing this early could save you a fortune by knowing when to replace the battery pack. Keep these factors in mind during diagnosis.
Read more: Nissan Trouble Codes: Comprehensive List For OBD1/OBD2
DIY Repair Level And Estimated Costs
Taking on the diagnostic and repair process outlined above requires a moderate to advanced level of DIY expertise, especially due to the involvement of high-voltage components. While the step-by-step guide offers clear instructions, working on complex systems like HV battery packs demands careful handling and specialized tools.
If you’re uncertain about any aspect of this procedure, it’s strongly recommended to seek assistance from a qualified mechanic or expert technician to ensure safety and accuracy.
Here’s a general cost overview for potential repair tasks that may arise during the process:
| Repair Task | Estimated Cost Range |
| HVBMS Sensor Replacement | $50 – $150 |
| Individual Cell Replacement | $100 – $300 per cell |
| HV Battery Pack Replacement | $1,500 – $5,000 |
| Component Corrosion Treatment | $20 – $100 |
| Diagnostic Scanner Rental/Service | $50 – $150 |
Please note that these cost ranges are approximate and can vary depending on the vehicle’s make and model, as well as the region you’re in. It’s essential to factor in labor costs if seeking professional assistance. Your safety and the vehicle’s proper functioning are of utmost importance; if unsure, consult an expert to ensure a successful repair outcome.
P0A80 Infographic

Final Thoughts
Once you’ve got the P0A80 code, it’s essential to have a grasp of and find solutions for this error code to ensure your vehicle maintains top-notch performance. By equipping yourself with the right tools and following the step-by-step procedure, you can confidently diagnose and repair hybrid battery issues. Remember, safety comes first, so if in doubt, consult a professional mechanic.
If you found this guide helpful, don’t hesitate to share it with fellow enthusiasts. Have questions or insights? Feel free to comment below – we’re here to help you keep your hybrid running smoothly.
Reference Sources
- OBD-Codes.com, P0A80 Error Code: Replace Hybrid Battery Pack
- National Highway Traffic Safety Administration (NHTSA), Technical Service Bulletin: MC-10131823-9999
- Synopsys, Battery Management System (BMS)
P0050 Code: Understanding Its Causes, Symptoms, and Repairs
P0050 Code: Understanding Its Causes, Symptoms, and Repairs
Hey there, fellow car enthusiasts and DIY mechanics! Have you ever come across the pesky P0050 error code on your car’s dashboard? Don’t panic! We’ve got your back. In this article, we’ll delve into the P0050 trouble code, specifically referring to the HO2S (Heated Oxygen Sensor) Heater Control Circuit related to Bank 2 Sensor 1. If you’ve encountered this code during a diagnostic scan, don’t worry. We’re here to help you understand its meaning, severity, symptoms, causes, necessary diagnosis and repair steps. So, let’s get started!
P0050 Code: Quick Overview
Here is an overview of the P0050 code. Take a look!
Definition: HO2S (Heated Oxygen Sensor) Heater Control Circuit Bank 2 Sensor 1
Severity: Medium
DIY Skill Level: Intermediate
Continue To Drive?: Yes (short-term)
Estimated Repair Cost: $100 – $300
What Does The P0050 Code Mean?
The P0050 code is triggered when the engine control module (ECM) detects an issue with the heater control circuit for Bank 2 Sensor 1. Bank 2 refers to the side of the engine that does not contain cylinder number one, while Sensor 1 denotes the upstream sensor located before the catalytic converter.
In modern vehicles, the engine management system relies on sensors to monitor various parameters and ensure optimal performance. One critical sensor is the oxygen sensor, also known as the HO2 sensor. Its primary function is to measure the oxygen content in the exhaust gases and provide feedback to the ECM for efficient fuel delivery and emissions control.
It’s important to note that the P0050 code is commonly associated with other related trouble codes, such as P0030, P0036, and P0056. These codes all indicate potential problems with the HO2S heater control circuit but may vary regarding the sensor position. Additionally, while the P0050 code can occur in various car brands, it is frequently found in vehicles such as Ford, Chevy (Silverado), BMW, and GMC.
How Severe Is P0050?
When it comes to the severity of the P0050 trouble code, it is considered a moderate issue. While this code doesn’t typically pose an immediate threat to your safety, it should not be ignored either due to its potential impact on fuel efficiency, engine performance, and emissions control.
It’s important not to drive for too long without fixing the P0050 code. While your vehicle may still operate, it’s important to address the underlying problem promptly to prevent potential long-term damage and ensure optimal engine performance. Taking proactive steps to resolve the P0050 code will help maintain your vehicle’s efficiency, performance, and overall reliability.
Read more: P0135 – O2 Sensor Heater Circuit Malfunction (Bank 1, Sensor 1)
Common Symptoms of P0050
The P0050 trouble code can cause various symptoms, including:
- Check Engine Light (MIL) illuminated
- Decreased fuel efficiency
- Rough idle or engine misfires
- Engine hesitation or stalling
- Failed emissions test
- Decreased engine performance
Causes of the P0050 Code
Several underlying causes can trigger the P0050 trouble code, including:
- Faulty HO2S heater control circuit
- Damaged or malfunctioning oxygen sensor
- Wiring or connector issues in the heater circuit
- Blown fuse related to the sensor heater
- Faulty ECM
Read more: P0161 – O2 Sensor Heater Circuit
How To Diagnosis And Fix The P0050 Code
When it comes to diagnosing and repairing the P0050 trouble code, it is essential to have the right tools and follow a systematic procedure. Let’s explore the necessary tools and parts, along with a step-by-step guide to resolving the code.
Essential Tools and Parts
- OBD-II scanner
- Digital multimeter
- Oxygen sensor socket
- Wire crimping tool
- Electrical contact cleaner
- Replacement oxygen sensor (if necessary)
- A test light
- Electrical connectors and wiring
Step-by-Step Procedure
Step 1: Retrieve the trouble codes and record freeze frame data
Use an OBD-II scanner to retrieve P0050 and any associated code. Take note of any freeze frame data, which provides additional information about the conditions when the code was triggered.
Step 2: Inspect the oxygen sensor wiring and connectors
Thoroughly examine the wiring and connectors associated with the affected oxygen sensor. Look for signs of damage, corrosion, or loose connections. Repair/clean if needed.
Step 3: Test the oxygen sensor heater circuit
Use a digital multimeter to check the resistance and voltage of the oxygen sensor heater circuit and compare it to the manufacturer’s specifications. If the reading is out of range, repair the circuit.
Step 4: Check the fuse related to the sensor heater
Locate the fuse responsible for the oxygen sensor heater circuit and inspect it for any signs of damage or blown fuse. Replace the fuse if necessary, ensuring it matches the proper specifications.
Step 5: Replace the oxygen sensor
Use a multimeter to test the oxygen sensor’s voltage. If the voltage is outside the range in the vehicle’s repair manual, it indicates it’s faulty. Replace the sensor following the manufacturer’s guidelines for proper installation and ensure the new sensor is compatible with your vehicle.
Step 6: Clear the codes and perform a road test
Once the repairs have been made, clear the trouble codes using an OBD-II scanner. Take the vehicle for a road test to ensure the P0050 code does not reappear and that the engine is running smoothly.
Notes:
- It’s recommended to consult the vehicle’s service manual for detailed instructions specific to your make and model.
- If you are unsure or uncomfortable with the diagnostic and repair procedures, it is best to seek assistance from a qualified mechanic.
DIY Repair Level and Estimated Costs
The diagnosis and repair of the P0050 code fall under intermediate-level repairs that require some technical knowledge. If you’re confident in your abilities, you can attempt the procedure. However, if you’re unsure or uncomfortable, it’s best to seek assistance from a professional mechanic.
Here’s a breakdown of the estimated costs for common repair tasks:
| Repair Task | Estimated Cost Range |
| Oxygen sensor replacement | $100 – $300 |
| Wiring or connector repair | $100 – $200 |
| Fuse replacement | $10 – $20 |
| Professional diagnostics | $80 – $150 (approx.) |
Please note that these approximate cost ranges can vary depending on the vehicle’s make and model, labor rates in your area, and the specific cause of the P0050 code. It’s always a good idea to consult a professional mechanic who can provide a more accurate estimate based on your circumstances.
Final Thoughts
Understanding the P0050 trouble code and its meaning can empower you to take the necessary knowledge for diagnosis and repair. By recognizing this code’s symptoms, causes, and severity, you can make informed decisions to maintain your vehicle’s performance and reliability.
Remember, if you’re confident in your DIY skills, you can attempt the repair procedure mentioned in this article. However, if you’re unsure or prefer the expertise of a professional, don’t hesitate to seek assistance from a qualified mechanic.
We hope this guide has shed light on the P0050 trouble code and provided valuable insights into its meaning and repair. If you found this article helpful, feel free to share it with others who may benefit. And if you have any questions or experiences to share, don’t hesitate to leave a comment below.
Safe travels and happy motoring!
Reference:
Freeasestudyguides. com – Heated Oxygen Sensors
P2118 Code: A Guide to Throttle Actuator Control Motor Issues
P2118 Code: A Guide to Throttle Actuator Control Motor Issues
Welcome to our comprehensive guide on the P2118 engine code, a common issue related to throttle actuator control motors.
If you’ve encountered this code, you’re not alone. In this article, we’ll explore the meaning, severity, symptoms, causes, and diagnostic process for P2118. We aim to equip you with the knowledge to understand this code and its implications for your vehicle’s performance.
So, let’s dive in!
P2118 Code: A Quick Overview
Here is an overview of the P2118 code. Let’s take a look!
- Definition: Throttle Actuator Control Motor Current Range/Performance
- Severity: High
- DIY Skill Level: Intermediate
- Continue To Drive?: No
- Estimated Repair Cost: $100 – $500
What Does The P2118 Mean?
The P2118 engine code indicates a malfunction in the operation of the Throttle Actuator Control System. This system is responsible for regulating the airflow into the engine by controlling the position of the throttle plate.
When the Powertrain Control Module (PCM) detects an issue with this system, such as voltage readings or performance outside the expected range, it triggers the P2118 code. This serves as a warning that there may be a problem with the current range and performance of the throttle actuator control motor.
It’s worth noting that the P2118 code is commonly found in various car brands, including Toyota, Lexus, Ford, KIA, and Hyundai. Additionally, it is often associated with codes P2102, P2103, P2107, P2108, P2110, P2111, and P2119, which relate to the throttle actuator control system.
Read more: P0122 – Throttle/Pedal Position Sensor/Switch “A” Circuit Low
Can You Still Drive With The Code P2118?
The P2118 engine code is considered a high severity level. This code directly affects the engine’s performance and drivability, so it should not be overlooked.
Driving with the P2118 code present can result in severe consequences. The engine may experience reduced power, poor acceleration, and potentially even stalling. These issues can compromise the safety of both the driver and the vehicle.
So, it is strongly advised not to continue driving with the P2118 code unresolved. Instead, it is essential to diagnose and repair the underlying problem as soon as possible. Promptly addressing this code will restore optimal throttle actuator control system function, ensuring the safe and efficient operation of your vehicle.
Signs Of The P2118 Code
Here are some common symptoms typically seen with this code:
- Illuminated check engine light, TRAC OFF light
- Limp mode (Fail-safe mode)
- Reduced engine power or lack of acceleration
- Engine stalling or rough idle
- Hard starting
- Little or no throttle response
Causes Of The P2118 Code
Here are some possible triggers:
- Faulty throttle actuator control motor
- Issues with the throttle body or throttle position sensor
- Defective accelerator pedal position sensor
- Wiring or electrical connection problems
- Blown throttle actuator control motor’s fuse
- Malfunctioning PCM
How Do I Diagnose And Fix The P2118 Code?
In this section, we will explore the essential tools and parts required for diagnosing and repairing the P2118 code, provide a step-by-step procedure to address the issue and discuss the level of DIY repair along with estimated costs.
Essential Tools and Parts
- OBD-II scanner
- Multimeter
- Throttle actuator control motor replacement (if necessary)
- Throttle body cleaner
- Electrical contact cleaner
- Wire connectors and electrical tape
Step-by-Step Procedure
- Retrieve the trouble codes using an OBD-II scanner.
- Check the throttle actuator control motor’s fuse on the junction box with a test light. Replace the fuse if it doesn’t work properly.
- Inspect the throttle body and wiring connections for any signs of damage or loose connections. Clean/repair it if needed.
- Check other components related to the Throttle Actuator Control System, such as the throttle position sensor and accelerator pedal position sensor, to ensure it works properly. Replace any faulty components if it’s bad.
- Test the throttle actuator control motor’s voltage using a multimeter. If the voltage is outside the range in the vehicle’s repair manual, replace it with a new one.
- Inspect the electrical wiring and connections associated with the throttle actuator control system. Clean/replace it if you see any dirt or damage.
- Clear codes and test drive to ensure the issue has been resolved.
Note:
- It is recommended to consult the vehicle’s repair manual for detailed instructions specific to your make and model.
- Double-check all before reassembling.
DIY Repair Level And Estimated Costs
Regarding the P2118 code, tasks like cleaning the throttle body and changing the car fuse are within the capabilities of most DIY enthusiasts. However, replacing the throttle actuator control motor may require advanced knowledge and specialized tools, making it better suited for individuals with intermediate to advanced DIY skills.
Here’s a breakdown of estimated costs for the main repair tasks to repair the P2118 code:
| Repair Task | Estimated Cost |
| Wiring Repairs | $50 – $150 |
| Blown Fuse Replacement | $50 – $100 |
| Throttle Body Cleaning | $10 – $30 |
| Throttle Actuator Control Motor Replacement | $150 – $500 |
Please note that these estimated costs are approximate and can vary depending on the vehicle’s make, model, and location. Additionally, prices for parts and labor can vary among different service providers. It’s always recommended to obtain quotes from reputable mechanics or parts suppliers for a more accurate estimate based on your specific circumstances.
Final Thoughts
In conclusion, the P2118 engine code indicates a significant issue with the throttle actuator control motor’s current range and performance. Ignoring this code can lead to reduced engine power, stalling, and compromised driving safety. Prompt action is crucial.
If you’re experiencing the symptoms associated with the P2118 code, it’s essential to diagnose and address the underlying problem. While DIY enthusiasts can tackle some tasks, assistance from a qualified mechanic is advisable for complex repairs.
We hope this guide has provided valuable insights into the P2118 code. If you found it helpful, feel free to share it with others. If you have any questions or comments, please leave them below.
Safe and smooth driving!
Reference:
- Wikipedia – Electronic throttle control
- Toyota – T-TT-0321-15 TSB
- Toyota 20RAV4 – Repair Manual
P00B7 Code: Ensuring Proper Engine Coolant Flow
P00B7 Code: Ensuring Proper Engine Coolant Flow
When that check engine light suddenly appears on your dashboard and the P00B7 code pops up on your scanner’s screen, your vehicle is sending a signal about a potential hiccup in its cooling system. In this article, we’re here to break down the meaning behind this code, highlight possible indicators, explain why it occurs, and provide step-by-step guidance to diagnose and resolve the issue.
Whether you’re a seasoned car enthusiast or simply curious about what’s happening beneath the hood, this article will simplify the process of dealing with the P00B7 code.
Let’s dive in!
P00B7 Code: A Quick Overview
- Definition: Engine Coolant Flow Low/Performance
- Severity: Medium
- DIY Skill Level: Intermediate
- Continue To Drive?: No
- Estimated Repair Cost: $50 – $500
What Does the P00B7 Code Mean?
When your car’s computer (PCM) detects code P00B7 – Engine Coolant Flow Low/Performance, it’s essentially saying that there’s a problem with how coolant is flowing through your engine’s cooling system. In simpler terms, your engine might not be getting enough coolant to stay cool.
This code shows up when the PCM notices a mismatch between signals from two temperature sensors: the engine coolant temperature (ECT) sensor and the radiator coolant temperature (RCT) sensor (or secondary engine coolant temperature sensor). This mismatch usually occurs when the PCM can’t control the thermostat properly. Think of it like the PCM trying to balance the engine’s temperature by using these sensors, and when they don’t agree, it suspects there’s a coolant flow issue.
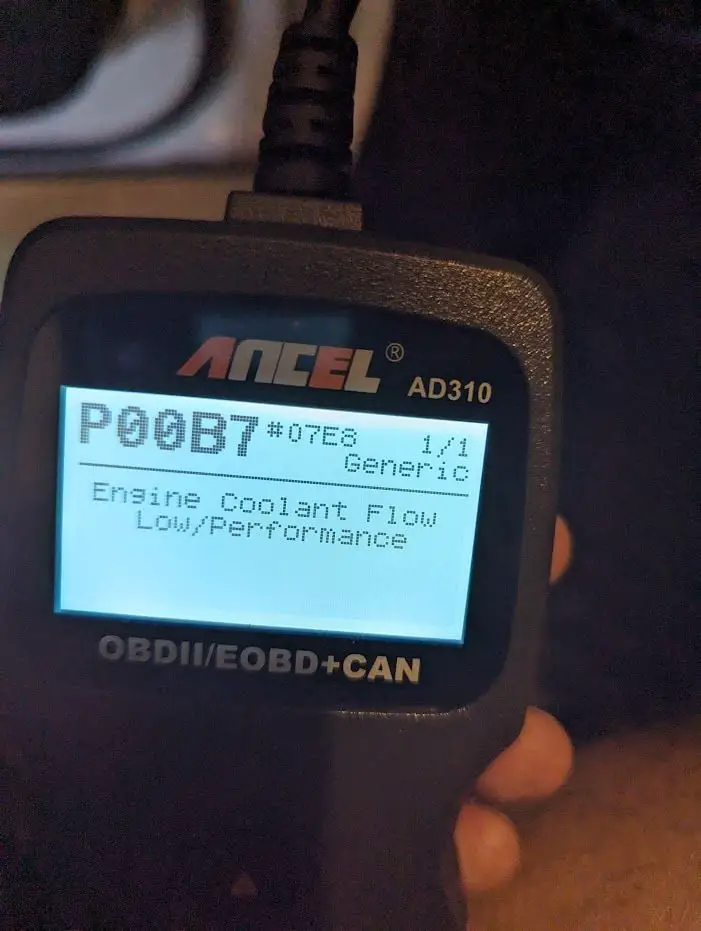
Your car’s PCM keeps a close eye on both sensors. If it sees a significant temperature difference (more than 68°F) between the radiator coolant temperature sensor (RCT) and the engine coolant temperature sensor (ECT), the P00B7 would be logged.
To prevent the engine from getting too hot, the PCM might kick the radiator fan(s) into high gear. This mechanism helps cool things down and prevents overheating. Code P00B7 can be encountered in various vehicle brands and models, including Chevrolet, GMC, Buick, Cadillac, and other manufacturers.
How Serious is the P00B7 Code?
The severity of code P00B7 falls into the moderate category. While it doesn’t represent an immediate danger like some other codes, it does require attention. Continuing to drive with this code present is generally not recommended. A restricted coolant flow can lead to overheating, which, if left unchecked, may cause engine damage. Overheating can also compromise your vehicle’s performance and fuel efficiency.
It’s advisable to address code P00B7 promptly. Have your vehicle inspected by a qualified mechanic to determine the exact cause. Timely maintenance can prevent more extensive and costly issues down the road, ensuring your vehicle operates efficiently and reliably.
What are the Symptoms of the P00B7 Code?
Here are some common symptoms that come along with the P00B7 code:
- Illuminated Check Engine Light
- Engine running rough
- Poor fuel economy
- Engine overheating
Read more: P0118: Engine Coolant Temperature Sensor Circuit High Input
What are the Causes of the P00B7 Code?
Now, let’s go through the potential causes of the P00B7 code:
- Wiring or connector problems in the thermostat circuit
- Low coolant level
- Bad water pump
- Damaged thermostats
- Malfunctioning ECT sensor
- Defective RCT sensor
- Faulty PCM/ECM
How To Diagnose and Repair P00B7 Code?
Diagnostic Tools and Essential Parts
When dealing with the P00B7 code, having the right tools and parts on hand is crucial. Here’s what you’ll need:
- OBD-II scanner
- Multimeter
- Coolant
- Thermostat replacement kit
- Wiring repair kit
- ECT sensor
- RCT sensor
Step-by-Step Guide
- OBD-II Code Retrieval:
Begin by using an OBD-II scanner to confirm the P00B7 code and assess any accompanying codes. - Wiring and connectors checking:
Inspect the PCM/ECM power relay for signs of damage or wear. If it’s faulty, replace it.
- Coolant level inspection:
Verify the coolant level is adequate. Top it up if it’s low.
- ECT and RCT Testing:
- Make sure the car’s ignition is off and unplug the sensors.
- Using a multimeter to check the resistance of each sensor.
- Compare the results to your car’s repair manual specs.
- If it’s not within the range, consider replacing the sensors.
- Checking the Thermostat
- Locate the thermostat housing on your vehicle’s engine.
- Remove the thermostat and inspect it for any signs of wear, such as rust or corrosion.
- Replace the thermostat if it shows signs of damage.
- PCM/ECM Testing (if needed):
- If the issue persists after addressing the above steps, consult a professional mechanic or auto technician to perform a diagnostic check on the PCM/ECM.
- They will use specialized tools to diagnose and potentially reprogram the PCM/ECM, if required.
- Clearing the code:
Clear the code and test drive.
Special Notes
If you have a Chevrolet or Cadillac vehicle, please check for this Technical Service Bulletin (TSB) (PIE0266) to see if they include your model or not. Similarly, Vauxhall Meriva (2011-2012) owners should look for this TSB. These TSBs often contain valuable information regarding known issues and solutions.
Keep in mind that the exact procedure may vary depending on the type of sensors and thermostats in your specific vehicle model, so it’s essential to consult your vehicle’s repair manual for precise testing instructions and specifications.
Read more: P0128 – Coolant thermostat
DIY Repair Level and Estimated Costs
This repair falls into the intermediate DIY category. While some experienced home mechanics may tackle it, others may prefer consulting a professional, especially when dealing with the PCM/ECM.
Take a look at this rough estimate for P00B7 solutions:
| Repair Task | Estimated Cost |
| Wiring and connector repair | $50 – $150 |
| ECT sensor replacement | $200 – $400 |
| RCT sensor replacement | $200 – $400 |
| Water pump replacement | $400 – $600 |
| Thermostat replacement | $150 -$300 |
| PCM/ECM replacement (rarely) | $500 – $1500 |
Please note that the estimated costs provided are approximate. For precise repair costs, we recommend consulting a certified mechanic or dealership. They can provide an accurate quote based on your vehicle’s make, model, and the extent of the required repairs.
Conclusion
Now that you have a clearer understanding of code P00B7 and its implications for your vehicle’s cooling system, you’re better prepared to address this issue confidently. By taking prompt action, you can ensure your engine stays within the suitable temperature range, keeping your car running smoothly.
If you found this article helpful, consider sharing it with other car owners who drive different makes and models, as the P00B7 isn’t exclusive to any particular brand.
Have you ever encountered the P00B7 code, or do you have additional insights or tips to share with the community? Feel free to drop a comment below. Your experiences and advice can be invaluable to others facing similar automotive issues.
Reference Sources
TechTips, Opel Meriva B – Fault Code P00B7.
P015B Code: Understanding Oxygen Sensor Issues
P015B Code: Understanding Oxygen Sensor Issues
Your vehicle suddenly experienced issues; you connected a diagnostic tool and discovered the P015B code. What happened to your car?
Well, P015B specifically refers to a delayed response from the Oxygen sensor (O2 sensor) in Bank 1, Sensor 1, resulting in a transition from a rich to a lean air-fuel mixture. This can have an impact on the vehicle’s performance and fuel efficiency.
Keep reading if you’re curious to learn more about the P015B code, its implications, and how to address it. We’ll guide you through the process, providing expert insights and practical solutions to help you get your vehicle back on track.
Let’s dive in!
P015B Code: Quick Overview
Here’s a glance at the key details regarding the P015B code!
- Definition: O2 sensor Delayed Response – Lean to Rich (Bank 1, Sensor 1)
- Severity: Medium
- DIY Skill Level: Intermediate
- Continue To Drive?: No
- Estimated Repair Cost: $50 – $300
What Does the P015B Code Mean?
The P015B code indicates a specific issue with the O2 sensor in Bank 1, Sensor 1, of the vehicle’s exhaust system. This sensor is responsible for measuring the oxygen content in the exhaust gases and providing feedback to the engine control module (ECM) to ensure optimal air-fuel mixture for combustion.
The code is commonly triggered in various car models, including Chevy (especially Cruze, Silverado, Tahoe, and Malibu), GMC, Nissan, Subaru, and Buick. However, it’s important to note that the P015B code can also be present in other vehicles as it’s a generic OBD-II code.
To understand why the P015B code is triggered, let’s take a closer look at the systems and components involved. In modern vehicles, the exhaust system consists of multiple O2 sensors strategically placed before and after the catalytic converter. The O2 sensor in Bank 1, Sensor 1, is located on the side of the engine where cylinder 1 is present.
The O2 sensor works with the ECM and other engine sensors to maintain the proper air-fuel ratio. It continuously measures the oxygen content in the exhaust gases before they enter the catalytic converter. Based on this measurement, the ECM adjusts the fuel delivery to ensure efficient combustion. When the O2 sensor in Bank 1, Sensor 1, experiences a delayed response in transitioning from a rich (more fuel) to a lean (less fuel) air-fuel mixture, it triggers the P015B code.
Read more: P0151 Code: Understanding O2 Sensor Circuit Low Voltage
How Serious is the P015B Code?
The P015B code could affect the engine’s air-fuel mixture and, consequently, its performance and fuel efficiency. Therefore, this diagnostic trouble code (DTC) should be considered a medium-to-high severity.
While the P015B code itself may not cause immediate or severe damage to the vehicle, it’s important not to ignore it. Continuously driving with the code unresolved can lead to long-term issues, such as reduced fuel economy, engine misfires, or damage to the catalytic converter.
Therefore, we strongly advise against continuing to drive and ignoring the P015B code. It’s best to address the underlying cause promptly to prevent any potential complications. By diagnosing and repairing the issue, you can restore the proper functioning of the O2 sensor and ensure optimal engine performance.
Read more: P0171: System Too Lean (Bank 1)
Signs of the P015B Code
When your vehicle encounters the P015B code, it may exhibit certain symptoms that indicate the presence of this issue.
- Illuminated Check Engine Light (CEL) or Service Engine Soon (SES) Light
- Poor fuel economy
- Reduced engine performance
- Increased emissions
- Rough idling and engine misfiring (less common)
Read more: P0172: System Too Rich (Bank 1)
Potential Triggers of the P015B Code
The P015B code can be triggered by various underlying causes.
- Malfunctioning O2 sensor
- Wiring or connector issues
- Exhaust leaks
- Fuel system problems
- Faulty ECM
How To Effectively Diagnose and Fix The Code P015B?
Take a look at this section, which provides step-by-step instructions for diagnosing and repairing the P2006 code.
Essential Tools and Parts
To diagnose and repair the P015B code, you will need the following tools and parts:
- OBD-II scanner or code reader
- Multimeter
- Oxygen sensor socket or wrench
- Wire crimping tool
- Replacement O2 sensor (if necessary)
Step-by-step procedure
Step 1: Use the OBD-II scanner or code reader to retrieve the P015B and any accompanying codes.
Step 2: Inspect the wiring and connectors associated with the O2 sensor. Look for any visible damage, corrosion, or loose connections. Repair/ replace any damaged components as necessary.
Step 3: Test the O2 sensor using a multimeter to measure its voltage output and response time. If the O2 sensor fails the tests, it may need to be replaced. Refer to the vehicle’s manual or online resources for the specific replacement procedure.
Step 4: Inspect the exhaust system for any leaks or damage. Check for signs of leakage, such as sooty deposits or unusual noises. Repair any identified exhaust leaks promptly.
Step 5: Examine the fuel system components, including the fuel injectors, fuel pressure regulator, and fuel lines, for any issues. Look for clogs, leaks, or improper fuel pressure. Address any fuel system problems found during the inspection.
Step 6: Clear the codes using the OBD-II scanner or code reader. This will reset the vehicle’s ECM. Perform a test drive to monitor the vehicle’s performance and confirm if the issue has been resolved.
Notes and tips:
- The location of the O2 sensor may vary depending on the car model. For example, in a Chevy Cruze, the Bank 1 Sensor 1 is located in the exhaust manifold, while in a Nissan Altima, it is found in the front exhaust pipe.
- If the code still exists, after all, the ECM may be faulty. However, diagnosing and fixing ECM issues usually requires special tools and expertise. Consult a professional mechanic or authorized service center for further diagnosis and ECM-related repairs if needed.
DIY Repair Level and Estimated Costs
The diagnosis and repair of the P015B code can be considered a moderate-level DIY repair. It requires some technical knowledge and the use of specialized tools. If you’re unsure or uncomfortable performing the tasks, you should seek assistance from an expert or a qualified mechanic.
The estimated cost for the repair tasks associated with the P015B code can vary depending on factors such as the vehicle model, the need for parts replacement, and the labor rates in your area. Here is a breakdown of estimated costs for common repair tasks associated with addressing the P015B code.
| Repair Task | Estimated Cost |
| Wiring or connector repair/replacement | $50 – $200 |
| Replacement O2 sensor | $50 – $200 |
| Exhaust system repair | $200 – $1000 |
| Fuel system repair | $150 – $800 |
It’s essential to consult with a mechanic or obtain accurate cost estimates from local repair shops to better understand the specific costs involved in resolving the P015B code for your particular vehicle.
Wrapping Up
Now that you understand the P015B code and its significance in your vehicle, you’re ready to tackle this frustrating issue confidently. We hope our comprehensive guide has empowered you to effectively address the code and its causes. With this knowledge, you can approach the P015B code with confidence, knowing you have the tools to deal with it.
If you found this article helpful, please share it with fellow car enthusiasts and leave a comment below to share your experience or ask questions. For a complete list of OBD codes, use our user-friendly OBD Code list generator or try our OBD code lookup tool for specific DTCs.
Stay proactive for smoother driving!
Reference Sources
Wikipedia, Air-fuel ratio.
Autoscope, What Are The Differences Between Lean And Rich Mixtures In An Internal Combustion Engine?.
P0325 – Knock sensor 1 circuit
P0325 – Knock sensor 1 circuit
The P0325 code relates to the knock sensor on the bank 1 side of your car’s engine. It basically tells you it isn’t sending the right signals to the computer. There are a lot of reasons this could be happening, from bad wiring to a faulty sensor.
P0325 is a generic powertrain code that applies to a wide range of vehicle types. Having said that, it’s seen more often on certain cars than others. It’s more common in Asian cars than those made in the United States or Europe and is most common on Hondas, Nissans, and Toyotas.
You won’t likely experience any drivability issues when the P0325 code is active, but that doesn’t mean you can ignore it. Read on below to learn how to diagnose and repair this knock sensor trouble code before it leads to further problems.
P0325 code definition
P0325 code definition (generic): Knock sensor circuit malfunction (bank 1)
P0325 Honda code definition: Knock sensor circuit malfunction
P0325 Hyundai code definition: Knock sensor circuit malfunction
P0325 Nissan code definition: Knock sensor circuit malfunction
P0325 Toyota code definition: Knock sensor circuit malfunction
What does P0325 mean?
The knock sensor in your engine is there to tell you when the air/fuel mixture isn’t combusting properly. It detects explosions, which are called knocks, because of the noise they cause. When knocks happen, the engine doesn’t get as much power. If these happen for too long, it can cause engine damage.
The information sent to the computer from the knock sensor allows it to make adjustments. It may change the timing or otherwise tune the engine to prevent the knocks. You’ll find the knock sensor bolted or threaded into the engine block.
When the engine computer isn’t receiving the right information from the knock sensor, it triggers the P0325 trouble code. This code specifically refers to the knock sensor on bank 1 of the engine. Bank 1 is the side that includes cylinder 1.
What are the symptoms of the P0325 code?
There are not typically any drivability symptoms with the P0325 trouble code. The most common symptoms are:
- Activation of the check engine light
- Reduced engine power
If there are engine knocks occurring as well as damage to the knock sensor, you may notice the following symptoms:
- Hesitation from the engine
- Audible pinging from the engine, especially while accelerating
- Reduced fuel economy
What are the causes of P0325?
- Faulty knock sensor,
- Shorted or faulty wiring in the knock sensor circuit,
- Shorts or faults in the wiring harness,
- Faulty or loose electrical connections,
- Faults with engine coolant system,
- Engine running too lean,
- Failed PCM or ECU.
How serious is the P0325 code?
The P0325 trouble code is of relatively low severity. You won’t notice any drivability symptoms in most cases and can drive your car safely until you can repair it. However, it would be best if you fixed it quickly so you can be notified of knocking problems, which can damage your engine.
How to diagnose the P0325 code
Tools you’ll need:

Method:
- Check your vehicle’s manual for any specific troubleshooting tips related to the knock sensor. You can also check if there are any technical service bulletins out related to this trouble code. The repair for P0325 is often vehicle-specific. Follow any manufacturer-specific instructions you find before proceeding with the generic diagnostic below.
- Use your OBD2 scanner to check for any other codes. You may see other codes related to the knock sensor, such as P0330. If you see codes related to other sensors, such as the MAF sensor or oxygen sensors, this likely points to a wiring problem.
- Read the freeze frame data related to the knock sensor. Check the conditions that were present when the code was set, which can help you make a complete diagnosis.
- Clear the codes and test drive your vehicle, attempting to replicate the conditions of the failure.
- Verify that the knock sensor is sending a signal to the powertrain control module. If it’s not, use the OBD2 scanner to check the readings from the coolant temperature sensor.
- Visually inspect the wires around the knock sensor and wiring harness. Replace any wires that are damaged or corroded and ensure all the connections are secure.
Common mistakes to avoid while diagnosing the P0325 code
Many people replace the knock sensor before checking the wiring or looking for issues with the coolant system. Make sure you conduct a thorough diagnosis before replacing any components.
What should you do to fix the code P0325?
After each step of your repairs, clear all the trouble codes and test drive your vehicle to see if the code comes back. Since there are rarely drivability issues with this code, your OBD2 scanner will be crucial in discovering if you’ve fixed the problem.
- Replace any damaged wires you found during your diagnosis.
- If you detected any issues with the coolant temperature readings, replace the temperature sensor. Incorrect temperature readings can lead to overheating and other serious engine issues.
- If you’re certain there are no damaged wires or missing connections in your engine, replace the knock sensor and the knock harness.
- Should the P0325 code still not clear, take your car to a mechanic for further diagnosis. In rare instances, this code could indicate a problem with your electrical connections or the engine computer.
Tips to avoid P0325 in the future
An improperly-installed knock sensor is the most common cause of a P0325 code. Wires that aren’t firmly connected could be shaken loose over time by the vibration of the engine. Damaged or broken wires will also often trigger diagnostic trouble codes—not only P0325 but a host of codes related to sensors throughout your engine.
Take the extra time to check all the wires whenever you install or repair something in your engine. Check that the connections are secure and that the wires are clear of things that could cause damage or shorts.
Read more: P0010 Code: Meaning, Symptoms, Causes, Diagnostics, and Fixes
C0035 Code: Understanding Wheel Speed Sensor Issues
C0035 Code: Understanding Wheel Speed Sensor Issues
Encountering the C0035 code? Don’t worry – we’re here to help. The C0035 code is a common ABS fault code that relates to wheel speed sensor issues in vehicles.
In this comprehensive article, we’ll be your trusted companion as we explore the ins and outs of the C0035 code. From identifying symptoms to uncovering causes and offering practical solutions, we’ve got you covered.
So, let’s dive in!
C0035 OBD2 Code: A Quick Overview
Take a quick look at the key information of the C0035 code below!
- Definition: Right Front Wheel Speed Sensor Supply (subfault)/ Left Front Wheel Speed Sensor
- Severity: High
- DIY Skill Level: Intermediate
- Continue To Drive?: No
- Estimated Repair Cost: $30 – $200
What Does The C0035 Code Indicate?
The C0035 code indicates a fault related to the wheel speed sensor in the vehicle’s anti-lock brake system (ABS). Although this is a generic fault code, which can happen on all cars equipped with the OBD2 system, it most frequently occurs in GM vehicles, including popular models like Chevy Silverado, Impala, and Equinox.
The wheel speed sensors play a vital role in the ABS system. Each wheel speed sensor generates a digital square wave signal as the front wheels spin. The electronic brake control module (EBCM) relies on the frequency of these signals to determine the speed of each wheel. When the EBCM detects an issue with the front wheel speed sensor or its circuit, such as a missing signal or significantly low supply voltage compared to the monitored ignition voltage, it logs the C0035 code.
Special Note:
There might be variations in code definitions depending on the car model. When researching information about the C0035 code, you might come across these two definitions: “Right Front Wheel Speed Sensor Supply (subfault)” and “Left Front Wheel Speed Sensor.”
In certain GM vehicles, the code is commonly referred to as “Right Front Wheel Speed Sensor Supply (subfault). The SAE organization also uses this definition for the C0035 code. While most cars will display the code in reference to the right front wheel, there are a few exceptions where it may pertain to the left wheel instead.
To accurately diagnose the problem in your specific vehicle, it’s crucial to not only consider the diagnostic code you receive but also carefully review the short description of the problem that your car is experiencing.
C0035 Severity: Don’t Ignore It!
The C0035 code should be considered a high-severity issue. Ignoring this code can adversely affect your vehicle’s performance and safety. It is important to address the issue promptly to avoid potential risks and ensure optimal operation of your vehicle’s braking system.
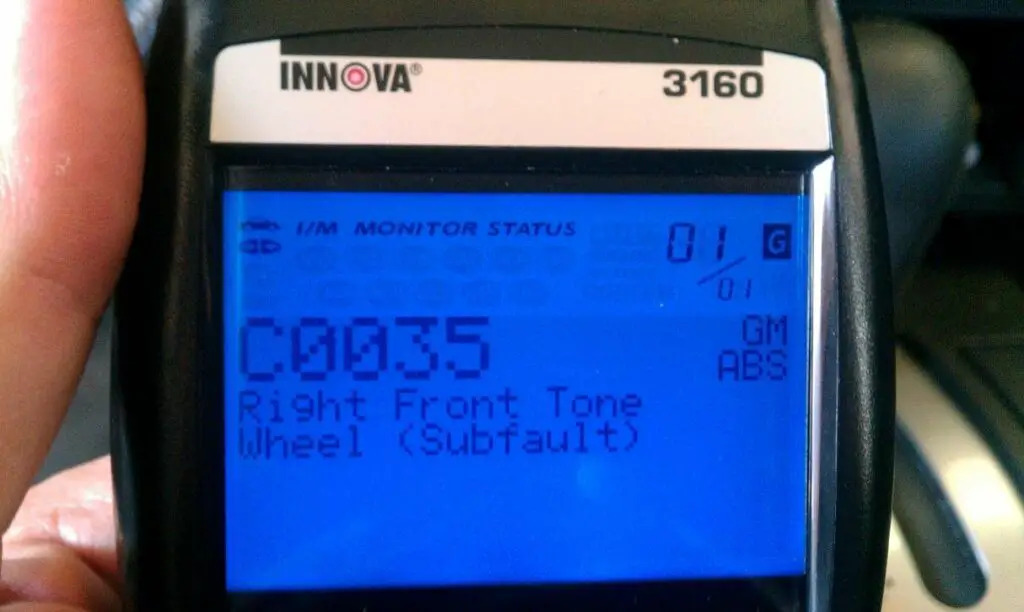
(Image credit: 3800Pro Forum)
We advise against continuing to drive with the C0035 code. It’s recommended to have your vehicle inspected and repaired by a qualified mechanic who can diagnose the specific cause of the code and perform the necessary repairs.
Signs Of The C0035 Code To Look Out For
When the C0035 code is present in your vehicle, you may experience several symptoms, such as:
- Illuminated dashboard warning lights: Check Engine Light, ABS warning light, traction control light may also be illuminated
- Inoperative or overactive ABS, traction control, and stability control systems
- Issues with the vehicle speed displayed on the dashboard
- Brake pedal shocks or abnormal feedback
Read more: GM OBD2 Codes List For FREE Download
Common Triggers Of The C0035 Code
The C0035 code can be triggered by various causes related to the wheel speed sensor and the ABS system, including:
- Faulty or malfunctioning wheel speed sensor
- Damaged or disconnected sensor wires
- Poor connection or corrosion in the sensor circuit
- Sensor reluctor wheel damage
- Issues with the ABS module, including outdated software or programming
Read more: U0415 Code – Invalid Data Received From ABS Control
Step-by-Step Guide: Diagnosing And Fixing The C0035 Code
Check the following sections as we guide you through diagnosing and repairing the C0035 code.
Essential Tools And Parts
- OBD-II scanner or diagnostic tool
- Wheel speed sensor (if replacement is necessary)
- Socket set and wrenches
- Electrical contact cleaner
- Wire brush or abrasive pad
- Dielectric grease
- Jack and jack stands (if required)
Step-by-Step Procedure
Step 1: Retrieve DTCs and identify the affected wheel speed sensor
Connect the OBD-II scanner or diagnostic tool to retrieve the specific trouble codes. Take note of any accompanying codes that may be present. Address these codes first before proceeding with the C0035 diagnosis and repair process.
The OBD-II scanner or diagnostic tool should provide information about which wheel speed sensor is causing the code C0035. Typically, the code will specify the specific wheel or location, such as the front left (FL) or front right (FR) wheel speed sensor.
Step 2: Inspect the sensor wires and connectors
Inspect the sensor wires and connectors for visible damage, such as cuts or loose connections. Clean the connectors using an electrical contact cleaner to remove any corrosion or dirt.
Step 3: Check the sensor reluctor wheel
Check the sensor reluctor wheel for damage or debris. Clean it using a wire brush or abrasive pad if necessary.
Step 4: Test the wheel speed sensor resistance
Test the resistance of the wheel speed sensor using a multimeter. Compare the resistance readings to the manufacturer’s specifications to determine if the sensor is faulty.
Step 5: Replace the faulty wheel speed sensor
If the sensor is determined to be faulty, replace it with a new one. Ensure proper installation by connecting the electrical connector and securely fastening the sensor.
Step 6: Clear codes and test drive
Clear the trouble codes using the OBD-II scanner and test drive the vehicle to ensure the code does not reappear.
Note:
- The exact location of the wheel speed sensor can vary depending on your vehicle’s specific model. For example, in many Chevrolet vehicles, the wheel speed sensors are typically located near the wheel hub or inside the wheel bearing assembly. While in Ford F-150 trucks, these sensors are typically located on each wheel hub assembly, near the brake rotor or axle.
- It’s recommended to consult a service manual or seek professional assistance for detailed instructions specific to your vehicle’s make and model.
- Additionally, taking necessary safety precautions, such as wearing gloves and working in a well-ventilated area, is essential during the repair process.
DIY Repair Level And Estimated Costs
DIY enthusiasts with intermediate mechanical skills can attempt the wheel speed sensor diagnostic and repair process. It involves basic electrical troubleshooting, visual inspection, and potential component replacement.
Diagnosing and cleaning the sensor connectors or reluctor wheel is relatively easy and can be done by most people. However, it’s best to consult an expert mechanic if sensor replacement or advanced troubleshooting is needed.
Below is a general overview of the estimated costs for common repair tasks related to the wheel speed sensor issue:
| Repair Task | Cost Range |
| Diagnostic fee | $50 – $150 |
| Wiring Repair | $50 – $200 |
| Wheel speed sensor replacement | $50-$150 (including labor) |
Remember, these costs are approximate and can vary depending on factors such as vehicle make and model, location, and labor rates. It’s always recommended to obtain an accurate estimate from a trusted mechanic or repair shop.
Wrapping Up
So, to wrap things up, remember that understanding and addressing the C0035 code is key to keeping your ABS system performing at its best.
But hey, we get it – not everyone is a car repair expert. That’s why it’s always a smart move to turn to a qualified mechanic when you need that extra expertise.
If you find this guide helpful, don’t keep it to yourself! Share it with others who may benefit from it. Also, leave your questions or insights about the C0035 code in the comments below.
Wishing you safe and enjoyable driving experiences ahead!
Reference Sources
- Tire Review, Wheel Speed Sensor Diagnostics for Meters and Scopes.
- MyCarDoesWhat, Anti-Lock Braking System.
P0442: Evaporative Emission System Leak Detected (small leak)
P0442: Evaporative Emission System Leak Detected (small leak)
If you’ve got the P0442 error code showing up on your OBD scanner, don’t worry, as it is easily fixable.
Here is a quick brief to let you know what you’re facing and what to expect.
- P0442 Definition: Evaporative Emission Control System Leak Detected (Small Leak).
- Code Type: Generic – P0442 indicates the same problem whether you’re having a Chevy, Ford, or Toyota, etc.
- Can I drive with the P0442 code? Yes. There is almost no danger to the driver.
- Easy to fix: Beginner to intermediate DIY skills.
- Cost: $10 – $20 (common)
Luckily, P0442 is safe to drive with!
But to avoid more harm to the car’s fuel economy and environment, let’s read on to know the possible causes, how to fix the issues, and the replacement costs.
What Does The P0442 Code Mean?
P0442 is an OBD-II generic code triggered when the engine control unit (ECU) detects a fuel vapor leak (small) somewhere in the evaporative emission control (EVAP) system.
The EVAP is a closed system, consisting of several valves, lines, and a charcoal canister.
Its purpose is to help prevent any fuel vapors from escaping into the atmosphere.
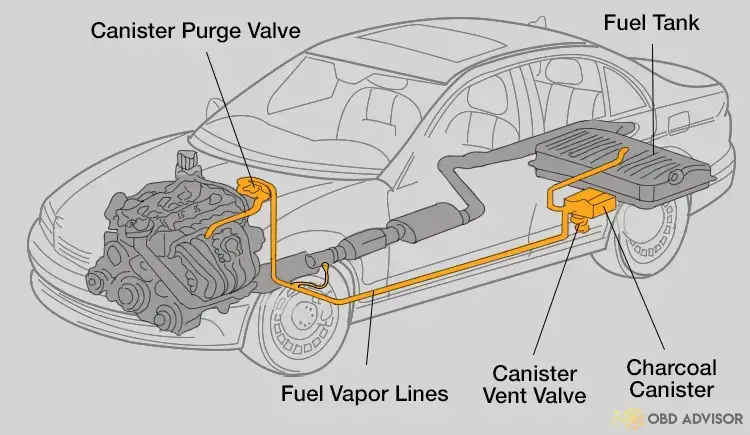
What happens if there is any leak in the EVAP system?
If there are any EVAP leaks, the fuel odor can enter the car’s interior and cause performance issues, triggering P0442.
You can continue to drive your car in the short run, but it’ll negatively affect the car’s mileage and the environment.
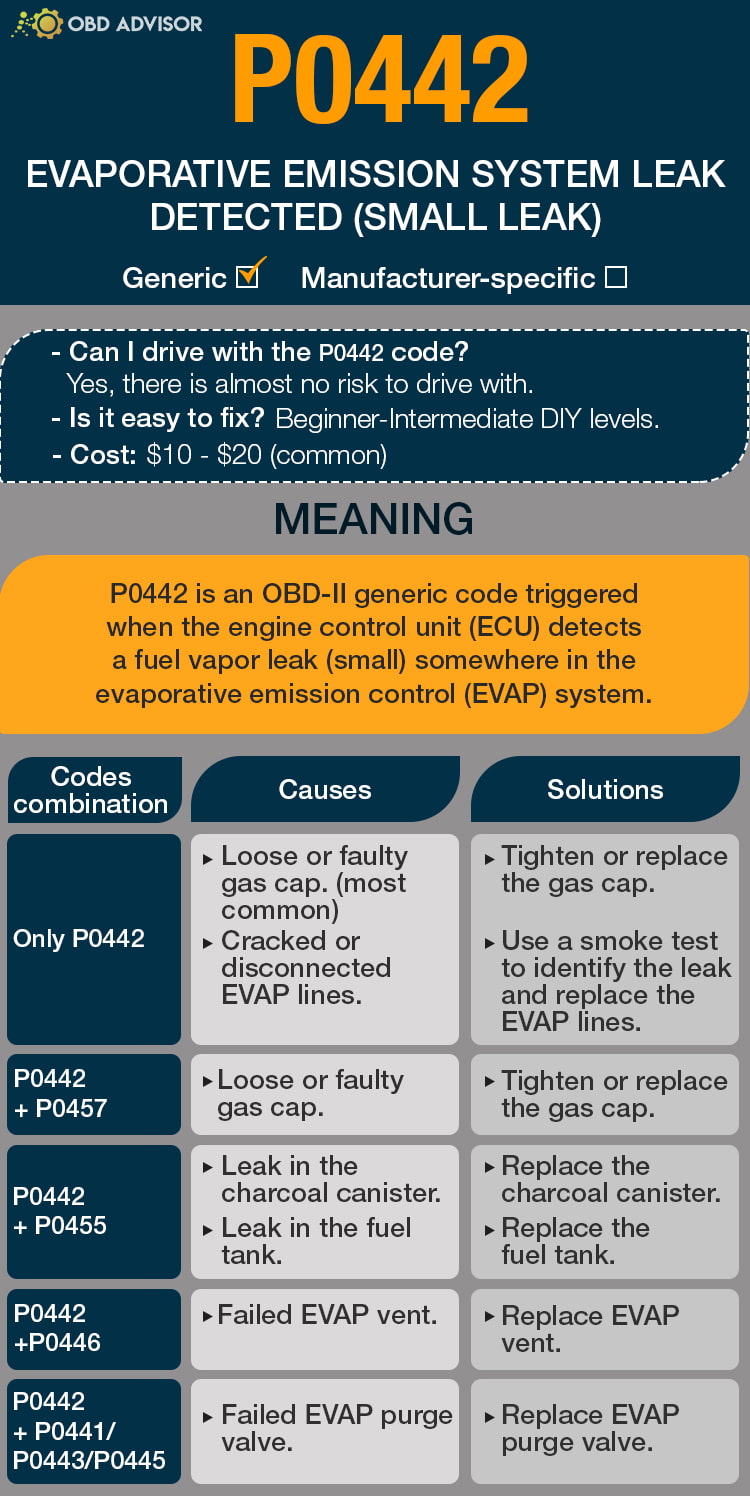
P0442 Causes Identification: Quick View
The EVAP system is built around several components, and most of the leaks are hard to detect as they could be present in any of these parts.
The table below will help identify possible causes for the leaks and their solutions.
| Codes Combination | Causes | Solutions |
|---|---|---|
| Only P0442 | Loose and faulty gas cap. Cracked or disconnected EVAP lines. | Tighten or replace the gas cap. Use a smoke test to identify the leak and replace the EVAP lines. |
| P0442 + P0457 | Loose and faulty gas cap. | Tighten or replace the gas cap. |
| P0442 + P0455 | Leak in the charcoal canister. Leak in the fuel tank. | Replace the charcoal canister. Replace the fuel tank. |
| P0442 +P0446 | Failed EVAP vent. | Replace EVAP vent. |
| P0442 + P0441/P0443/P0445 | Failed EVAP purge valve. | Replace the EVAP purge valve. |
Note: The causes for each code combination are the most common ones. There can be some uncommon issues hidden under those codes.
P0442: Causes, Symptoms, And How To Fix
It is important to understand what is causing the underlying problem to determine a solution.
Let’s look at some of the common causes of the P0442 error code and how you may go about fixing them.
Cause #1: Loose Or Faulty Gas Cap
Check your car’s gas cap first before moving on to further diagnosis.
Although a fuel cap may look pretty simple, it does play a vital role in preventing dirt, dust, and other particles from entering the fuel tank. The gas cap also acts as a seal, stopping the fuel vapors from escaping.
A faulty gas cap can cause the fuel vapors to leak into the atmosphere, resulting in the illuminated check engine light.
Cause #2: Cracked Or Disconnected EVAP Lines
You may be seeing the P0442 error code because of cracked or disconnected EVAP lines.
A running car can experience certain vibrations, causing the EVAP hose to disconnect and trigger the P0442 fault code.
On the other hand, cracked hoses are not so common as they’re not exposed to excessive heat. However, it can experience wear and tear due to age.
Symptoms of a faulty/disconnected EVAP line include:
- P0442 error code.
- Check engine light on.
- Poor engine performance.
- Hard start.
- Failed emissions test.
Check for any disconnected EVAP lines. If there are any, make sure to reconnect the lines and replace the clamps that hold the hoses in place.
However, it can be challenging to identify if you have a cracked EVAP line. You would need to conduct a smoke test to determine the leakage.
Cause #3: Leak In The Charcoal Canister
The charcoal canister captures the fumes in the EVAP system, which is then used to power the car’s engine.
After years of use, a charcoal canister may start to leak due to wear and tear, and if that occurs, it may cause the following symptoms:
- Combination of P0442 and P0455 error codes.
- Check engine light on.
- Failed emissions test.
- Reduced vehicle performance.
- Fuel smell coming from the vehicle.
A leaky charcoal canister can cause performance issues and require replacement. Buying a new one is relatively inexpensive.
You can even carry out the job at home with basic DIY skills. It’s just a matter of disconnecting the hoses and electrical connectors, removing the canister, and reconnecting everything.
Cause #4: Leak In The Fuel Tank
A gas tank is a durable car component and is placed in a protective area.
However, it can sustain damage from accidents or get punctured by road debris, resulting in a leak.
Here are some common signs that your fuel tank is leaking:
- Combination of P0442 and P0455 error codes.
- Fuel smell coming from the vehicle.
- A wet spot under the car.
- High fuel consumption.
You can repair the gas tank by using epoxy putty on smaller leaks and welding on larger leaking spots. But before you start welding, empty the fuel tank of any fuel and vapors.
It can often be a hassle to seal a fuel tank. It’s best to replace a leaky fuel tank with a new one.
Cause #5: Failed EVAP Vent
The vent assists the EVAP system by allowing air into the charcoal canister.
A faulty EVAP vent can prevent fresh air from entering the EVAP system, affecting its operations.
Some of the symptoms of a failed EVAP vent include:
- Combination of P0442 and P0446 error codes.
- Check engine light on.
- Pressure in the gas tank.
- Failed emissions test.
If your car has a failed EVAP vent, it’s time to buy a new one.
Cause #6: Failed EVAP Purge Valve
The EVAP purge valve is responsible for “purging” the EVAP system by acting as a switch that holds the fuel vapors in the charcoal canister and prevents them from leaking.
A failed EVAP purge valve will negatively affect the car’s emission output levels, indicating an evaporative emission system leak.
If you have a bad EVAP purge valve, you may experience the following symptoms:
- A combination of P0442 with either P0441/P0443/P0445.
- Rough idle.
- Poor engine performance.
- Difficulty starting.
- Low fuel economy.
- Check engine light on.
To fix this issue, purchase a new EVAP purge valve and replace it with the old one.
How Much Does It Cost To Fix P0442?
The most common cause of the P0442 is a faulty gas cap which can cost anywhere between $10 and $20, depending on your car’s make and model.
Other causes can set you back up to $1000 if the fuel tank is the problem. Below, we’ve broken down the repair costs (DIY or mechanic) according to the solutions.
The Estimated Repair Cost Of P0442
| Solutions | Cost |
|---|---|
| Replace gas cap | – DIY: $10 – $20 – Repair shop: not recommended |
| Replace EVAP lines | – DIY: $8 – $15 – Repair shop: $60 – $65 |
| Replace charcoal canister | – DIY: $80 – $250 – Repair shop: $130 – $350 |
| Replace fuel tank | – DIY: $600 – $800 – Repair shop: more than $1000 |
| Replace EVAP vent | – DIY: $30 – $150 – Repair shop: $60 – $250 |
| Replace EVAP purge valve | – DIY: $35 – $100 – Repair shop: $85 – $220 |
Note: The data in this table is collected in June 2022. The actual price depends on many factors, such as your car’s make and year, mechanic’s rate, etc.
You Ask, I Answer
Although a small leak in the EVAP system is not dangerous to drive with a P0442 error code for the short term, it is best to get it fixed.
I would like to thank you for sticking with me to the end.
If you have any questions or concerns about the error code P0442, please let me know in the comments section below, and I’ll try my best to answer your concerns.
See ya!
Read more: The 9 Best OBD2 Scanners for 2024: The Only Review You Need
P0120 Code: Understanding TPS “A” Circuit Malfunction
P0120 Code: Understanding TPS “A” Circuit Malfunction
If you’ve ever encountered the P0120 OBD-II trouble code, you know how frustrating it can be to have your vehicle’s check engine light illuminate. This code refers to the “Throttle/Pedal Position Sensor/Switch “A” Circuit” issue, which can cause several serious issues if not addressed.
In this article, we’ll take a comprehensive look at the P0120 code, including its severity, common symptoms, underlying causes, and the necessary diagnostic and repair steps. By understanding this information, you’ll be able to address the issue quickly and efficiently, getting your vehicle back on the road in no time.
So, let’s dive in.
P0120 Code: An Overview
Here is a summary of the P0120 code. Check it out!
- Definition: Throttle/Pedal Position Sensor/Switch “A” Circuit
- Severity: Medium
- DIY Skill Level: Intermediate
- Continue To Drive?: Yes (short-term)
- Estimated Repair Cost: $50 – $200
What Does The P0120 Code Mean?
P0120 is a diagnostic trouble code (DTC) that indicates there is a problem with the throttle position sensor (TPS) circuit, specifically circuit “A.”. While it is a generic code that can occur in various car makes and models, it is particularly more common in Chevrolet, Toyota, and Nissan among others.
The TPS is part of the engine management system, which controls the air-fuel mixture and other engine parameters to optimize performance and emissions. The TPS works together with the throttle valve and the Engine Control Unit (ECU) to ensure that the engine receives the correct amount of air.
When you press the accelerator pedal, the throttle valve opens, allowing more air to enter the engine. The TPS sends a signal to the ECU indicating the position of the throttle valve. The ECU then uses this information to calculate the correct amount of fuel to inject into the engine.
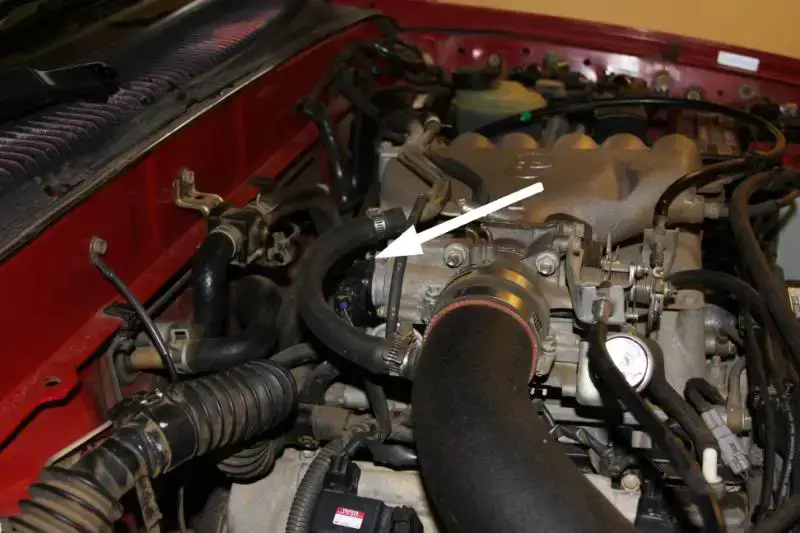
If the TPS “A” circuit is faulty, the TPS may not be able to send a signal to the ECU, or the ECU may not be able to receive the signal, triggering the code P0120. Specifically, when the ECM identifies that the voltage output from TPS circuit “A” exceeds the designated voltage range, in contrast to TPS sensor circuit “B,” the P0120 code is triggered. The specific voltage range may differ depending on the vehicle’s manufacturer and model.
Note: In some vehicle models, the ECU monitors the TPS and the manifold absolute pressure (MAP) sensor together. The ECU expects a consistent relationship between the throttle position and the manifold pressure. If there is a significant difference between the two, it can trigger the P0120 code.
How Severe Is P0120?
The P0120 code is of medium severity. While it doesn’t indicate an immediate danger or major mechanical failure, it should be addressed promptly to prevent potential issues from getting worse.
Driving with the P0120 code in the short term is generally safe. However, if ignored for a long time, it could cause reduced fuel efficiency, drivability problems, or even damage to other engine components.
To ensure your vehicle’s longevity and optimal performance, it’s recommended to have the code diagnosed and repaired as soon as possible. Consult a qualified mechanic to identify the root cause and make the necessary repairs. Taking this proactive approach will help prevent further complications in the future.
Read more: P0122 – Throttle/Pedal Position Sensor/Switch “A” Circuit Low
What Are The Symptoms of P0120?
When your vehicle experiences the P0120 code, you may notice the following symptoms:
- Check Engine Light (CEL) illuminated on the dashboard
- Failsafe mode
- Reduced engine power or lack of response when pressing the accelerator pedal
- Irregular or fluctuating idle speed
- Poor fuel efficiency
- Hard starting
Read more: P0121 – Throttle/Pedal position sensor/switch “A” circuit
What Causes P0120?
The P0120 code can be triggered by various underlying causes, including:
- Malfunctioning TPS sensor (most common)
- Damaged or frayed wiring in the TPS circuit
- Loose or poor electrical connections
- Corrosion or debris on the sensor or connectors
- Faulty ECM or related components such as accelerator position sensor, MAP sensor.
Read more: P1516 Chevy Code: Throttle Position Sensor Issues Explained
DIY Guide To Diagnosing and Repairing P0120
In this section, we’ll provide the tools and parts you’ll need, along with a step-by-step procedure to help you diagnose and fix the P0120 code yourself. By following this guide, you can save money on repairs and better understand your vehicle’s throttle position sensor.
Essential Tools and Parts
To diagnose and repair the P0120 code, you may need the following tools and parts:
- OBD-II scanner or code reader
- Multimeter
- TPS replacement (if necessary)
- Electrical contact cleaner
- Wire connectors and electrical tape (for wiring repairs)
Step-by-step Procedure
Step 1: Retrieve Stored DTCs
Connect the OBD-II scanner or code reader to retrieve the stored trouble codes and any additional relevant data.
Step 2: Inspect Throttle Pedal
Inspect the throttle pedal position sensor and its wiring for any signs of damage, such as frayed wires or loose connections. Pay close attention to the wiring harness near the sensor.
Step 3: Check the Sensor and Connector
Check for any corrosion or debris on the sensor or its connectors. Clean them if necessary to ensure proper electrical contact.
Step 4: Test Voltage Signals
Use a multimeter to test the voltage signals from the TPS circuit and compare them to specifications provided by the manufacturer. Ensure the TPS is receiving and transmitting the correct voltage signals. If the voltage signals are outside the expected range or erratic, replace the throttle position sensor.
Step 5: Inspect Related Components
Inspect other related components, such as the accelerator position sensor, MAP sensor, and their respective wiring connections, for any signs of damage or loose connections. Repair or replace as needed.
Step 6: Clear Codes and Test Drive
Clear the trouble codes using the OBD-II scanner and test drive the vehicle to ensure the issue has been resolved.
Note: It’s recommended to consult the vehicle’s service manual or seek professional assistance for specific diagnostic and repair steps tailored to your vehicle’s make and model.
DIY Repair Level and Estimated Costs
Diagnosing the P0120 code can be moderately challenging, requiring some technical knowledge and the use of specialized tools. The level of DIY repair for this code is considered intermediate.
The estimated costs for the main repair tasks associated with the P0120 code can vary depending on factors such as the vehicle make, model, and the specific cause of the issue. Here’s a general breakdown of potential costs:
| Repair Task | Estimated Cost Range |
| Diagnostic Fee | $50 – $100 |
| Wiring Repair | $50 – $200 |
| Throttle Position Sensor Replacement | $60 – $100 (aftermarket part)$100 – $200 (OEM part) |
Remember, if you’re unsure about any step or lack the necessary tools and expertise, it’s always advisable to consult with a qualified mechanic or automotive technician to ensure proper diagnosis and repair. They can provide accurate guidance and ensure the issue is resolved effectively and safely.
Final Thoughts
Understanding the P0120 OBD-II trouble code is super important to keep your vehicle running smoothly. By knowing the signs to look out for, the possible causes, and the steps for diagnosing and fixing the issue, you’ll feel confident handling the problem and avoiding any additional headaches. Of course, it’s always a good idea to reach out to a qualified mechanic for expert advice and assistance.
If you found this information helpful, feel free to share it with fellow car enthusiasts. Don’t forget to leave a comment below sharing your experiences or questions.
Stay informed and keep your car running smoothly!
Reference Sources
AutoZone, Symptoms of a Bad Throttle Position Sensor.
Autoditex, THROTTLE POSITION SENSOR (TPS).
P2459 Code: Understanding, DIY Solutions, And Repair Costs
P2459 Code: Understanding, DIY Solutions, And Repair Costs
OBD-II code P2459 is like a hidden message that your car wants to share with you. When your car’s sensors detect something’s not right, they use this code to let you know.
In this article, we’re going to uncover the mystery behind P2459. We’ll find out what it’s trying to tell us, why it appears, and most importantly, how we can solve it. So whether you’re a car enthusiast or just curious about car secrets, understanding P2459 will help you take better care of your vehicle.
Let’s get started!
P2459 Code: A Quick Overview
Check out the summary of the P2459 code provided below!
- Definition: Diesel Particulate Filter Regeneration Frequency
- Severity: Medium
- DIY Skill Level: Intermediate
- Continue To Drive?: Yes (with Limp mode)
- Estimated Repair Cost: $50 – $500
What Does The P2459 Code Mean?
The P2459 Diagnostic Trouble Code (DTC), labeled as “Diesel Particulate Filter Regeneration Frequency,” is a generic code specifically relevant to vehicles equipped with diesel engines. When this code is triggered, it signifies that the powertrain control module (PCM) has identified issues related to the diesel particulate filter (DPF) regeneration process.
The diesel particulate filter is a crucial component in controlling the emissions produced by diesel engines. Its primary function is to capture and remove up to 90% of the soot particles present in the exhaust gases, thus reducing harmful emissions. The DPF needs to undergo a periodic regeneration process to burn off the accumulated soot and maintain its effectiveness.
(Credit: Cumminsforum.com)
The PCM monitors the DPF regeneration process and exhaust pressure to ensure optimal performance. It will trigger the P2459 code under two specific circumstances:
- First, if the exhaust pressure fails to reach the required level
- Second, if the passive regeneration process (typically in a passive DPF system) does not adhere to the programmed frequency.
As I mentioned above, the DTC P2459 is exclusive to diesel-powered vehicles, encompassing both passenger cars and trucks that utilize diesel engines. Models from various manufacturers can experience this issue, including brands such as Ford, Chevrolet, Dodge, and more. There are some engines familiar with this code, including Duramax engines or 6.7 Cummins, etc.
How Severe Is The P2459 Code?
The severity of the P2459 code is considered moderate. While the code itself doesn’t indicate an immediate safety threat, it signifies a malfunction in the DPF regeneration process.
So can you still drive with the P2459? – The answer is Yes – However, it’s important to note that when this code is triggered, your vehicle might go into limp mode. In this mode, the engine’s power and performance might be limited to prevent further damage.
While you can drive your vehicle in this condition for short distances, it’s not a recommended long-term solution. In this case, it’s necessary to have the issue diagnosed by a qualified mechanic.
What Are The Symptoms Of The P2459 Code On Diesel Vehicles?
The presence of DTC P2459 can manifest through several noticeable symptoms, including:
- Illuminated warning lights ON (MIL and/or DPF light)
- Vehicle stuck in reduced performance mode (limp mode)
- Impaired acceleration
- Engine-related issues
What Causes The P2459 Code?
There are multiple factors can trigger the P2459 code, such as:
- Malfunctioning DPF pressure sensor
- Restricted DPF or exhaust system
- Accumulated soot within the DPF
- Electrical circuit problems
- Faulty fuel system
- Damaged diesel oxidation catalyst (DOC)/DPF filter
- Air leaks
- Bad fuel filters
- PCM-related concerns
Read more: Ford OBD2 Codes List for FREE Download
How To Diagnose And Fix The P2459 Code On Your Vehicles?
When faced with Diagnostic Trouble Code (DTC) P2459, it’s important to follow a systematic approach for diagnosis and repair. Below are the essential tools and parts, a step-by-step procedure, and an estimation of repair costs to assist in resolving the issue.
Essential Tools And Parts
To diagnose and repair the P145C code effectively, ensure you have the following tools and parts at hand:
- OBD-II scanner
- Digital multimeter
- DPF pressure sensor
- DPF cleaning kit (if necessary)
- Replacement parts based on diagnosis
Step-by-Step Procedure
1. Check The DPF Pressure Sensor
- Locate the DPF pressure sensor (consult your vehicle’s repair manual if needed).
- Disconnect the electrical connector from the sensor.
- Use a digital multimeter to measure the sensor’s resistance and compare it to the specifications in the repair manual.
- If the resistance is out of range, replace the DPF pressure sensor with a new one.
2. Visually Inspect The Restricted DPF Or Exhaust System
- Inspect the exhaust system and DPF for visible blockages or damage.
- If no visible issues are found, perform a back pressure test to measure exhaust flow.
- Compare the measured back pressure to the manufacturer’s specifications.
- If the back pressure is too high, consider cleaning or replacing the DPF or exhaust components as needed.
3. Check The Accumulation Of Soot Within The DPF
- Perform a forced DPF regeneration as recommended in your vehicle’s manual. This may involve driving at a certain speed or RPM range for a specified duration.
- If forced regeneration doesn’t resolve the issue, consider using a DPF cleaning additive or a professional DPF cleaning service.
4. Examine Wiring Harnesses And Connectors
- Check all wiring and connectors related to the DPF pressure sensor and other relevant components.
- Repair any damaged wires or connectors and ensure proper connections.
5. Inspect The Fuel System For Clogging Or Damage
- Inspect the fuel system components, including fuel filters, fuel lines, and injectors.
- Replace any faulty or clogged fuel filters and ensure proper fuel flow to the engine.
6. Examine The DOC Or DPF Filters
- Inspect the DOC/DPF filter for physical damage or cracks.
- If damage is evident, replace the damaged component with a new one.
7. Check For Any Air Leaks In The Exhaust System
- Carefully inspect the entire exhaust system for any leaks or gaps.
- Use exhaust sealant or gaskets to seal any identified leaks.
8. Test The Performance Of The PCM
- Perform a thorough scan of the PCM using a diagnostic tool to identify any related faults.
- If PCM-related issues are found, consult the vehicle’s repair manual or seek professional assistance for appropriate diagnosis and repair.
9. Clear The Codes And Test Drive
After conducting all procedures, clear the codes by using an OBD scanner. Perform a test drive to see if the codes come back or not.
Note: It’s important to consult your vehicle’s repair manual or seek professional assistance if you’re unsure about any step in the process.
Read more: Honda OBD2 Codes List [Generic + Manufacturer-specific]
DIY Repair Level And Estimated Costs
When it comes to addressing Code P2459 and related issues, there are steps you can take on your own to diagnose and potentially fix the problem. However, the level of DIY repair varies based on your mechanical skills, tools, and comfort level. If you’re experienced and confident, you might successfully complete tasks like inspecting for visible blockages, checking wiring, or performing basic checks. For more complex tasks, it’s advisable to consult a professional mechanic.
Here’s an estimated cost breakdown for main repair tasks:
| Repair Task | Estimated Cost |
| DPF pressure sensor replacement | $50 – $150 |
| Exhaust system inspection and repair | $50 – $300 |
| Professional DPF cleaning service | $150 – $500 |
| Diesel Oxidation Catalyst (DOC)/DPF replacement | $200 – $800 |
| PCM software update or replacement | $100 – $1,500 |
Keep in mind that these costs are approximate and can vary based on vehicle make, model, and location. If you’re uncertain or encounter challenges during the repair process, don’t hesitate to seek help from a qualified mechanic to ensure the job is done correctly and safely.
P2459 Infographic

Final Thoughts
Facing the P2459 code might seem daunting, but armed with knowledge and guidance, you’re well-equipped to address the issue. Remember, proper diagnosis and timely repairs are essential for maintaining optimal vehicle performance and minimizing emissions. Whether you’re a seasoned DIY enthusiast or prefer leaving it to the experts, taking action now ensures a smoother ride ahead.
If you found this guide helpful, share it with fellow vehicle owners who might benefit. Feel free to leave your comments and questions below – we’re here to assist you on your automotive journey. Safe travels and happy troubleshooting!
Find more codes by using our OBD lookup tool!
Reference Sources
- JustAnswer, P2459 Diagnostic Procedure [PDF document]
- Wikipedia, Diesel particulate filter
- Mr Tyre, Limp Mode Causes and What to Do About It. Mr Tyre
P0420: Catalyst System Efficiency Below Threshold (Bank 1)
P0420: Catalyst System Efficiency Below Threshold (Bank 1)
Did your car scanner throw the P0420 code? Are you confused about which decision to make and whether to keep driving?
Continue reading to briefly evaluate your current situation.
- P0420 Definition: Catalyst System Efficiency Below Threshold (Bank 1).
- Code Type: Generic – P0420 indicates the same problem whether you’re having a Chevy, Honda, or Nissan, etc.
- Can I drive with the P0420 code? Yes, but doing so will further damage your catalytic converter.
- Easy to fix? Intermediate to advanced level.
- Cost: $400 – $2200 (common).
Now you know that the P0420 code may not imply immediate danger.
To avoid wasting time and money on finding the problem, let’s dive into four causes of the P0420 code and their corresponding solutions.
What Does the P0420 Code Mean?
The P0420 is the diagnostic code for a defective or underperforming catalytic converter. However, this code may pop up due to other reasons not directly related to the converter.
What Is The Catalytic Converter’s Function?
To protect the environment, the catalytic converter limits and breaks down the harmful exhaust gasses (e.g., Carbon Monoxide and Nitrogen Oxide) from internal combustion engines.
How Do You Know Your Catalyst System Is Below Efficiency?
There are two oxygen sensors sitting near the converter, one at the front (upstream) and another at the rear (downstream).
The upstream sensor measures the O2 level of exhaust fumes exiting the engine. Meanwhile, the downstream sensor checks the O2 level of gasses leaving the converter.
In normal conditions, the data from the upstream sensor will fluctuate while the downstream’s must remain steady. If both sensors output the same data, the catalyst system is inefficient, harmful gasses will be released into the environment, and P0420 is set.
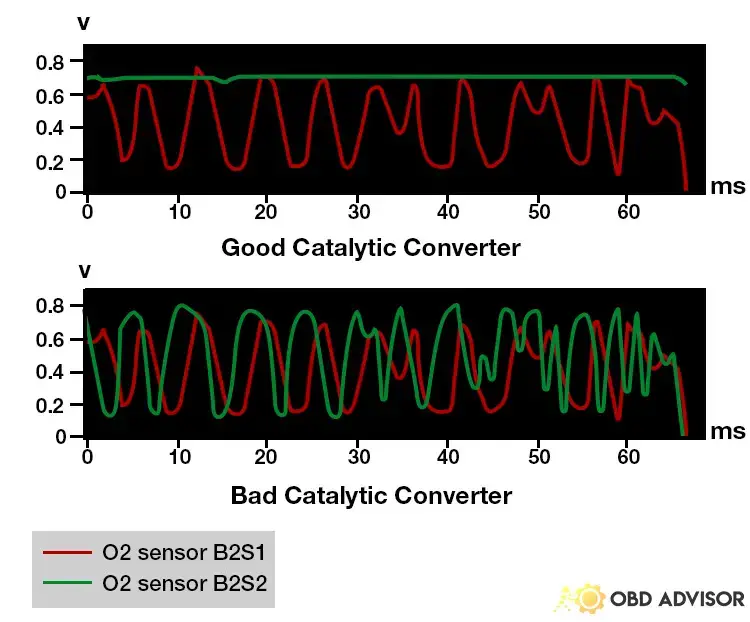
The P0420 code may not seem serious enough to stop driving. However, the catalyst system may be further damaged, and the car will fail emission tests.
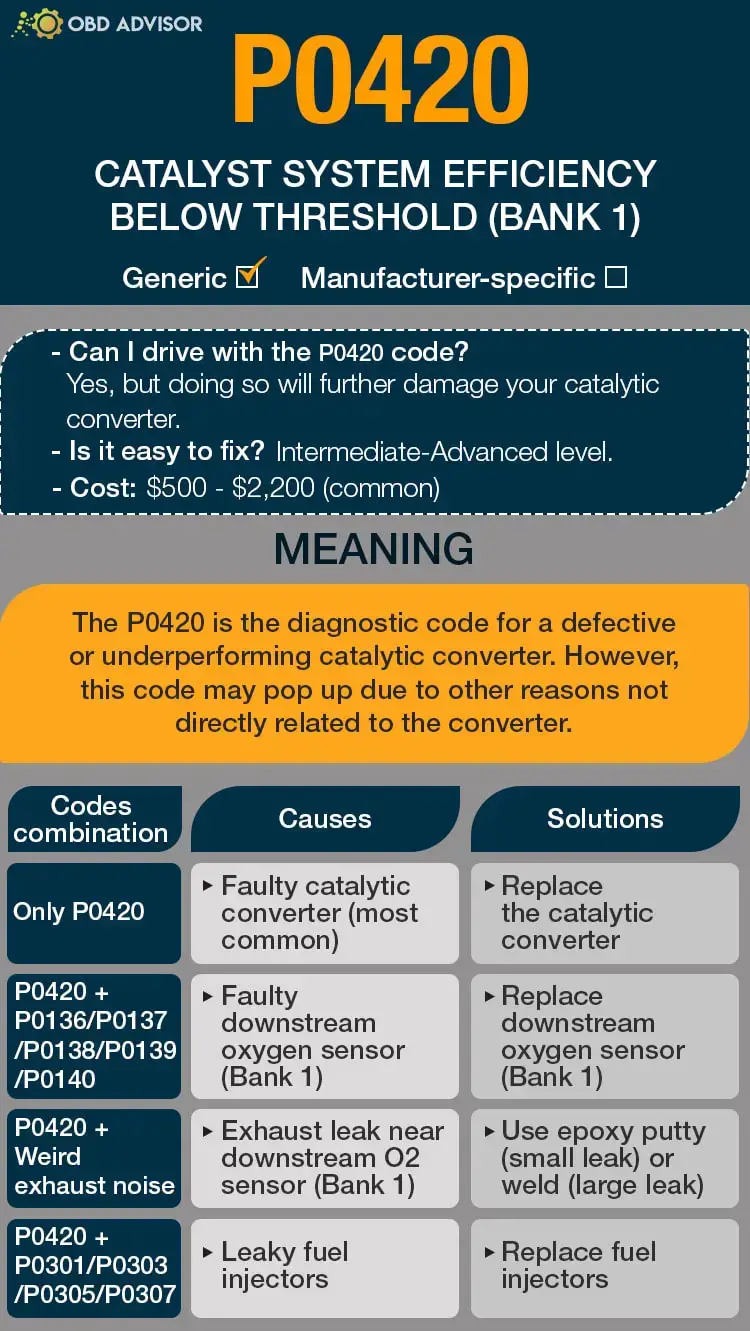
P0420 Causes Identification: Quick View
A faulty catalytic converter is often the culprit when a scanner indicates the P0420 code. However, the downstream oxygen sensor or a failing engine component may be the root cause. Hence, another code may show up with the P0420.
Below are the likely causes of this code and their possible solutions.
| Codes Combination | Causes | Solutions |
|---|---|---|
| Only P0420 | Faulty catalytic converter (most common) | Replace the catalytic converter |
| P0420 + P0136/P0137/P0138/P0139/P0140 | Faulty downstream oxygen sensor (Bank 1) | Replace downstream oxygen sensor (Bank 1) |
| P0420 + Weird exhaust noise | Exhaust leak near downstream O2 sensor (Bank 1) | Use epoxy putty (small leak) or weld (large leak) |
| P0420 + P0301/P0303/P0305/P0307 | Leaky fuel injectors | Replace fuel injectors |
Note: The causes for each code combination are the most common ones. There can be some uncommon issues hidden under those codes.
P0420: Causes, Symptoms, And How to Fix
If a vehicle outputs the P0420 diagnostic code after scanning, the following might be the cause.
Cause #1: Faulty Catalytic Converter
A faulty catalytic converter is the most common cause of the P0420 code. Sometimes, this might be due to:
- Structural damage caused by thermal shocks
- Weak welding points
- Direct hits from rocks and debris
- Unburnt fuel coats the catalyst
In any case, a faulty catalytic converter fails to convert exhaust fumes to environmental-friendly gasses.
Therefore, the exhaust fumes exit from the catalytic converter without any changes (filtering or cleaning). As a result, the upstream and downstream oxygen sensors’ reading will be the same, triggering P0420.
Look out for the following symptoms to identify a fault catalytic converter.
- Check engine light
- Dark exhaust smoke
- Gasoline smell around the car
- Excess heat under the car
- Poor engine performance
The chances of restoring the catalytic converter to its initial condition are slim. A suitable replacement is the best solution though it is pricey.
Cause #2: Faulty Downstream Oxygen Sensor
The downstream oxygen sensor’s function is to keep track of the catalytic converter’s efficiency. If the sensor fails, it may tell the PCM that the catalytic converter is underperforming (in fact, it isn’t.)
There are no obvious symptoms of a faulty downstream oxygen sensor. You can conduct an O2 sensor test to determine whether it is faulty or not.
If it is your problem, your scan tool will trigger only P0420 or with other codes like P0136, P0137, P0138, P0139, and P0140.
The most realistic solution is to replace the oxygen sensor. Buying the part and changing it yourself will save you money from the repair shop.
Cause #3: Exhaust Leak Near Downstream O2 Sensor
The exhaust leak affecting the output voltage can be found near the downstream oxygen sensor.
The exhaust system can suck oxygen into the exhaust flow through a leak due to the pressure differences. Consequently, the sensors will capture incorrect readings due to the extra oxygen, causing the PCM to set P0420.
The following are the common symptoms of an exhaust leak:
- Unusual blowing noise from underneath the car
- Low engine performance
- Unpleasant odor around the car during operation
In the case of small leaks, epoxy glue will resolve the issue. However, some larger leaks may require welding.
Cause #4: Leaky Fuel Injectors
Leaky fuel injectors can also be the root cause of the P0420 code. When the fuel injector leaks, excess fuel in liquid form reaches the combustion chamber.
As a result, some amount of fuel is left unburnt and passed to the exhaust system. Over time, the waste fuel builds up and overloads the catalyst system, reducing its efficiency drastically.
The following symptoms can mean that a car has leaky fuel injectors.
- Gasoline smell in and around the car
- Rough engine performance and idling
- Increased fuel consumption
- Heavy exhaust fumes
- Excessive heat under the car
The only way to resolve the problem is to replace the leaky fuel injectors with suitable ones.
How Much Does It Cost to Fix P0420?
The cost of resolving the P0420 depends on the root cause of the problem. A fault catalytic converter is the most common cause which costs $400 – $2,000 to repair yourself. If it is too difficult to handle this job, you will pay $500 – $2200 to visit a mechanic.
The following are the possible costs of fixing the P0420.
The Estimated Repair Cost Of P0420
| Solutions | Cost |
|---|---|
| Replace the catalytic converter | DIY: $400 – $2000 Repair shop: $500 – $2200 |
| Replace downstream oxygen sensor (Bank 1) | DIY: $20 – $95 Repair shop: $100 – $450 |
| Use epoxy putty (small leak) | DIY: under $10 Repair shop: not recommended |
| Weld the leak (large leak) | DIY: not recommended Repair shop: $30 – $100 |
| Replace fuel injectors | DIY: $400 – $900 Repair shop: $600 – $1,200 |
Note: The data in this table was collected in June 2022. The actual price depends on many factors, such as your car’s make and year, mechanic’s rate, etc.
You Ask, I Answer
Once the catalytic converter fails or underperforms, the car’s computer transmits the P0420 and related diagnostic codes.
By now, you should be able to understand the likely causes of the code and decide how to fix them.
Do you have questions or comments regarding the P0420 code? Please reach out to us using the comment section.
See ya!
Read more: The 9 Best OBD2 Scanners for 2024: The Only Review You Need
P0101 – Mass or Volume Air Flow “A” Circuit Range/Performance
P0101 – Mass or Volume Air Flow “A” Circuit Range/Performance
The P0101 OBD2 code indicates a problem with your mass air flow circuit. Proper air flow is key to your engine’s operation, and the MAF sensor helps to regulate it. When it has a problem, it can make your system run rough and reduce your gas mileage.
There are a couple of primary sources of the P0101 trouble code. It could mean there’s a vacuum leak somewhere in your exhaust system. It could also indicate a problem with the MAF sensor itself. The good news is, it’s relatively easy to find the source of the code if you follow the diagnostic process outlined below.
P0101 Code Definition
P0101 Code Definition (Generic): Mass air flow (MAF) circuit range/performance
P0101 Audi Code Definition: Mass or volume air flow circuit range/performance problem
P0101 Duramax Code Definition: MAF/VAF sensor range/performance problem
P0101 Mercedes Code Definition: Mass or volume air flow circuit range/performance problem
P0101 Nissan Code Definition: Mass Air Flow (MAF) (very common, service bulletin exists)
P0101 Toyota Code Definition: Mass air flow circuit range/performance
P0101 VW Code Definition: Mass or volume air flow circuit range/performance problem
What Does P0101 Mean?
The P0101 OBD2 code tells you the amount of air entering the engine is out of your engine’s specified range. The air flow into the engine is measured by the mass air flow (MAF) sensor. It sends this information to the engine control unit (ECU) to help manage the engine.
When the air flow reported by the MAF sensor is outside your system’s acceptable range, the P0101 trouble code activates. Issues with the air flow also reduce your engine’s performance and can make your car drive erratically.
The MAF sensor is mounted in the engine air intake tract for your vehicle, downstream from your air filter. It measures the air’s density and volume being pulled into the engine by sampling a portion of the air. From this data, it extrapolates the conditions in the total air mass. Some MAF sensors also have an air temperature circuit, which could also contribute to the air flow problems.
Many systems can be the root cause of this trouble code. Your system could have a vacuum leak or other mechanical issue that allows too much air into the engine. It could also be a malfunction of the sensor itself. A full diagnosis is the best way to track down and fix the problem.
What Are The Symptoms Of The P0101 Code?
You will likely notice drivability problems if there is too much air going into your engine. These symptoms include:
- Illumination of the check engine light
- Stalling engine
- Black smoke in the exhaust
- Rough starts or idling
- Low engine power
- Decreased fuel economy
What Are The Causes Of P0101?
- MAF sensor is dirty or faulty
- Damaged or faulty wires on the MAF sensor
- Damaged air intake boot
- Clogged air filter
- Leaks in the air intake system
- Clogged catalytic converter (most common on Chevrolets and GMCs)
How Serious Is The P0101 Code?
The P0101 code is moderately severe. While it’s not dangerous to drive your car with this code active, sustained driving can damage the engine. You should repair this trouble code as soon as possible.
How To Diagnose The P0101 Code

You may find technical service bulletins for this trouble code related to your vehicle’s make or model. Check before you start your diagnosis, as this can save you some time in isolating the problem.
Tools You’ll Need:
Method:
- Scan your system for other related trouble codes, especially P0100-P0104, which indicate other issues with the air flow. If these codes are present, diagnose them first.
- Read the real-time data for the oxygen sensors and MAF sensor to check their operation.
- Open the air intake box and check the air filter. Make sure it’s installed properly, and replace it if it’s clogged or dirty.
- Remove the air intake snorkel. Check it for damage, and inspect the MAF sensor. While you’re at it, check the wiring around the harness for damage or loose connections. Replace the air intake snorkel if necessary.
- Check the air intake system for leaks. You can visually inspect the hoses, running your fingers down them to check for hidden weak spots and cracks. Also, make sure they’re securely attached.
- Run an exhaust back pressure test to check for clogs in the catalytic converter. Clean it using a catalytic converter cleaner, following the instructions on the bottle.
Common Mistakes To Avoid While Diagnosing The P0101 Code
While the MAF sensor can cause the P0101 trouble code, it’s not always the problem. Make sure you check for clogs and leaks throughout your system before you replace the sensor.
What Should You Do To Fix The Code P0101?
The steps you take to diagnose P0101 may clear it, as well. Clear the codes and take a test drive. If the code comes back, follow the steps below:
- Replace any damaged wires or leaking hoses found in your diagnosis.
- Clean your MAF sensor. This sensor is very sensitive, so only use cleaners specifically designed for mass air flow sensors. Spray each side of the sensor for 3-5 seconds, wait 10 seconds, then spray again. You don’t need to wipe it off.
- Clear the codes and test drive your car to see if the code comes back. If it does, replace the MAF sensor. Make sure you use an OEM component, not an after-market product. Incompatible MAF sensors can lead to further problems with your system.
- If there is mesh in your air intake system (mostly Volkswagen vehicles), inspect it for dirt and damage. Clean or replace it as necessary.
- Check the operation of the catalytic converter. If it’s still failing after cleaning it, replace it.
Tips To Avoid P0101 In The Future
Dirt and build-up in your engine can cause many problems, and the P0101 trouble code is among them. Check your air filter regularly, and make sure it’s correctly installed when you replace it. Regular maintenance of your engine’s fluids, especially the oil, will also help keep your engine clean.
Frayed wires can also trigger this code. Make sure all the wires in your system are kept clear of ignition coils and other potential sources of damage.
Read more: P0012 Code: Meaning, Symptoms, Causes, And Fixes
P0118: Engine Coolant Temperature Sensor Circuit High Input
P0118: Engine Coolant Temperature Sensor Circuit High Input
Suppose you are driving down the road, and your check engine light turns on, displaying a P0118 code error!
Well, you read that using an OBD scanner, but what next?
Let’s discuss your situation in this article.
- P0118 Definition: Engine coolant temperature sensor circuit high input problem.
- Code type: Generic – P0118 indicates the same problem whether you’re having a Chevy, Honda, Dodge, etc.
- Can I drive with the P0118 code? Yes, you can. However, it may cause damage to your engine in the long term.
- It is easy to fix? DIY to advanced levels.
- Cost: $85 – $170 (common).
To help you understand the P0118 code, I have split this article into four parts: causes, symptoms, how to diagnose, and how to fix the P0118 code.
Read further and unveil everything you need to know about the P0118 and its quick fixes.
What Does the P0118 Code Mean?
The P0118 code stands for “Engine Coolant Temperature (ECT) Sensor Circuit High Input”. The code is triggered when PCM recognizes that the input voltage of the ECT is more than 5V.
The ECT sensor measures the engine coolant temperature. This data is sent to the powertrain control module (PCM) to control the cooling system.
Under good conditions, the higher the temperature, the lower the ECT sensor voltage. This number ranges from 0.5 to 4.5V.
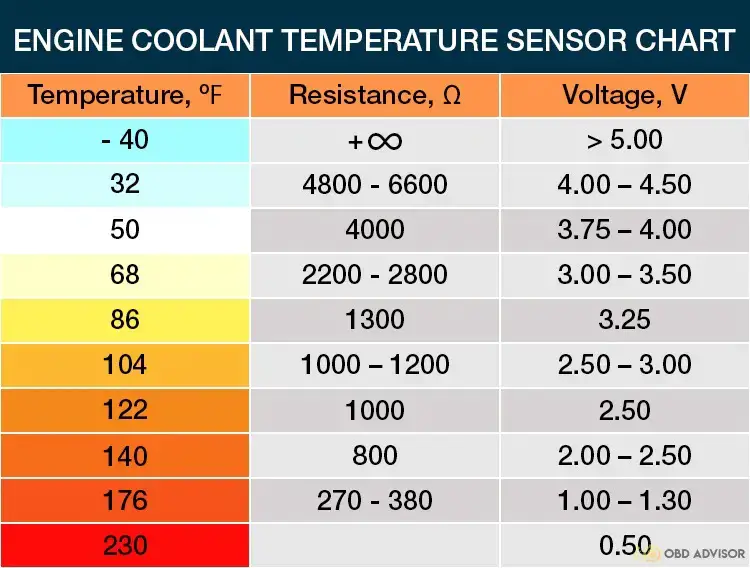
As mentioned above, the code P0118 is set when the ECT voltage is higher than 5V. This means the PCM is receiving a “too cold” signal (-40F). Of course, the PCM knows this signal is abnormal and does not believe in it (if it did, the thermostat would close, leading to an overheating engine.)
As a result, P0118 makes your car enter failsafe mode to prevent the engine from overheating.
In this mode, the cooling system is allowed to run at maximum capacity, which includes:
- Radiator constantly running.
- Wide-open thermostat.
- AC off.
Consequently, the car takes more time to warm up. This reduces fuel economy and damages the engine parts in the long run.
Other codes may appear with P0118: P0115, P0116, P0117, and P0119.
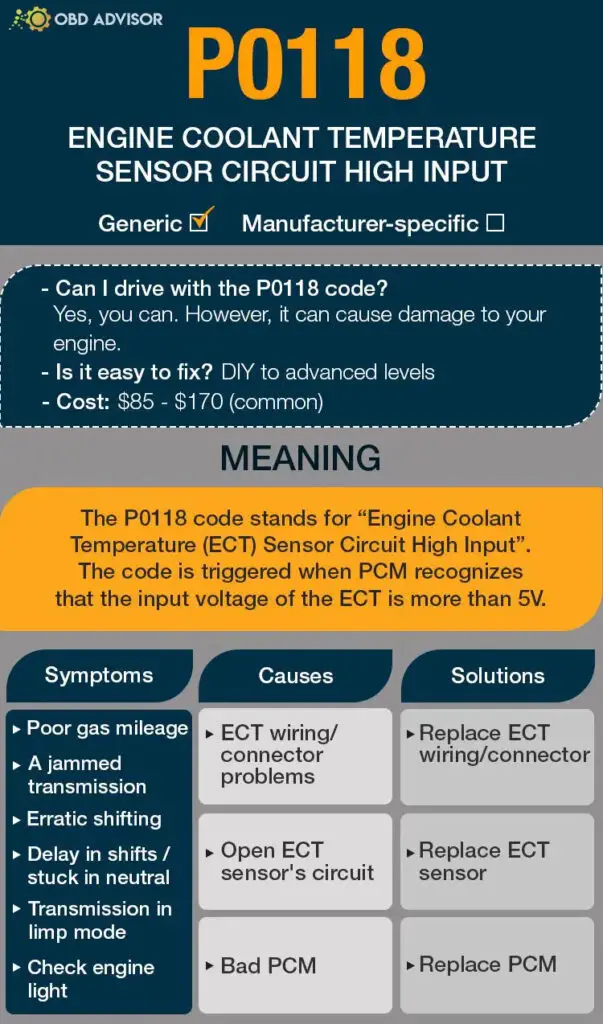
P0118: Causes, Symptoms, and How To Fix
Causes #1: ECT Wiring/Connector Problems
In many cases, P0118 is caused by the ECT sensor connection problems in the wiring harness or inside the connectors.
The symptoms of this problem are shown by:
- Erratic temperature gauge readings.
- Malfunctioning air conditioner.
- Radiator fans running constantly.
- High fuel consumption.
- Hard start.
- Check engine light on.
- Black smoke from the engine.
- Poor idling.
If this is the case, repairing the wiring harness will fix the problem.
Causes #2: Open ECT Sensor’s Circuit
If the wiring is fine, the circuit inside the ECT sensor can be open for various reasons, which leads to the P0118 popping up.
The symptoms of a bad ECT sensor are the same as the ECT wiring/connector causes.
In this case, replacing the ECT will fix the P0118.
Read more: P0172: System Too Rich (Bank 1)
Causes #3: Faulty PCM (Rare)
The powertrain control module (PCM) is the main engine computer that ensures your engine transmission works effectively. So, a faulty PCM can be a potential cause of the P0118 code, although it rarely occurs.
Also, there are combination codes with P0115 and P0117 associated with faulty PCM in some cases.
You can repair faulty PCM by reprogramming it, although that won’t be effective in the long run.
So, replacing the PCM would be the best option.
P0118 Causes Identification: How to Diagnose
As mentioned above, in most cases, there are 2 main causes triggering the P0118 code:
- The ECT wiring harness.
- The ECT sensor itself.
The question is: “Which one?”
Continue reading to reveal how you can diagnose the cause of the P0118 code.
Diagnosing ECT Wiring/Connector Problems
First, locate the sensor and visually inspect its wiring to check if there are any burnt, broken, or unplugged wires and fix them.
If there isn’t, use a multimeter to check the wiring harness. Here are the steps to do so:
- Unplug the cables connecting the sensor.
- Turn on your vehicle’s ignition key without starting the engine.
- Connect the multimeter red clip to the positive terminal and the black clip to the ground wire.
- Record the multimeter readings. Your sensor wiring has a problem if your multimeter registers a zero ohm reading. Slightly more than zero ohms multimeter reading should be good wiring.
Diagnosing Open ECT Sensor’s Circuit
If all the wires are good, the ECT itself is very likely to be the problem.
Here’s how you can test it:
- Locate the ECT sensor: near the thermostat in the cylinder head or block or on the thermostat housing.
- Remove the sensor wiring connectors while the engine ignition is off.
- Connect an ohmmeter between the sensor terminals. Measure and record the resistance.
If the ohms reading is more than 6600Ω or infinity, the sensor’s circuit is open and needs a replacement.
Diagnosing Faulty PCM
After testing the ECT sensor and circuit problems and there aren’t any problems with these, a bad PCM should be the last conclusion.
However, this is a rare cause.
Having a mechanic handle it is the best solution in this case. And it’s not cheap!
How Much Does It Cost to Fix the Code P0118?
Most P0118 causes can be fixed by yourself with a few bucks.
For example, the ECT sensor can cost you $10 to $30.
Most Auto shops charge the cost of fixing code P0118 in terms of the hours for the work.
Although the charges vary from shop to shop, you can expect to spend between $85 and $170, excluding the cost of the parts.
The estimated repair cost of the P0118
| Solutions | Repair cost |
|---|---|
| Repairing ECT wiring / connector problems | DIY: a few bucks Mechanic: $85 to $170 |
| Replacing malfunctioning ECT sensor | DIY: $10 to $30 Mechanic: $85 to $170 |
| Replacing faulty PCM | DIY: Not recommended Mechanic: $1000 to $3000 |
Note: The data in this table is dated June 2022. The exact cost will depend on various factors such as mechanic rates, car model, etc.
You Ask, I Answer
Hopefully, this article explains why you are getting the P0118 and how you can find the best solution that saves you money.
If you have any other concerns about the P0118 code, don’t hesitate to comment below, and I will be quick to answer.
Also, you can help someone by sharing what you did in case you had this code before.
Let’s all have a safe and risk-free drive!
Read more: The 9 Best OBD2 Scanners for 2024: The Only Review You Need
P0430: Catalyst System Efficiency Below Threshold (Bank 2)
P0430: Catalyst System Efficiency Below Threshold (Bank 2)
What Does The P0430 Code Mean?
P0430 is a diagnostic trouble code triggering when the catalytic converter underperforms.
A catalytic converter breaks harmful pollutants in the exhaust gas into safer forms. If the catalytic converter fails, more oxygen is present in the exhaust gas downstream.
The downstream oxygen sensor detects that change and sends the signal to the powertrain control module (PCM). The PCM, in turn, sets the P0430 code and the Check Engine Light comes on.
This is a moderate fault, but it is crucial to diagnose the car and fix it as soon as possible.
P0430 Causes Identification: Quick View
A problem with your vehicle’s catalytic converter may sometimes trigger more than the P0430 code. An OBD2 scanner may return other DTCs depending on what causes the issue.
The chart below summarizes all possible combinations.
| Codes Combination | Causes | Solutions |
|---|---|---|
| Only P0430 | Faulty catalytic converter (most common) Exhaust leak near downstream O2 sensor (Bank 2) Leaky fuel injectors | Replace the catalytic converter Use epoxy putty (small leak) or weld (large leak) Replace fuel injectors |
| P0430 + P0156/P0157/P0158/P0159/P0160 | Faulty downstream oxygen sensor (Bank 2) | Replace downstream oxygen sensor (Bank 2) |
Note: The causes for each code combination are the most common ones. There can be some uncommon issues hidden under those codes.
P0430: Causes, Symptoms, And How To Fix
Many reasons why your vehicle sets the P0430 code exists. That can vary from model to model, but the following are the most common ones:
Cause #1: Faulty Catalytic Converter
A catalytic converter is designed to last the lifetime of the vehicle. However, it can also become faulty.
In that case, its function will be compromised. This malfunction is detected by the downstream oxygen sensor, which signals PCM to activate the P0430 code.
The most common symptoms of a bad catalytic converter include the following:
- Rotten egg smell
- Rattling noise underneath the car
- Decreased gas mileage
- Engine misfiring
- Failed emission test
- Check engine light on
A faulty catalytic converter requires replacement. You can do this yourself, but this process is a little advanced and expensive. But, of course, bringing it to mechanics is even more pricey.
Cause #2: Faulty Downstream Oxygen Sensor
A downstream oxygen sensor keeps track of the catalytic converter’s performance.
Its failure will trick the PCM into thinking the catalytic converter is bad, triggering the P0430.
If this is your problem, you may receive other DTCs along with P0430, such as P0156, P0157, P0158, P0159, and P0160.
Downstream O2 sensors do not take part in the air-fuel ratio adjustment process. As a result, there is almost no symptom in this case but the CEL.
The most realistic solution is to replace the faulty downstream O2 sensor. Fortunately, it isn’t expensive or difficult to install without the help of a mechanic.
Cause #3: Exhaust Leak Near Downstream O2 sensor
A leaking exhaust near the downstream O2 sensor will let the air go into the pipe. This air confuses the sensor’s reading, which makes the PCM activate the P0430 code as a warning sign.
An exhaust leak can cause the following:
- Check engine light on
- Blowing sound from underneath your car
- Louder engine sound than usual
- Low engine performance
- Decreased fuel efficiency
- Unusual odor in the cabin
Use a smoke test to identify the leak.
After confirming the location, you can repair it using the epoxy putty or welding the leak. It can be a difficult task for anyone unfamiliar with DIY jobs.
Cause #4: Leaky Fuel Injectors
Leaky fuel injectors will allow more fuel into the combustion cylinder. That disrupts the usual cycle since not all the gas gets burned. The excess finds its way into the exhaust system, where they burn and produce soot that blocks the catalytic converter.
This can also result in high temperatures that literally melt the catalytic converter inside.
Signs of leaky fuel injectors include the following:
- Fuel consumption increases
- Poor and shaky idling
- Gasoline smell
- Hard starts (when the engine is hot)
- Bad emission performance
The solution to leaking fuel injectors is replacing them. This is not an easy job, so it is recommended to visit a mechanic.
How Much Does It Cost To Fix P0430?
The cost of fixing P0430 varies significantly depending on the affected part, model, and year of the car.
Catalytic converters are the most common culprits, which cost about $500 – $2,200 to fix at an auto repair shop. You can save on the labor fee through a DIY approach. In that case, you will need $400 – $2000.
The Estimated Repair Cost Of P0430
| Solutions | Cost |
|---|---|
| Replace the catalytic converter | DIY: $400 – $2,000 Repair shop: $500 – $2,200 |
| Replace downstream oxygen sensor (Bank 2) | DIY: $20 – $200 Repair shop: $60 – $300 |
| Use epoxy putty (small leak) | DIY: under $10 Repair shop: not recommended |
| Weld the leak (large leak) | DIY: not recommended Repair shop: $30 – $100 |
| Replace fuel injectors | DIY: $400 – $900 Repair shop: $600 – $1,200 |
Note: The data in this table was collected in June 2022. The actual price depends on many factors, such as your car’s make and year, mechanic’s rate, etc.
You Ask, I Answer
The P0430 is a moderate code but requires immediate fixing to avoid more internal damages.
And if you have dealt with the P0430 code before, tell us what the problem was and how you fixed it. Use the comment section below to share your thoughts.
See ya!
Read more: The 9 Best OBD2 Scanners for 2024: The Only Review You Need
P0018 Code: Crankshaft Position – Camshaft Position Correlation (Bank 2 Sensor A)
P0018 Code: Crankshaft Position – Camshaft Position Correlation (Bank 2 Sensor A)
If you’ve encountered the P0018 code during a scan of your vehicle’s onboard diagnostic system, fret not! We’re here to discuss its meaning and implications.
So, what does the code P0018 mean? In simple terms, it points to a potential issue with the correlation between the crankshaft position and the camshaft position on Bank 2 Sensor A. Dive in to learn more about this issue as we’ve got you covered with an in-depth exploration of its causes, symptoms, diagnosis, and repair methods.
P0018 Code: An Overview
Check the key information of the P0018 code below!
- Definition: Crankshaft Position – Camshaft Position Correlation (Bank 2 Sensor A)
- Severity: High
- DIY Skill Level: Intermediate
- Continue To Drive?: No
- Estimated Repair Cost: $50 – $500
What Does The P0018 Code Mean?
P0018 is an OBD-II generic code indicating a lack of correlation between the signals from the camshaft position (CMP) sensor A for bank 2 and the crankshaft position sensor (CKP). This code is commonly triggered in various car brands such as Ford, Subaru, Chevrolet, Hyundai, Kia, GMC, Mercedes, Toyota, Subaru, Jeep, Audi, and Lexus.
In a typical engine, bank 2 typically refers to the side of the engine that doesn’t house cylinder #1. The “A” sensor is commonly found on the intake camshaft side. It’s important to note that the P0018 code is often associated with other CKP sensor-related codes such as P0016, P0017, and P0019.

The CMP sensor A for bank 2 is responsible for monitoring the position and rotation speed of the camshaft. In contrast, the CKP sensor detects the position and rotation speed of the crankshaft. The Powertrain Control Module (PCM) relies on these signals to properly synchronize the camshaft and crankshaft.
When the PCM detects that the crankshaft and camshaft signals are out of time by a specific number of degrees, it triggers the P0018 code. This means that the correlation between the signals from the CMP sensor A for bank 2 and the CKP sensor is not within the expected parameters. The specific number of degrees may vary depending on the vehicle and manufacturer.
Special Notes
The systems/components involved in triggering this code can vary depending on the specific car brand and model. For example, in General Motors (GM) vehicles, the issue may be related to the CMP actuator solenoid or the timing chain. In Subaru vehicles, it may be associated with the active valve control system (AVCS) and related DTCs. In Ford vehicles, the code may refer to the Variable Camshaft Timing (VCT) system.
Many car manufacturers have issued Technical Service Bulletins (TSBs) related to the P0018 code, indicating a known issue and providing guidance for diagnosis and repair. For instance, the GM TSB 18-144-453 highlights potential causes and solutions for this code. The Subaru TSB 02-163-16R provides inspection and repair procedures for AVCS-related DTCs, including P0018. The Ford TSB 18-2360 addresses concerns with Bank 2 VCT in specific models.
Reminder: Consult the relevant TSBs specific to your vehicle’s make, model, and year for detailed information on diagnosing and resolving the P0018 code.
How Serious is The P0018 Code?
The severity of the P0018 code is typically considered medium to high, depending on the specific circumstances and the extent of the issue. Generally, this code can potentially affect the engine’s performance and fuel efficiency. It is recommended not to continue driving with the P0018 code unresolved for an extended period.
Driving with this code may result in decreased engine performance, rough idling, reduced fuel economy, and potential damage to engine components over time. Ignoring the issue can lead to more severe engine problems and costly repairs. It is advisable to have the vehicle diagnosed and repaired by a qualified mechanic as soon as possible to prevent further damage and ensure optimal engine performance and reliability.
Symptoms of P0018 Code to Watch Out For
The following are common symptoms associated with the P0018 code:
- Check Engine Light (CEL) illuminated
- Engine misfires or runs rough
- Decreased engine performance
- Rough idling or stalling
- Reduced fuel efficiency
- Engine hesitation or surging
Common Causes of P0018 Code
The P0018 code can be triggered by various factors, including:
- Low engine oil level or improper oil viscosity.
- Wiring problems related to the crankshaft or camshaft sensors.
- Damaged or malfunctioning crankshaft or camshaft sensors.
- Timing chain or belt issues (stretching, misalignment, or wear).
- Issues with timing chain tensioner or guides.
- Faulty camshaft variable timing solenoid or variable valve timing (VVT) actuator.
- Engine timing set incorrectly.
- Problems with the VCT unit, such as alignment or solenoid issues (Ford vehicles).

How To Diagnose and Fix The P0018 Code?
This section will provide you with a step-by-step guide to diagnose and resolve the P0018 code. We will walk you through the process of inspecting timing components, sensors, and wiring and guide you on the necessary repairs or replacements to address the issue effectively. Check it out!
Essential Tools and Parts
- OBD-II scanner or scan tool
- Basic hand tools (such as wrenches, sockets, and pliers)
- CKP/CMP sensor
- Timing chain or belt (if necessary)
- Variable valve timing (VVT) solenoid (if necessary)
- Engine oil and oil filter (if required)
Step-by-step Procedure
Step 1: Retrieve DTCs
Scan for codes using an OBD-II scanner or scan tool. If any CKP or CMP sensor-related DTCs are present, prioritize diagnosing and addressing them first. If there are no CKP or CMP sensor-related DTCs, proceed with the following steps.
Step 2: Check Engine Oil
Check the engine oil level and ensure it meets the manufacturer’s specified range. Adjust or replace the engine oil or the oil filter if necessary.
Step 3: Inspect Sensor Wiring
Inspect the wiring related to the crankshaft and camshaft sensors for any damage, loose connections, or corrosion. Repair or replace as needed.
Step 4: Check Timing Components
- Verify that the engine timing is correctly set according to the manufacturer’s specifications.
- Inspect the timing chain or belt, along with the timing chain tensioner and guides, for stretching, misalignment, wear, and proper operation.
- Also, inspect the camshaft variable timing solenoid or variable valve timing actuator for faults, malfunctions, or wear.
Step 5: Clear Codes and Test Drive
Clear all stored codes and test drive the vehicle to verify if the P0018 code returns.
Note: It is recommended to consult the specific service manual for your vehicle make, model, and year to obtain detailed step-by-step instructions tailored to your car.
DIY Repair Level and Estimated Costs
The diagnosis and repair procedure for the P0018 code can range in complexity from intermediate to advanced. Simple tasks such as inspecting the engine oil pressure may be manageable for DIY enthusiasts. However, replacing components like the CMP sensor, timing chain or belt, or VVT solenoid may require advanced mechanical skills and specialized tools. It is advisable to seek assistance from a qualified mechanic or technician if you are unsure about performing the repairs yourself.
The estimated costs for resolving the P0018 code can vary depending on the vehicle make, model, and location. Costs typically involve the price of replacement parts, labor charges, and any additional repairs needed. Below is a breakdown of estimated repair costs for addressing the P0018 code:
| Repair Task | Cost Estimate |
| Engine Oil Change | $50 – $100 |
| Wiring Repair | $50 – $200 |
| Sensor Replacement | $50 – $200 |
| Timing Components Repair/Replacement | $100 – $500 |
Note: Consult with local repair shops or dealerships to obtain accurate estimates for the specific repairs required in your case.
Wrapping Up
In conclusion, it’s important to understand and address the P0018 code to keep your engine running smoothly. By diagnosing and fixing camshaft timing issues, you can improve fuel efficiency, prevent further damage, and ensure your vehicle performs reliably. If you need assistance, consult the service manual or seek professional help.
Feel free to share this helpful information with others. If you have any comments or questions, let us know. For a comprehensive list of OBD codes, you can utilize our OBD Code List Generator tool. Additionally, our OBD code lookup tool can assist you in searching for specific codes and their meanings.
Stay informed and keep your vehicle running smoothly!
Reference Sources
Wikipedia, Timing Chain.
Austin Community College, Variable Valve Timing (VVT).
P2006 Code: Intake Manifold Runner Control Stuck Closed Bank 1
P2006 Code: Intake Manifold Runner Control Stuck Closed Bank 1
If you’ve encountered the P2006 trouble code on your vehicle, it’s essential to address it promptly to ensure optimal engine performance. The P2006 code specifically relates to the intake manifold runner control circuit and indicates that the intake manifold runner flap for bank 1 is stuck closed. But what does this mean for your vehicle?
In this article, we’ll explain the P2006 code, its potential severity, common symptoms, possible causes, diagnostic procedures, and repair solutions. By understanding the details of this code, you’ll be better equipped to take appropriate action and keep your vehicle running smoothly.
Let’s get started.
P2006 Code: An Overview
Take a look at the essential information about the P2006 code below!
- Definition: Intake Manifold Runner Control Stuck Closed Bank 1
- Severity: Medium
- DIY Skill Level: Advanced
- Continue To Drive?: Yes
- Estimated Repair Cost: $50 – $2000
What Does The P2006 Code Mean?
The P2006 diagnostic trouble code (DTC) indicates a malfunction in the intake manifold runner control (IMRC) system. Though this is a generic code that can happen on all vehicles equipped with OBD-II, it is more commonly triggered in Mercedes, Audi, Ford, Hyundai, Mazda, Volkswagen, Kia, Dodge, and Jeep.
The intake manifold runner control system is designed to optimize the airflow into the engine for improved performance and efficiency. It consists of several components, including the intake manifold, intake manifold runner control valve, actuator motor, and linkage. These components work together to adjust the length of the intake runners, which helps optimize the intake air velocity and maximize engine power and torque across different RPM ranges.
When the P2006 code is triggered, it means that the powertrain control module (PCM) has identified a problem with the IMRC actuator for engine bank 1. Specifically, the actuator is detected to be stuck in the closed position. This issue hinders the proper functioning of the IMRC system, leading to disrupted airflow and negatively impacting the engine’s performance.
The P2006 code shares similarities with other codes related to the IMRC system. They are P2005, P2007, P2008, P2009, P2010 and P2015.
Special Notes
To address this issue, car manufacturers have issued Technical Service Bulletins (TSBs) or recall campaigns. For example, Ford and Mercury have released TSB 06-7-10 related to the P2006 code. Audi has also issued a TSB regarding this code. Additionally, Mazda has a recall campaign specifically addressing the P2006 code in certain models.
These TSBs and recall campaigns provide guidance for diagnosing and repairing the intake manifold runner control system to resolve the P2006 code. It is important for car owners experiencing this issue to consult the specific TSB or recall campaign relevant to their vehicle make and model to ensure proper solutions for your vehicle.
How Serious is the P2006 Code and Should You Continue Driving?
The severity level of the P2006 code is high. While it may not cause immediate drivability issues or safety hazards, it can significantly impact engine performance and fuel efficiency. Ignoring the P2006 code can lead to a reduction in engine power, decreased fuel economy, and potential long-term damage to the engine or emission control system.
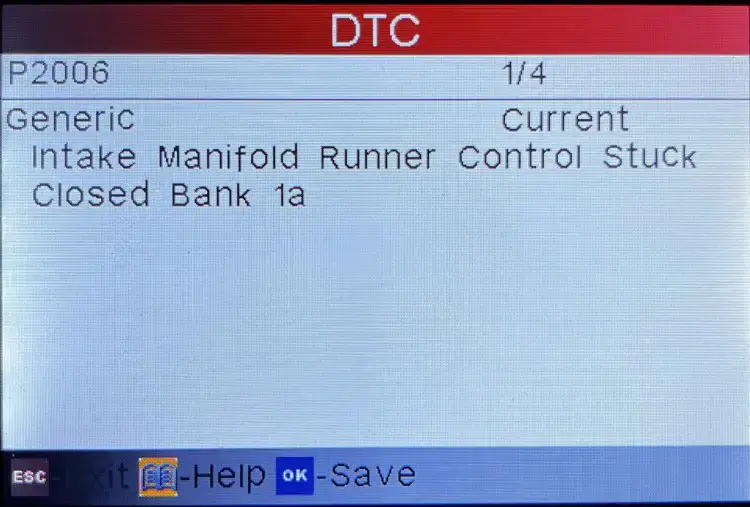
Although you may be able to continue driving for a short period of time with the P2006 code, it is strongly recommended to have the issue diagnosed and repaired as soon as possible. Continuing to drive without resolving the P2006 code can decrease drivability and lead to increased repair costs over time.
Read more: P1077 Honda Code: IMRC/ IMT System Malfunction (Low RPM)
P2006 Code Symptoms and Indicators
When the P2006 code is present, several symptoms may be observed.
- Check Engine Light (MIL) illuminated
- Reduced engine power or hesitation during acceleration
- Decreased fuel efficiency
- Rough idle or stalling
Read more: P026A Code: Causes & Solutions for Charge Air Cooler Issues
Possible Causes of P2006 Code
There are various potential causes for the P2006 code.
- Stuck or malfunctioning IMRC valve
- Faulty actuator motor or linkage
- Vacuum leaks in the intake manifold
- Carbon buildup within the IMRC system, particularly on the IMRC flaps or intake manifold ports
- Open or shorted wiring within the solenoid control circuit for the IMRC actuator
- Broken actuator linkage pin between the actuator and the runner control valve.
- Faulty MAP sensor
- Issues with the Tumble Generator Valve (TGV) in Subaru vehicles (may require TGV delete)
Repairing the P2006 Code: Diagnosis and Solutions
This section will guide you through diagnosing and fixing the P2006 code. Check it out!
Essential Tools and Parts
- OBD-II scanner
- Basic hand tools (such as wrenches, sockets, and screwdrivers)
- Intake manifold gaskets
- Intake manifold runner control valve
- Actuator motor
- Vacuum hoses
Step-by-step Procedure
Step 1: Use an OBD-II scanner to retrieve the P2006 code and any accompanying codes.
Step 2: Inspect the intake manifold, vacuum hoses, and related components for any visible signs of damage, leaks, or loose connections. Repair/replace any damaged components and ensure all connections are secure.
Step 3: Test the intake manifold runner control valve and actuator motor for proper operation and movement. Ensure they are not stuck or malfunctioning. Replace any faulty components.
Step 4: Check the electrical connections and wiring related to the intake manifold runner control system. Look for any open or shorted circuits. Repair/replace any damaged wiring or connectors.
Step 5: Clean or replace the intake manifold and valves to remove carbon buildup.
Step 6: Inspect and test the MAP sensor for proper functionality. Replace the sensor if it is faulty.
Step 7: Clear the codes using the OBD-II scanner and test drive the vehicle to verify if the P2006 code reappears. Monitor the system for any new issues or codes that may arise.
Notes and tips:
- Refer to the vehicle’s service manual or manufacturer’s instructions for specific diagnostic and repair procedures.
- Take precautions when working with the intake manifold to avoid damaging sensitive components.
- Ensure all connections, hoses, and wiring are properly secured and in good condition.
- Consider performing regular maintenance, such as cleaning the intake system, to prevent future carbon buildup.
DIY Repair Level and Estimated Costs
Diagnosing and repairing the P2006 code can range in difficulty, from intermediate to advanced, depending on the specific cause and vehicle model. DIY enthusiasts can perform basic troubleshooting steps, such as checking for visible damage and inspecting connections. However, certain tasks, such as replacing the intake manifold runner control valve or performing a TGV delete in Subaru vehicles, may require advanced mechanical skills and specialized tools.
The estimated costs for the repair tasks associated with addressing the P2006 code will vary depending on the specific vehicle, the extent of the issue, and labor rates. Below is a breakdown of the estimated costs for repairing the P2006 code:
| Repair Task | Estimated Cost |
| Wiring repair | $50 – $200 |
| Intake manifold inspection/repair | $200 – $2000 |
| Vacuum leaks repair | $50 – $100 |
| MAP sensor replacement | $50 – $150 |
Wrapping Up
Picture this: You’re behind the wheel, feeling the power and efficiency of your car as it runs smoothly. By fixing the intake manifold runner control system and handling the P2006 code, you’re improving your vehicles’ performance.
You’ll notice better acceleration and improved gas mileage. We believe that with the information provided above, you’ll be able to repair your car’s problem and reset the P2006 with ease.
If you found this information helpful, please share it with others who might find it useful. Feel free to leave any comments or questions below.
To access a comprehensive list of OBD codes, use our user-friendly OBD Code list generator or our OBD code lookup tool to search for specific codes.
Stay informed and keep your vehicle running smoothly!
Reference Sources
Complete Car, Intake Manifold Runner Control Valve 101.
YourMechanic, Symptoms of a Bad or Failing Intake Manifold Runner Control.
P0151 Code: Understanding O2 Sensor Circuit Low Voltage
P0151 Code: Understanding O2 Sensor Circuit Low Voltage
Welcome, fellow car enthusiasts! Today, we explore a common trouble code in automotive diagnostics that can be puzzling: P0151.
If you’ve ever seen the check engine light illuminate, connected a scanner, and wondered about the meaning behind the P0151 code that has just appeared, you’ve come to the right place for answers. In this article, we’ll provide a comprehensive explanation of the P0151 code, which is defined as the O2 Sensor Circuit Low Voltage (Bank 2, Sensor 1) code. We also cover its causes, severity, potential solutions, and estimated breakdown of repair costs.
So, let’s rev up!
P0151 Code: Quick Overview
Here is an overview of the P0151 code. Take a look!
- Definition: O2 Sensor Circuit Low Voltage (Bank 2, Sensor 1)
- Severity: Medium
- DIY Skill Level: Intermediate
- Continue To Drive?: No
- Estimated Repair Cost: $100 – $300
What Does The P0151 Code Mean?
The P0151 code indicates that the oxygen sensor Bank 2, Sensor 2 detects a voltage lower than the specified range. This sensor is typically located before the catalytic converter on the side of the engine with cylinder bank 2.
The oxygen sensor (O2/H2OS sensor) plays a crucial role in monitoring the oxygen levels in the exhaust gases. It sends voltage signals to the engine control module (ECM), providing feedback on the oxygen content. Based on this information, the ECM adjusts the fuel mixture to achieve optimal combustion and ensures the proper functioning of the emission control system.
( Image credit: toyota-4runner.org)
It’s important to note that the specific definition of the P0151 code may vary depending on the vehicle manufacturer, although they generally have the same meaning. For instance, in GM vehicles, P0151 is defined as HO2S Circuit Low Voltage Bank 2 Sensor 1, whereas Ford describes this code as O2 Sensor Circuit Low Voltage Bank 2 Sensor 1.
Moreover, while it is commonly found in car brands like Ford (mostly F150) and Chevy, it can also occur in various other makes and models. Other O2 sensor-related codes includes P0136, P0137, and P0131.
Read more: P0136 – O2 Sensor Circuit
Is it Safe to Continue Driving With The Code P0151?
This P0151 code is typically categorized as a moderate-level issue. It can affect the engine’s fuel-air mixture and potentially decrease fuel efficiency and performance.
While the P0151 code may not cause immediate breakdown or safety concerns, it is crucial to address it promptly. Ignoring this code can lead to long-term engine damage and increased emissions. Additionally, prolonged exposure to a faulty air-fuel mixture can negatively impact other engine components, such as the catalytic converter.
Therefore, it is advisable not to continue driving with the P0151 code present. Instead, it is recommended to have the issue diagnosed and repaired as soon as possible. By addressing the root cause and replacing faulty components, you can ensure optimal engine performance, fuel economy, and reduce the risk of further damage.
Signs Of P0151 Trouble Code
In most cases, the main symptom of the P0151 code is the Check Engine Light (CEL) illuminated on the vehicle’s dashboard, typically without any noticeable drivability issues. However, in certain instances, you may encounter additional symptoms, which can include:
- Decreased fuel efficiency
- Poor engine performance
- Rough idling or stalling
- Irregular engine surges or hesitation
- Increased emissions
Read more: P0137: O2 Sensor Circuit Low Voltage (Bank 1 Sensor 2)
What Triggers the P0151 Code on Your Vehicle?
Several potential causes can trigger the P0151 code to appear:
- Faulty oxygen sensor (Bank 2, Sensor 1)
- Wiring issues, such as frayed or damaged wires
- Loose or corroded sensor connections
- Vacuum leaks in the intake manifold or exhaust system
How To Diagnose and Fix This Code
Now that we have a good understanding of the P0151 code, let’s dive into the diagnosis and repair process. In this section, we’ll cover the essential tools and parts needed, provide a step-by-step procedure, and discuss the level of DIY repair along with estimated costs.
Essential Tools and Parts
- OBD-II scanner
- Multimeter
- Oxygen sensor socket or wrench
- Wire connectors
- Electrical tape
- Replacement oxygen sensor (Bank 2, Sensor 1)
- Wiring harness (if necessary)
Step-by-Step Procedure
- Use a compatible OBD-II scanner or diagnostic tool to retrieve the trouble codes from the vehicle’s onboard computer.
- Perform a thorough visual inspection of the O2 sensor and its wiring for any signs of damage, loose connections, or corrosion. Clean/repair if necessary.
- Use a multimeter to measure the voltage output of the O2 sensor and compare it to the manufacturer’s specifications. Repair if the sensor is malfunctioning.
- Inspect the exhaust system for any leaks, blockages, or damage that could affect the O2 sensor’s readings. Repair or replace any faulty components as needed.
- After performing the necessary repairs and inspections, clear codes using the OBD-II scanner and test drive.
Note: It’s recommended to consult the specific repair manual for your vehicle model for detailed instructions tailored to your car’s configuration.
DIY Repair Level and Estimated Costs
The DIY repair level for diagnosing and replacing the oxygen sensor associated with the P0151 code is moderate. While it can be done by experienced DIYers, if you’re unsure or uncomfortable with the process, it’s best to seek the assistance of a professional mechanic.
Below is a repair estimate costs table related to resolving the P0151 code:
| Repair Task | Estimated Cost Range |
| Replacement Oxygen Sensor | $100 – $300 |
| Wiring Repair | $50 – $100 |
Please note that these estimated costs are general ranges and can vary depending on the vehicle make and model, location, and the specific parts required. It’s always recommended to consult with a trusted mechanic or service center to get accurate cost estimates tailored to your specific situation.
Read more: P0131 – O2 Sensor Circuit Low Voltage
Final Thoughts
You’ve now gained valuable insights into the P0151 code and its implications. With this knowledge, you can confidently diagnose and address the O2 Sensor Circuit Low Voltage (Bank 2, Sensor 1) issue. Remember, timely action is key to maintaining optimal engine performance and reducing potential long-term damage.
If you found this article helpful, don’t keep it to yourself! Share it with other car enthusiasts who may be facing similar challenges. We’d love to hear about your experiences or any additional tips and tricks you’ve discovered along the way. Feel free to leave a comment below.
Additionally, don’t forget to take a look at our OBD Code List Generator to find specific code lists, or use our OBD code lookup tool for instant reference.
Safe travels, and keep your cars running smoothly!
Reference:
- ProDemand, P0151, Replaced Oxygen Sensor (B2-S1).
- Chilton Library, DTC P0151.
- Wikipedia, Exhaust system.
P0335 – Crankshaft Position Sensor “A” Circuit
P0335 Code Definition
What Does P0335 Mean?
What Are The Symptoms Of The P0335 Code?
What Are The Causes Of P0335?
How Serious Is The P0335 Code?
How To Diagnose The P0335 Code
Tools You’ll Need:
Method:
Common Mistakes To Avoid While Diagnosing The P0335 Code
What Should You Do To Fix The Code P0335?
Tips To Avoid P0335 In The Future
P0452 – Evaporative emission system pressure sensor/switch low
P0452 – Evaporative emission system pressure sensor/switch low
The P0452 OBD2 code is one of the milder diagnostic trouble codes you’ll come across. In about 75% of cases, the fix is as simple as tightening your gas cap. Even when the underlying issue is more serious, it won’t affect your engine performance.
The main negative side-effect you’ll see from P0452 is a rise in harmful emissions. Considering it’s often an easy code to clear, that’s reason enough to make the necessary repairs.
P0452 code definition
P0452 (generic): Evaporative emission system pressure sensor/switch low
What does P0452 mean?
Your vehicle evaporative emission control (EVAP) system limits the fuel vapors that escape into the atmosphere in your exhaust. The system’s main component is the charcoal canister, which purges the fuel vapors, trapping harmful particles.
The engine computer monitors the pressure in the EVAP system. Generally, the system’s pressure rises as the temperature goes up and lowers when the stored vapors in the charcoal canister are purged. Depending on the manufacturer, this is tracked either by the fuel tank pressure sensor or a designated EVAP pressure sensor.
When the engine control module (ECM) or powertrain control module (PCM) detects the voltage from this sensor is below standard parameters, the P0452 OBD2 code is triggered. Usually, the code will only trigger after this low voltage has been recorded for a designated length of time, though this varies from one manufacturer to the next.
The EVAP pressure sensor may be located inside the fuel purge line or at the top of the fuel tank. Check your vehicle manual to find out where the sensor is in your engine.
The EVAP system and fuel system are closely linked. Improper pressure in the fuel tank can cause the P0452 code to activate, especially if you also see trouble codes related to the fuel pressure. Vacuum leaks and faulty wiring can also be responsible for P0452.
Many vehicles have an extended warranty on EVAP system components, up to 100,000 miles for some manufacturers. If it seems you’ll need to replace components to clear the P0452 code, check your warranty before buying any parts, as they’ll likely be covered.
What are the symptoms of the P0452 code?
In many cases, you won’t notice any drivability symptoms when the P0452 trouble code is active. The most common symptoms include:
- Activation of the check engine light
- The smell of fuel in the exhaust
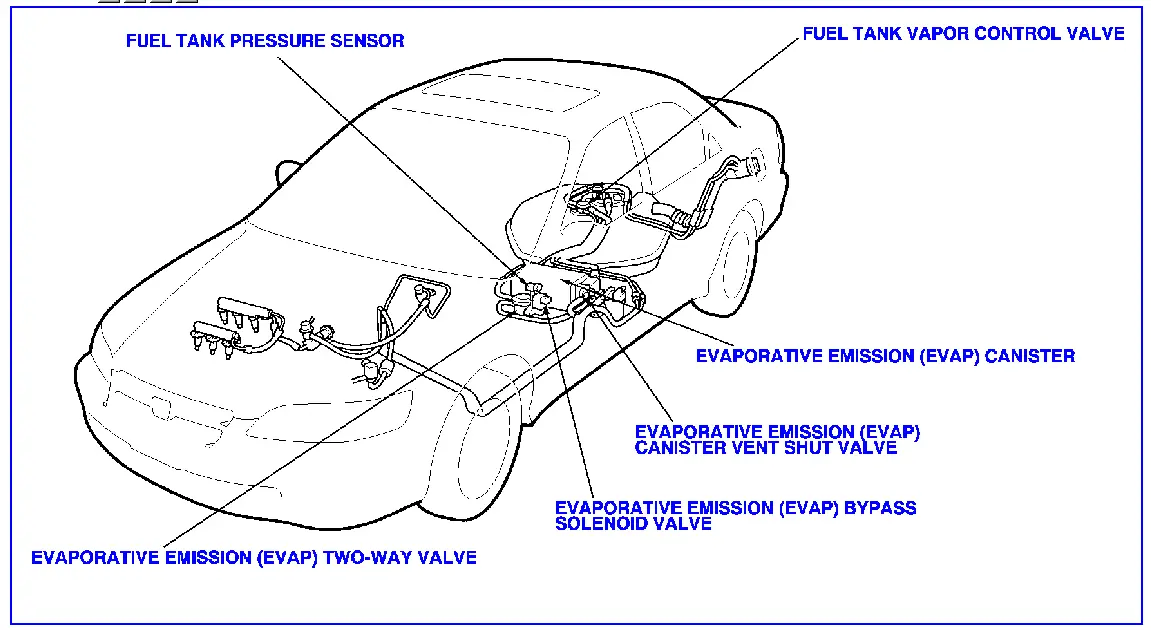
What are the causes of P0452?
- Faulty EVAP pressure sensor or fuel tank pressure sensor
- Faulty or loose wires around sensors
- Opens or shorts in EVAP system wires or wiring harness
- Faulty electrical connections
- The gas cap is loose, leaking, or missing
- Vacuum leaks in the EVAP system
- Plugged or pinched lines in the fuel system
- The charcoal canister is clogged or damaged
How serious is the P0452 code?
On its own, the P0452 diagnostic code is of low severity. You won’t notice any change in the vehicle’s operation, and the risk of further damage to the engine is low. While you will want to make repairs before your next emissions test, you can safely drive for a short time with this code active.
How to diagnose and fix the P0452 code
Tools you’ll need:
- Check for any technical service bulletins related to the P0452 code for your vehicle. Follow the suggested repairs for your make and model before proceeding with the general diagnosis below.
- Read all codes using an OBD2 scan tool. Address any other codes that come up first, especially if you read other EVAP system codes (P0450-P0459). Clear the codes and test drive your vehicle, then rescan to see if you’ve addressed the problem.
- Check your gas cap. If it’s loose, tighten it, and clear codes/rescan. If P0452 comes back, remove the gas cap and inspect it for cracks or wear. Pay close attention to the threads, and clean away any debris or dust that may be impeding a complete seal. Even if you don’t see any damage, you may want to replace the gas cap. It’s a very cheap component to replace and is often the root of P0452 problems.
- Read the freeze frame data using an OBD2 scanner. Check the fuel tank pressure data to verify the computer is reading a vacuum. If it’s not, this indicates either a wiring issue, a vacuum leak, or a faulty sensor.
- Visually inspect the wiring around the EVAP sensor and fuel tank pressure sensor. Replace any wires that are frayed or damaged and inspect the connections for build-up or corrosion. If you found any loose or faulty wires, clear the codes and rescan.
- Use a smoke machine to test your EVAP system for leaks. You can do this by pinching off the vent tube flowing to the EVAP vent control valve, then pressurizing the EVAP system and connecting it to a smoke tester. If there are any leaks, the smoke will give you a visible indication. Replace any leaking hoses or gaskets you discover.
- If there were no leaks, or if these repairs don’t clear the code, the issue is most likely with the sensor itself. Use a multimeter to check the voltage of the EVAP pressure sensor and fuel tank pressure sensor. Compare the readings to the specifications in your vehicle repair manual. Take another set of readings while you apply pressure with the smoke tester. If the readings don’t align with specifications, replace the sensor.
Common mistakes to avoid while diagnosing the P0452 code
Check the obvious and cheap fixes before you start replacing components. The repair could be as simple as tightening the gas cap or reconnecting a loose wire.
Tips to avoid P0452 in the future
The majority of P0452 codes trigger when the driver doesn’t fully close the gas cap after filling up the tank. Taking a second to double-check that the gas cap is screwed on tightly ensures your fuel system can create a proper vacuum, preventing the activation of many EVAP codes.
Read more: P0122 Code: Meaning, Symptoms, Causes, Diagnostics, and Fixes
P219A Code: Understanding Air-Fuel Ratio Imbalance
P219A Code: Understanding Air-Fuel Ratio Imbalance
Dealing with the P219A code in your vehicle? This article provides valuable insights and step-by-step instructions to help you diagnose and resolve the air-fuel mixture issue. By following our expert guide, you’ll gain the confidence to tackle the P219A code head-on and get your vehicle running smoothly again.
Read on to get an insight into this common automotive challenge and take control of your vehicle’s performance.
P219A Code: A Quick Overview
Here’s an overview of the P219A code. Give it a check now!
- Definition: Bank 1 Air/Fuel Ratio Imbalance
- Severity: Medium
- DIY Skill Level: Intermediate
- Continue To Drive?: Yes (short term)
- Estimated Repair Cost: $50 – $500
What Does The P219A Code Mean?
The fault code P219A indicates an air-fuel ratio imbalance in bank 1 as detected by the powertrain control module (PCM). The PCM monitors the air-fuel ratio in the engine’s cylinders and compares it to a predetermined allowable difference.
When the difference in air-fuel ratio between cylinders in bank 1 exceeds this threshold, the P219A code is triggered. This code would be set by both rich (excess fuel) or lean (insufficient fuel) conditions in bank 1. Bank 1 typically refers to the set of cylinders that includes cylinder 1.
In a combustion engine, achieving the ideal air-fuel ratio is crucial for optimal performance and efficiency. The ideal air-fuel ratio is 14.7 parts of air to 1 part of fuel (14.7:1). If the ratio deviates from this value, it can lead to several issues affecting the engine’s performance and emissions.
(Credit: Reddit)
The fault code P219A can be encountered in various vehicle models and brands. Here are some examples of brands where this code is commonly reported: Chevrolet, Dodge, Toyota, Ford, Honda, BMW, Mercedes-Benz, and Audi.
In some cases, additional diagnostic trouble codes may appear alongside the P219A code. These accompanying codes provide further insight into related issues that could be contributing to the fuel-air ratio imbalance. Some possible codes can be P0171, P0172, P219B, and P0300.
How Serious Is The P219A Code?
Generally, the severity of this P219A code is considered moderate. This code does not necessarily imply an immediate danger or major damage to the vehicle. However, it is important to address the issue promptly to avoid potential complications and prevent further damage to the engine and its components.
It’s okay to drive with this code for a short distance. Continuing to drive with the P219A code unresolved for a long time may lead to decreased fuel efficiency, reduced engine performance, and increased emissions. Additionally, if the underlying cause is left unattended, it could potentially result in further engine damage over time.
What Are The Symptoms Of The P219A Code?
When the P219A code is present, the following symptoms may be observed:
- Check Engine Light (CEL) illuminated
- Decreased fuel efficiency
- Rough idling or engine stalling
- Engine hesitation or lack of power
- Increased exhaust emissions
- Engine misfires
What Are The Causes Of The P219A Code?
The P219A code can be caused by various factors, including:
- Malfunctioning oxygen sensor
- Faulty fuel injector
- Vacuum leak in the intake system
- Clogged air filter
- Fuel pressure regulator issues
- Weak fuel pump
- Wiring or connector problems related to the air-fuel ratio sensors
How To Diagnose And Repair P219A Code?
In this section, I provide a step-by-step guide to help you identify potential causes and perform the appropriate repairs.
However, please note that some tasks may require advanced skills and specialized tools. For those who are unsure or uncomfortable with the process, we recommend seeking assistance from a qualified mechanic or automotive professional.
Diagnostic Tools And Essential Parts
To diagnose and repair the P219A code, you may need the following tools and parts:
- OBD-II scanner or code reader
- Multimeter
- Fuel pressure gauge
- Oxygen sensor socket or wrench
- Replacement oxygen sensor(s) (if necessary)
- Fuel injector cleaning kit (if applicable)
Step-by-Step Guide
- Retrieve the P219A code
Use an OBD-II scanner or code reader to retrieve the P219A code and accompanying codes.
- Inspect for vacuum leaks
- Examine the air intake system for any signs of vacuum leaks by using a can of carburetor cleaner or a smoke machine to identify potential leaks.
- Repair any detected leaks.
- Check fuel pressure
- Connect a fuel pressure gauge to the fuel rail or fuel line.
- Turn the ignition key to the “On” position without starting the engine.
- Compare the measured fuel pressure with manufacturer specifications.
- Repair or replace the faulty components.
- Test oxygen sensor(s)
- Locate the oxygen sensor(s) in bank 1.
- Use a multimeter to measure the sensor’s voltage output while the engine is running.
- Compare the readings with manufacturer specifications.
- Replace any faulty oxygen sensor(s) as needed.
- Inspect and clean fuel injectors
- Remove the fuel injectors and visually inspect them for clogs or damage.
- Clean the injectors using a fuel injector cleaning kit if necessary.
- Inspect wiring and connectors
- Inspect the wiring and connectors related to the oxygen sensor(s) and fuel injectors.
- Inspect for any indications of damage, such as visible signs of wear, loose connections, or the presence of corrosion.
- Repair or replace any faulty wiring or connectors as necessary.
- Clear the code and test drive
- Use the OBD-II scanner or code reader to clear the P219A code.
- Take the vehicle for a test drive to ensure the issue is resolved.
- Verify that the P219A code does not reappear and that the engine operates smoothly without any symptoms.
Note: The specific steps and procedures may vary depending on the vehicle make and model. Consult the vehicle’s service manual or a trusted repair guide for detailed instructions applicable to your specific vehicle.
DIY Repair Level And Estimated Costs
The diagnosis and repair of the P219A code can range from moderate to advanced difficulty, depending on the underlying cause. DIY enthusiasts with basic automotive knowledge and tools can perform simple tasks such as inspecting for vacuum leaks and checking fuel pressure. However, replacing components like oxygen sensors or fuel injectors may require more advanced skills and specialized tools.
It is crucial to emphasize that if readers are unsure or uncomfortable with the diagnostic and repair process, it is recommended to seek assistance from a qualified mechanic or automotive professional to avoid potential mistakes or further damage to the vehicle.
The estimated costs for repairing the P219A code can vary depending on the specific cause and the vehicle’s make and model. Here is a rough cost estimate for common repair tasks:
| Repair Task | Estimated Cost |
| Oxygen sensor replacement | $100 – $300 |
| Fuel injector cleaning/replacement | $50 – $300 per injector |
| Wiring issues repair | $50 – $200 |
| Vacuum leak repair | $100 – $300 |
| Professional diagnostics | $100 – $200 |
Conclusion
Ready to take on the P219A code in your vehicle? With the newfound knowledge you’ve acquired, you can confidently diagnose and resolve this air-fuel mixture issue. Don’t keep this valuable information to yourself – share it with fellow automotive enthusiasts who might be dealing with similar challenges.
If you have any questions or stories, we’re here to listen. Leave a comment below and join the conversation. Keep your vehicle running smoothly, and stay tuned for more expert automotive guides. Drive with confidence!
Reference Sources
- Kia Corporation, What is fuel efficiency?
- Professional Auto Repair, What is engine misfiring?
P0341 – Camshaft Position Sensor “A” Circuit Range/Performance
P0341 – Camshaft Position Sensor “A” Circuit Range/Performance
The P0341 trouble code indicates your vehicle’s ECM has detected a problem with the signal coming from the Camshaft Position Sensor. The ECM must detect a valid and accurate signal from the cam sensor, as it is used to control fuel injector and ignition timing. If you are experiencing a P0341 trouble code, read on for details on how to diagnose and repair the problem.
P0341 Code Definition
P0341 Code Definition (Generic): Camshaft Position Sensor “A” Range/Performance
What Does P0341 Mean?
The Camshaft Position Sensor is an essential input to the Engine Control Module. It allows the ECM to monitor your engine’s camshaft’s exact position, allowing it to make adjustments to fuel injector and ignition timing. When the signal is present but out of a specified range or missing altogether, a P0341 will be set, usually accompanied by a long crank to start or an engine that will not start at all.
What Are The Symptoms Of The P0341 Code?
P0341 can cause many driveability symptoms. Some of the more common symptoms are:
- Illuminated check engine light
- Long crank to start
- No start
- Stalling
What Are The Causes Of P0341?
- Defective Camshaft Position Sensor
- Faulty wiring
- Improper air gap/installation
How Serious Is The P0341 Trouble Code?
P0341 is a severe trouble code. This code can cause your vehicle to stall or not run at all. The camshaft position sensor is a critical input to the ECM and should be diagnosed and repaired right away.
How To Diagnose And Fix The P0341 Code
- Use a scan tool to scan for trouble codes and record freeze frame data. If there are other codes related to camshaft or crankshaft timing, they can help diagnose P0341.
- Perform a thorough visual inspection of all related wiring. Check for any broken or chafed wiring, misrouted harnesses, and ensure that all connectors are tight and not corroded. Also, verify that the Camshaft Position Sensor is installed correctly and seated flush.
- Next, check the internal resistance of the sensor. To do this, set your DVOM to ohms and disconnect the connector for the Cam Sensor. Use a wiring diagram to test the resistance across the sensor signal terminal and the sensor ground terminal. If resistance is infinite or the circuit is open, the sensor should be replaced. If not, verify the specification in your service manual.
- If the sensor passes the resistance test, depending on your vehicle sensor’s circuit configuration, you may have a 5-volt reference signal. Check your wiring diagram and verify that this terminal has 5 volts coming from the ECM with the ignition key in the run position.
- The best way to verify the Camshaft Position Sensor signal is to use an oscilloscope to give yourself a signal’s visual waveform. But this is a relatively advanced diagnostic tool that most non-professional technicians are not able to use. You can get a rough idea of the signal health by checking it with your DVOM set to AC voltage, and reading in the millivolts indicates that the sensor is at least producing a signal.
- If none of these tests produce any results, you may be dealing with a valve timing issue. Some vehicles have not been appropriately maintained, such as not replacing a timing belt at the suggested interval or lack of oil changes on a vehicle equipped with a timing chain. The belt or chain has likely jumped teeth on one of its gears in those vehicles. You can check this by disassembling the engine enough to check the cam and crankshaft’s timing marks visually. Or using an oscilloscope to compare the cam and crank sensor signals.
Common Mistakes To Avoid While Diagnosing The P0341 Code
When diagnosing a P0341 trouble code, it is vital to make sure the wiring is routed correctly and not pulled too tightly or chafing on other components. Also, a faulty Crankshaft Position Sensor has been known to cause P0341 on certain vehicles. It is always a good idea to verify the Crankshaft Position Sensor operation when diagnosing a P0341.
Tips To Avoid P0341 In The Future
To help avoid P0341 in the future, always route wiring harnesses in their original position to avoid wires and connectors from being stretched or rubbing on other components. And following the manufacturer’s maintenance schedule will reduce the risk of having any actual valve train timing problems.
Read More: P2135 OBD2 Code: Meaning, Symptoms, Causes, Diagnostics, And Fixes
P0299 – Turbocharger/Supercharger “A” Underboost Condition
P0299 – Turbocharger/Supercharger “A” Underboost Condition
The trouble code P0299 indicates that your vehicle’s turbo or supercharging system is creating an underboost condition. Generally, problems in your turbo/supercharger system should be taken seriously and repaired as soon as possible to prevent more serious and expensive engine damage. If you are experiencing a P0299, continue reading to learn more.
P0299 Definition
P0299 VW/Audi Definition: Boost Pressure Regulation, Control Range Not Reached
P0299 Ford Definition: Turbo/Supercharger Underboost Condition
P0299 Chevy Definition: Turbo/Supercharger Underboost Condition
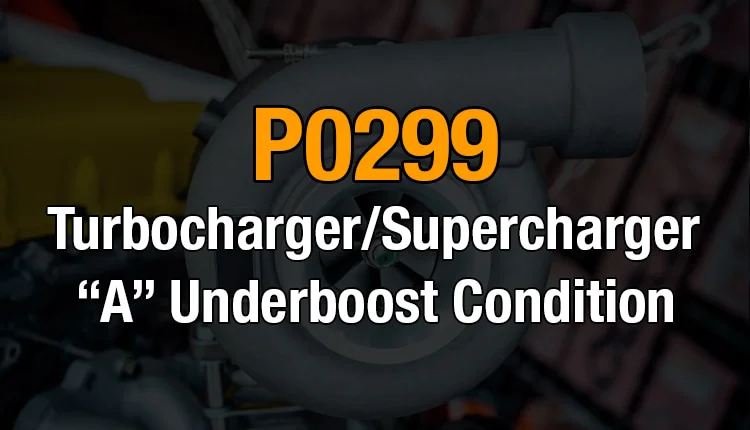
What Does P0299 Mean?
On vehicles equipped with a turbo or supercharger, air entering the engine is compressed and generally cooled before entering the intake manifold. This feature allows the engine to create substantially more power than engines without turbo or superchargers. When you experience a P0299 trouble code, the ECM has determined that your forced induction system is not producing enough boost.
As the vehicle is working, incoming air is compressed and then forced into the intake manifold. This pressurized air is called a “boost” and is monitored and regulated by the PCM. The boost the PCM allows the turbo/supercharger to create varies due to different operating conditions and driver inputs. The PCM compares the amount of the desired boost to the amount of the actual boost. If the actual boost cannot reach the desired level, the check engine light will be illuminated, and the car may enter “limp mode.”
What Are The Symptoms Of The P0299 Code?
The P0299 code will usually be accompanied by a few noticeable symptoms that include:
- Activation of the check engine light
- Low engine power
- Unusual engine noises
- Black smoke from the exhaust
What Are The Causes of P0299?
- Failed turbo or supercharger
- Intake air/book leak
- Vacuum leak
- MAP or boost pressure sensor failure
- Turbocharger wastegate and/or solenoid failure
How Serious Is The P0299 Code?
P0299 is a serious code. Failure to properly diagnose and repair the air induction system on a turbo or supercharged vehicle can potentially result in severe and expensive engine damage. It is common for a turbocharger to fail internally and cause scraps of metal to be introduced into the engine.
How To Diagnose And Fix The P0299 Code
Diagnosing a P0299 can vary widely from make to make, so consulting a service manual with vehicle specific information is highly recommended. But here are some general guidelines to follow.
- Scan the vehicle with a scan tool and record all codes and freeze frame data. If there are any other codes related to engine performance, including EGR, repair them first.
- Next, perform a thorough visual inspection of all boost piping and hoses, air intake system, and vacuum lines. Make sure all clamps are tight and properly positioned. If any leaks are found, repair or replace the component.
- If no leaks are visible, it may be necessary to use a smoke machine or introduce low pressure compressed air into the intake system to check for leaks.
- Once you have verified there are no leaks, remove the pipe from the turbo’s outlet side and look at the wheel/shaft for excessive side to side or up and down movement. Ensure the turbo has had time to cool off before touching, as it gets very, very hot during normal operation. If there are any signs of damage, you should replace the turbo.
- Use a scan tool to compare MAP sensor readings at idle and at 2500RPM with the specifications in-service information.
- If equipped with a Mass Air Flow sensor, perform the same test as the MAP sensor.
- Certain cars come equipped with a boost sensor that should also be tested using the correct service information. If any of these are out of specification, replace them.
- Check to make sure that the wastegate of capable of moving and is not seized in place. These are typically vacuum or electronically controlled. Again, consult service information. If it is vacuum controlled, ensure that the control solenoid has a steady vacuum with the engine running. Use a scan tool to perform a functional test of the vacuum solenoid to verify that the solenoid can open and close and the PCM is capable of controlling it.
Please use the above steps as a general guideline for diagnosis. The forced induction systems used by different vehicles make dramatic differences, so it would be impossible to cover each vehicle specific test in the space provided.
Common Mistakes To Avoid While Diagnosing The P0299 Code
Remember to check the engine air filter, and a dirty filter could not allow enough air into the intake system, causing a low boost condition. Also, on some cars, a fault in the EGR system can cause P0299, so repair EGR issues first. And, remember, just because you can’t see a leaking air pipe or hose with the engine off doesn’t mean it isn’t leaking under boost pressures.
Tips To Avoid P0299 In The Future
As usual, proper maintenance is key! Make sure to change your oil using the appropriate oil viscosity and specifications. The engine oil also lubricates your turbo/supercharger, so this is very important. Please do your best to keep rodents out of your engine bay, as they tend to destroy vacuum lines and electrical wires. And before shutting off your car, let it idle for a minute or two to allow the turbo to cool before cutting off its oil supply when shutting down the engine.
Read More: Procharger vs. turbocharger vs. supercharger: Which is best for me?
P0113: Intake Air Temperature Sensor 1 Circuit High
P0113: Intake Air Temperature Sensor 1 Circuit High
What does the P0113 code mean?
Can you continue to drive your car with it, and what are the aftereffects?
Here is a quick evaluation of the problem!
- P0113 Definition: Intake Air Temperature Sensor 1 Circuit High
- Code type: Generic – P0113 indicates the same problem whether you’re having a Ford, Honda, or Toyota, etc.
- Can I Drive with the P0113 code? Yes. It is not severe, and the car is safe to drive.
- Easy to fix? Intermediate-advanced level.
- Cost: $50-$200 (common)
Read on for detailed information about what P0113 is, its causes, and how to identify and fix it.
What Does The P0113 Code Mean?
P0113 is a diagnostic trouble code (DTC) for “Intake Air Temperature Sensor 1 Circuit High”.
The car’s computer sets this code if it detects the Intake Air Temperature (IAT) sensor’s voltage is higher than 4.6V.
This number tells the computer that the intake air temperature is abnormally low (40°F.)
How Do IAT Sensors Work?
An IAT sensor provides the temperature of the air going to the engine.
The combination of air temperature and air volume indicates air mass.
Based on the data received, PCM adjusts fuel added to the air-fuel ratio.
The colder the air gets, the heavier it becomes and the higher the IAT output voltage.
The voltage usually ranges from 0.5 to 4.5.
What Will Happen When P0113 Is Set?
If the IAT sensor is missing, the data is 4.6V (- 40°F). That tells the PCM that the temperature is cold (but it’s not). The computer doesn’t believe in that information and enters the Failsafe mode to avoid engine damage.
Instead of working with the incorrect data, the computer chooses a constant number to believe in. Usually, most cars will pick 100°F. This allows the engine to run optimally and with minimal damage.
If the actual intake air temperature goes below 100°F, the air is colder than what the computer knows. That causes more air to be sucked into the engine, which results in a lean condition.
On the other hand, an actual intake air temperature above 100°F makes the air hotter. That means less air gets in the engine, leading to a rich condition.
None of these conditions are desirable.
P0113: Causes, Symptoms, And How To Fix
Symptoms
P0113 will show the following common symptoms:
- Check engine light comes on
- Engine experience a hard start
- Lower fuel efficiency
- Reduced engine performance – vehicle hesitates to accelerate
- Rough idle
Causes
There are only three main causes for the P0113.
Cause #1: Faulty Or Loose IAT Sensor
If the IAT sensor is faulty or loose, it will be sending incorrect data to PCM. The PCM detects that and sets the P0113 code.
The solution is to replace the faulty IAT sensor or make it tighter in its socket if that was the cause of the malfunction.
Cause #2: Defective IAT Sensor Wiring
IAT sensor data goes to PCM through the signal wire. An open signal circuit will lead to high IAT voltage output.
Check the IAT sensor circuit for open, or loose wires and fix them accordingly. Damaged ones should be replaced.
Cause #3: Faulty MAF Sensor
Some vehicles have the IAT attached to the Mass Air Flow (MAF) sensor. So, when the MAF is gone, the IAT is gone.
In this case, if the MAF is bad, cleaning or replacing the MAF may fix P0113.
Cause #4: Faulty PCM (rare)
PCM rarely becomes faulty and this should be your last conclusion. The most common problem is a bug in its software or damage resulting from a short circuit, lightning, or impact.
Replacing the PCM is the best option in this case.
This is a complicated and expensive procedure so you may need a qualified automotive technician to help you.
P0113 Causes Identification: How to Diagnose
Solving the P0113 code problem involves diagnosing the causes, one after the other, and eliminating them. Proceed as follows:
Check The IAT Sensor
Start by visually inspecting the IAT sensor for loose terminal connections and dirt. If that is the case, tighten and clean everything.
The next step is to test the resistance across the IAT sensor terminals. If you get infinity resistant or OL (out of limit) reading, it is faulty. So, replace it.
In case the IAT is attached to the MAF, locate the IAT thermistor and repeat the above process.
Check IAT Sensor Wiring
Use an OBD2 scanner to view the live data from the IAT sensor with the sensor removed from its socket. The reading should be -40°F.
Repeat the process, but this time short the two pins with a jumper wire. The new value should be maxed out (around 285°F). That shows the IAT sensor wiring has no problems.
If you get different values, there is an issue with the IAT sensor wiring. So, use a wire tracker to find where it is open and fix it appropriately.
Check PCM
After checking both the sensor and its wiring, if they are not the problem, it can be because of the PCM.
9 out of 10 times, the IAT sensor or its wiring will reveal itself as the problem when you perform the above diagnosis. If it’s not, having a mechanic inspect your PCM is the next thing you should do.
How Much Does It Cost To Fix The Code P0113?
The cost of fixing the P0113 code varies depending on your car’s make, model, and year. Also, the part to be replaced influences the price tag.
The most common problem is a faulty IAT sensor, which typically costs $20-$150 to replace by yourself.
The Estimated Repair Cost Of P0113
| Solutions | Repair cost |
|---|---|
| Replace the IAT sensor | DIY: $20-$150 Mechanic: $40-$250 |
| Fix IAT sensor wiring | DIY: $0-$20 Mechanic: $20-$75 |
| Replace MAF sensor | DIY: $30 to $300 Mechanic: $80 to $380 |
| Replace PCM | DIY: not recommended Mechanic: $1,000-$3,000 |
Note: The data in this table was collected in June 2022. The actual price depends on many factors, such as your car’s make and year, mechanic’s rate, etc.
You Ask, I Answer
The P0113 code should not make you panic. Your car should still be drivable if it has the failsafe feature, and the cost of fixing it is relatively low, about $20-$150 for replacing the IAT sensor.
Do you have any hands-on experience with the P0113 code? How did you fix it? How much and how long did it take you? Let us know your responses in the comments.
See ya!
Read more: The 9 Best OBD2 Scanners for 2024: The Only Review You Need
P068A Code: Symptoms, Causes, and Solutions
P068A Code: Symptoms, Causes, and Solutions
The P068A code flashing on your vehicle’s diagnostics can be confusing, but we’re here to provide clarity and solutions.
In this guide, we’ll shed light on the P068A code, explain what it means, outline common symptoms, and pinpoint potential causes. Most importantly, we’ll walk you through the steps to diagnose and resolve the issue effectively.
Whether you’re a hands-on car enthusiast or someone seeking straightforward answers, this guide equips you with the knowledge to tackle the P068A code confidently and ensure your vehicle operates smoothly.
Let’s get started!
P068A Code: A Quick Summary
Definition: ECM / PCM Power Relay De-Energized Performance – Too Early
Severity: High
DIY Skill Level: Intermediate
Continue To Drive?: No
Estimated Repair Cost: $50 – $700
What Does the P068A Code Mean?
The P068A DTC is like a warning sign from your car’s computer. It’s a way for your vehicle to communicate that something might not be quite right with the engine or powertrain. Essentially, this code points to an issue related to the power relay in the engine control module (ECM) or powertrain control module (PCM).
In simple terms, it means that the computer in your car is having trouble with the electricity it needs to work correctly. More specifically, it’s concerned about how quickly the power relay turns off after you switch off the ignition. If it happens too fast, it can potentially harm the module.
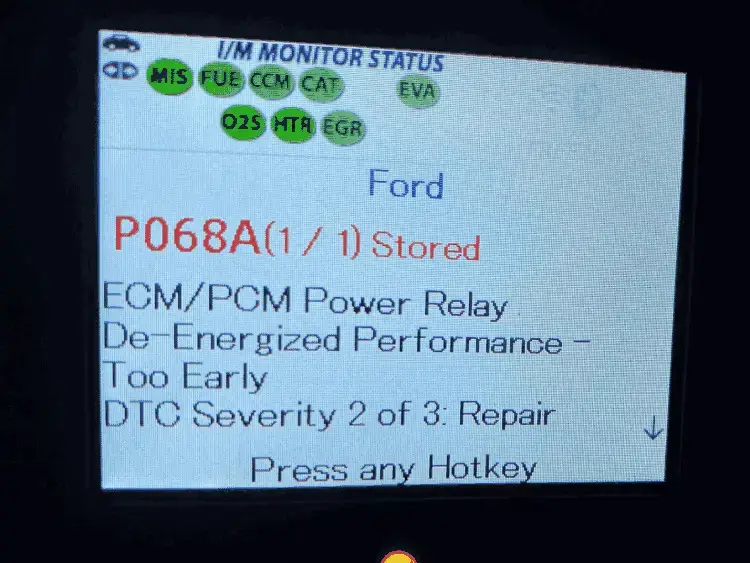
The P068A DTC can be found in various car makes and models. It’s not specific to just one brand. You might come across this code in vehicles from manufacturers like Ford, Volkswagen, Chevrolet, Toyota, Honda, and many others. It’s not picky about which car it appears in!
How Serious is the P068A Code?
The P068A code indicates a moderate to high severity issue. Driving with a P068A code is not advisable. It can be risky as your engine may stall unexpectedly, especially in traffic or on highways.
Moreover, ignoring this issue can result in more extensive and costly damage to your vehicle’s electrical system. To ensure your safety and prevent further damage, it’s recommended to have your vehicle inspected and repaired by a qualified mechanic as soon as possible when this code appears.
What are the Symptoms of the P068A Code?
Experiencing symptoms related to the P068A code? Here’s what you might notice:
- Illuminated Check Engine Light
- Difficulty starting the vehicle, especially in winter
- Engine stalling
What are the Causes of the P068A Code?
The P068A code can be triggered by several underlying issues. Common causes include:
- Faulty PCM/ECM power relay
- Damaged wiring or connectors in the power relay circuit
- Problems with the PCM/ECM itself
How To Diagnose and Repair P068A Code?
When dealing with the P068A code, it’s essential to have the right tools and parts, and a comprehensive guide for an effective diagnosis and repair. In this section, I’ll give you all.
Diagnostic Tools and Essential Parts
- OBD-II scanner for code reading and clearing
- Multimeter for electrical testing
- Wiring diagram for your vehicle
- Replacement PCM/ECM power relay (if required)
- Wiring repair kit (if wiring issues are detected)
Step-by-Step Guide
- Begin by connecting the OBD-II scanner to your vehicle’s diagnostic port and retrieve the P068A code.
- Inspect the PCM/ECM power relay for signs of damage or wear. If it’s faulty, replace it.
- Examine the wiring and connectors in the power relay circuit. Look for frayed wires or loose connections. Repair or replace as necessary.
- Clear the code and rescan to see whether the code reappears or not. If it is set again, proceed to step 5.
- Test the PCM/ECM to ensure it’s functioning correctly. If it’s found to be the issue, it may need professional reprogramming or replacement. Ensure the car operates properly after PCM replacement.
Note:
- Always disconnect the vehicle’s battery before working on electrical components.
- Refer to the wiring diagram specific to your vehicle for accurate testing.
- If you’re unsure about any step or lack experience with electrical systems, consider consulting a professional mechanic.
Read more: C1201 Toyota Code: How To Tackle Engine Control Problems
DIY Repair Level and Estimated Costs
This repair falls into the intermediate to advanced DIY category. Replacing the PCM/ECM power relay and addressing wiring issues can be tackled by experienced DIYers. However, you should find a professional to diagnose and replace the PCM/ECM.
The estimated costs for fixing the P068A code can vary depending on the specific cause and the vehicle’s make and model. Here is a rough cost estimate for common repair tasks:
| Repair Task | Estimated Cost |
| PCM/ECM power relay replacement | $50 – $150 |
| Wiring Issues Repair | $50 – $150 |
| PCM/ECM replacement and reprogramming | $500 – $1500 |
Conclusion
In wrapping up, understanding the P068A code is the first step in addressing potential issues with your vehicle’s PCM/ECM power relay control circuit. Driving with this code can pose risks to both your safety and your vehicle’s health. If you’ve experienced any of the listed symptoms, it’s wise to consult a qualified mechanic for a proper diagnosis and timely repair.
Have you or someone you know encountered the P068A code? Share your experiences and insights in the comments below. If you found this article helpful, don’t hesitate to share it with others who might benefit from this information. Safe driving, everyone!
Reference Sources
YourMechanic, Symptoms of a Bad or Failing ECM Power Relay.
P0741: Torque Converter Clutch Circuit Performance/Stuck Off
P0741: Torque Converter Clutch Circuit Performance/Stuck Off
The OBD2 error P0741 code triggers when the torque converter in your automatic transmission system is not functioning correctly.
If you are concerned about this code, let’s take a quick look at your situation.
- P0741 Definition: Torque Converter Clutch Circuit Performance/Stuck Off
- Code type: Generic – P0741 indicates the same problem whether you’re having a Chevy, Honda, Toyota, etc.
- Can I drive with the P0741 code? No. This can damage other parts of the transmission.
- Is it easy to fix?: Intermediate to advanced levels.
- Cost: $100 – $400 (common)
To make it easier for you to identify the situation, we’ll dive into all kinds of causes and the solutions for the p0741 code.
Read further to make the right repair decision.
What Does The P0741 Code Mean?
P0741 is a transmission DTC code triggered when the difference in speed between the torque converter and the transmission input shaft is greater than 200 revolutions per minute (RPM) and less than 7,500 RPM for 5 seconds.
Under normal conditions, the required ratio of these is 1 to 1 when the torque converter locks up. If this ratio is not achieved, PCM will set the P0741 code to warn you that the torque converter clutch circuit is stuck off or out of performance.
If the P0741 error code appears, sometimes it can be understood that there is a problem with the torque converter clutch, TCC solenoid, or the circuit.
P0741 Causes Identification: Quick View
P0741 can be attached with other codes in some cases for you to determine the causes easier.
In the below table, I’ll show you the leading causes and solutions f
| Codes combination | Causes | Solutions |
|---|---|---|
| P0741 only | Faulty torque converter clutch Faulty torque converter clutch solenoid Defective or damaged wires around TCC solenoid Faulty valve body | Replace torque converter Replace the TCC solenoid Repair damaged wiring to TCC solenoid Replace the valve body |
| P0741 + P0729 – P0736 | Faulty torque converter clutch Transmission fluid is dirty or old | Replace torque converter Change transmission fluid |
| P0741 + P1744 (Ford) | Faulty torque converter clutch solenoid Defective or damaged wires around TCC solenoid | Replace the TCC solenoid Repair damaged wiring to TCC solenoid |
| P0741 + P0218 | Faulty torque converter clutch solenoid Transmission fluid is dirty or old | Replace the TCC solenoid Change transmission fluid |
| P0741 + P0700 + P0768 | Damaged transmission wiring harness Transmission fluid is dirty or old Faulty valve body | Repair damaged wiring to the transmission wiring harness Change transmission fluid Replace the valve body |
| P0741 + P0118 | Faulty engine coolant temperature sensor | Replace ECT sensor |
| P0741 + P2757 (Lexus); P0741 + P0740 + P2761 (BMW); P0741 + P1744 + P0218 (Ford); | Transmission fluid is dirty or old | Change transmission fluid |
| P0741 + P0700 | Faulty TCM | Replace the TCM |
Note: The causes for each code combination are the most common ones. There can be some uncommon issues hidden under those codes.
So, it’s important to fully understand the correlation between your car’s symptoms and the true causes.
The below part will help you pinpoint your problems and how to fix them.
P0741: Causes, Symptoms, and How To Fix
Cause #1: Faulty Torque Converter Clutch
As I mentioned, the p0741 code is set on the powertrain control module (PCM) when there is a slip (different in speed) between the engine and the transmission input shaft at the time TCC is locked. This could mean the TCC doesn’t lock properly or is in an open state permanently.
The TCC starts locking up after using the first gear and always stays locked up from there. If the clutch doesn’t engage anymore, the symptoms are:
- Sometimes, only P0741 appears; sometimes, the combination between P0741 and P0729 to P0736 appears.
- Poor fuel economy.
- Decreased transmission fluid life.
- Transmission fluid getting hot ( >240F).
Cause #2: Faulty/Internal Short In Torque Converter Clutch Solenoid
The TCC solenoid controls the fluid flow to the torque converter. If the solenoid is faulty, it can’t measure how much transmission fluid is needed, which could cause unusual fluid pressures.
As a result, it can create a lot of irregular behaviors, such as
- Sometimes, only P0741 appears; sometimes, the combination between P0741+P0218 or P0741 + P1744 (Ford) or P0741 + P0729 to P0736 appears.
- The fuel consumption increases.
- The transmission may be jammed.
- The TCC solenoid erratic shift.
- Check engine light.
To test the TCC solenoid, measure the OHMs and make sure it is within a suitable range (12-28 Ohms).
If it is not, then replace it.
Cause #3: Defective Or Damaged Wires Around TCC Solenoid
It’s not hard to check the TCC solenoid wires. Test your TCC solenoid wire carefully to ensure that you don’t miss any problems.
Remember that the bad wire is zero ohms, and the good wire is slightly more than zero ohms.
If the wire goes bad, the P0741 popped up.
If you have a Ford, in some cases, P0741 and P1744 will appear to make you know this specific cause.
Cause #4: Damaged Transmission Wiring Harness
The faulty wiring harness can cause the difference in speed between the torque converter and the transmission input shaft, making the P0741 set.
Inspect the wires visually for damage and check the ohms (zero ohms for bad and infinity ohms for good) to ensure you find out all of the problems.
It sometimes appears the mixing codes with P0700 and P0768.
Cause #5: Faulty Engine Coolant Temperature Sensor
The ECT sensor helps measure the temperature of the coolant for the ECU. If the ECT sensor goes wrong, the proper temperature signal can’t deliver to the TCC, which leads to not locking up on the highway speed.
Like other parts, the ECT sensor can be damaged due to engine-related issues, leading to severe problems.
The signs for this cause are:
- A combination between P0741 and P0118.
- Check engine light.
- The poor mileage.
- The electric cooling fan is not working.
- Black smoke exhausting.
- Poor idling or engine performance.
Cause #6: Transmission Fluid Is Dirty
The Automatic Transmission Fluid (ATF) is filled in the torque converter. The torque converter and transmission are damaged if the fluid is contaminated, contains debris or sludge, or is old.
You need to check your transmission fluid to ensure whether the transmission fluid is the cause of this code or not.
Change the fluid right away if it’s dark brown.
Sometimes, P0741 combines with P0218 or P0729-P0736. In this particular case, the P0741 can be attached with P2757 (Lexus), P0740 and P2761 (BMW), and P1744 and P0218 (Ford) in your scanner to warn you to replace the transmission fluid.
Cause #7: Faulty Valve Body
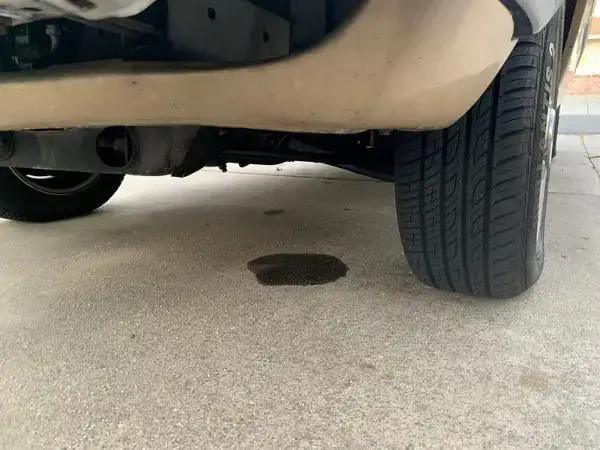
The valve body plays a vital role in the torque converter with various channels and passages in the automatic transmission. It interacts with the solenoid to push transmission fluid flow through those passages to initiate different clutches and switch gears.
The torque converter can not operate correctly when the valve body goes bad.
To know whether the valve body is good or not, there are a lot of signs for you to identify:
- P0741 appears alone or with P0700, and P0768.
- Incorrectly gear change.
- Harsh noise.
- Slipping whilst driving a manual box in the clutch.
- Transmission fluid leak.
Cause #8: Faulty Transmission Control Module (TCM)
The TCM measures severe signals from the engine speed sensor and the turbine speed sensor to estimate the torque converter slip value. Then, the TCM compares this value to the value preset in the TCM calibration.
P0741 pops up when this torque converter slip value exceeds 80 RPM. The slip value is inaccurate if the TCM fails, making TCC not work correctly.
This cause has a variety of signs to identify, including:
- P0741 combines with the P0700.
- Check engine light.
- Poor fuel mileage.
- Erratic shifting.
How Much Does It Cost To Fix The Code P0741?
The fixing cost of the P0741 is around $15 – $700 for DIY and $100 – $1000 for a mechanic shop or dealer.
However, it is based on the causes of your car and the area where you are at.
The estimated repair cost of the P0741
| Solutions | Cost |
|---|---|
| Replace torque converter | DIY: $150 – $500 Mechanic shop: $600 – $1000 |
| Replace the TCC solenoid / damaged wiring to TCC solenoid | DIY: $15 – $100 Mechanic shop: $100 – $400 |
| Repair damaged wiring to the transmission wiring harness | DIY: $50 – $250 Mechanic shop: $100 – $350 |
| Replace ECT sensor | DIY: $10 to $30 Mechanic shop: $85 to $170 |
| Change transmission fluid | DIY: $50 – $100 Mechanic shop: $80 – $250 |
| Replace the valve body | DIY: $250 – $500 Mechanic shop: $300 – $1000 |
| Replace the TCM | DIY: $450 – $700 Mechanic shop: $500 – $900 |
Note: The data in this table is collected in May 2022. The actual price depends on many factors, such as your car’s make and year, mechanic’s rate, time, market price, etc.
You Ask, I Answer
The P0741 error code isn’t a severe significant code, but you have to fix it right away to avoid the damage to the transmission.
I hope you can save your budget after reading my article.
If you have any other questions, don’t hesitate to leave a comment below, we’ll answer them all.
If you have had the same issue and fixed it before, share your story with us.
See ya!
Read more: The 9 Best OBD2 Scanners for 2024: The Only Review You Need
P0740: Torque Converter Clutch Circuit Malfunction
P0462 Code: Fuel Level Sensor Troubles and How to Fix Them
P0462 Code: Fuel Level Sensor Troubles and How to Fix Them
When that check engine light suddenly appears on your dashboard and the P0462 code pops up on your scanner’s screen, your vehicle is sending a signal about a potential hiccup in its cooling system. In this article, we’re here to break down the meaning behind this code, highlight possible indicators, explain why it occurs, and provide step-by-step guidance to diagnose and resolve the issue.
Whether you’re a seasoned car enthusiast or simply curious about what’s happening beneath the hood, this article will simplify the process of dealing with the P0462 code.
Let’s dive in!
P0462 Code: A Quick Overview
Definition: Fuel Level Sensor ‘A’ Circuit Low
Severity: Medium
DIY Skill Level: Intermediate
Continue To Drive?: No
Estimated Repair Cost: $50 – $300
What Does the P0462 Code Mean?
The P0462 code is a message from your car’s computer system indicating a problem with the “Fuel Level Sensor ‘A’ Circuit Low.” In practical terms, the vehicle’s Powertrain Control Module (PCM) has detected an abnormal signal from the fuel level sensor (FLS). The FLS is responsible for measuring the fuel level inside the fuel tank. When the PCM receives an irrational or mismatched input signal from the FLS, it triggers the P0462 code.
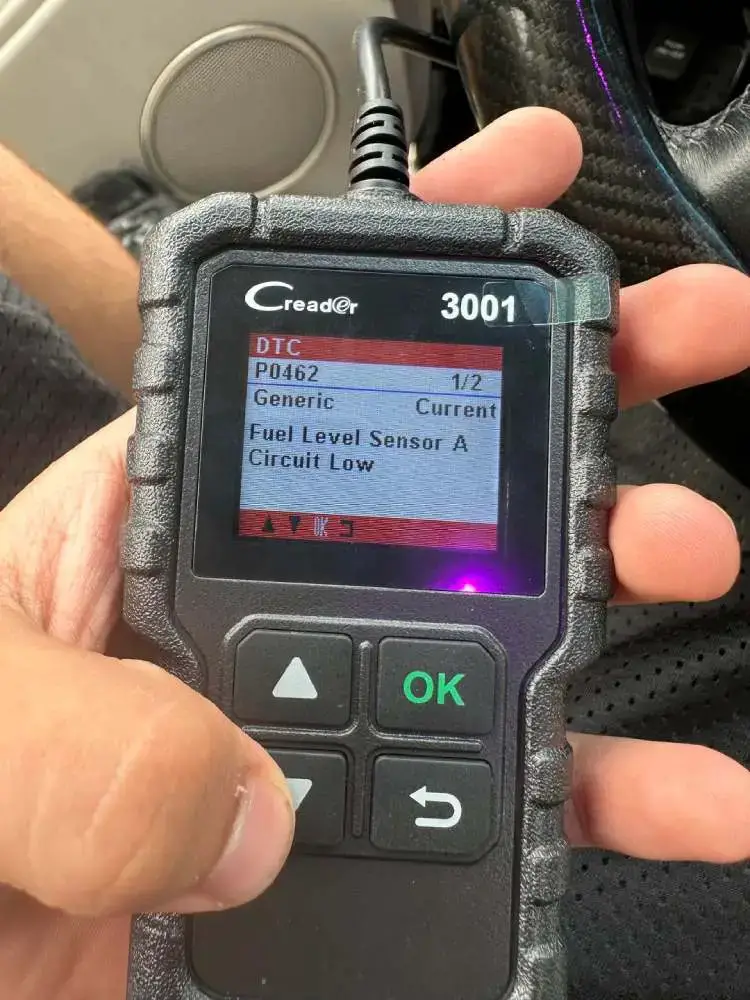
The P0462 is a generic trouble code. Therefore, it can show up in various models from manufacturers like Toyota, Ford, Chevrolet, Honda, and Nissan. When P0462 appears, it might come with related codes like P0460 (Fuel Level Sensor Circuit), and/or P0461 (Fuel Level Sensor Circuit Range/Performance). These codes offer more context, aiding mechanics in pinpointing the problem.
How Serious is the P0462 Code?
The P0462 code falls into the medium severity category. Continuing to drive with P0462 isn’t advisable. Inaccurate fuel readings can disrupt your travel plans and harm your vehicle.
Promptly addressing this issue ensures your fuel gauge remains reliable, preventing unexpected breakdowns and ensuring you can trust the information displayed. Consulting a mechanic for a thorough inspection and timely repair is the safest course of action, ensuring your journeys remain smooth and trouble-free.
What are the Symptoms of the P0462 Code?
When your P0462 is displayed on your vehicle, it may exhibit several symptoms indicating issues with the fuel level sensor circuit. Look out for:
- Illuminated Check Engine Light
- Inaccurate fuel gauge readings
- Fuel gauge stuck on empty, 1/2 or full
- Failed smog test
What are the Causes of the P0462 Code?
Several factors can trigger the P0462 code. Common causes include:
- Faulty fuel level sensor
- Damaged or corroded wiring in the fuel level sensor circuit
- Malfunctioning gauge cluster
- Damaged fuel tank
- Issues with the PCM
Read more: P0463 – Fuel Level Sensor “A” Circuit High
How To Diagnose and Repair P0462 Code?
In this section, we’ll guide you through the necessary steps to diagnose and fix the P0462 code in your vehicle, equipping you with the understanding and tools required to resolve this problem efficiently.
Diagnostic Tools and Essential Parts
- OBD-II scanner
- Multimeter
- Wiring diagram
- Replacement fuel level sensor
- Basic hand tools
- Instrument cluster
Step-by-Step Guide
- OBD-II Code Retrieval
Use an OBD-II scanner to retrieve the P0462 code and assess any accompanying codes. - Visual Inspection
Check for damaged wiring, loose connections, or corrosion in the fuel level sensor circuit. If it’s faulty, replace it.
- Sensor Testing
Use a multimeter to test the fuel level sensor’s resistance and voltage output. Consider replacing the sensor if necessary.
- Gauge Cluster Inspection
Inspect the gauge cluster for malfunctions affecting fuel readings. Repair or replace if it’s malfunctioning.
- PCM/ECM Testing (if needed):
Check the function of PCM and ensure it’s operating properly. Repair if any problems emerge. - Clearing the code:
Clear the codes with the OBD-II scanner and test the vehicle.
DIY Repair Level and Estimated Costs
This repair falls within the intermediate DIY level. While basic inspections can be done at home, replacing the fuel level sensor might require expertise. Costs vary based on parts and labor, approximately ranging from $150 to $300 for professional repair. If unsure, consult a mechanic for accurate diagnosis and safe repairs.
| Repair Task | Estimated Cost |
| Wiring and connector repair | $50 – $150 |
| Fuel Level Sensor | $50 – $150 |
| Instrument Cluster | $100 – $300 |
Conclusion
Dealing with the P0462 code in your car might seem overwhelming, but it’s manageable with the right information. By understanding the code, inspecting your vehicle, and addressing the issue, you can prevent inconvenient breakdowns. Remember, ignoring the problem can lead to more significant troubles. Taking on the challenge of the P0462 code is an opportunity to enhance your knowledge about your vehicle.
If you found this information helpful, share it with other car enthusiasts, regardless of their vehicle’s make and model. The P0462 code can affect any type of car. Safe travels!
Have you ever encountered the P0462 code, or do you possess additional insights or tips to contribute to the community? Feel free to drop a comment below. Your firsthand experiences and guidance can prove invaluable to others grappling with similar automotive dilemmas.
Reference Sources
Delphi Auto Parts, How to Test and Replace a Fuel Sending Unit. J.D. Power, What is a Smog Check?
P0102 – Mass Air Flow (MAF) Circuit Low Input
Your scan tool throws the P0102 code?
Here is a quick brief to let you know what you’re facing and what to expect.
- P0102 definition: Mass Air Flow (MAF) Circuit Low Input.
- Code type: Generic – P0102 indicates the same problem whether you’re having a Chevy, Ford, or Nissan, etc.
- Can I drive with the P0102 code? Yes, but extended driving can lead to costly repairs.
- Easy to fix? Beginner to intermediate DIY level.
- Cost: $30 to $380.
Keep driving with this code is not that dangerous. But the best way to avoid unnecessary expenses is to get it fixed ASAP.
Now let us take a deeper look into the code!
What Does The P0102 Code Mean?
The error P0102 code is triggered when the Mass Air Flow (MAF) sensor’s voltage is lower than 0.2v for a certain period of time. This number is telling the car’s computer that the amount of intake air is abnormally low.
How Does The MAF Sensor Work?
The MAF sensor measures how much air is coming into the combustion chamber. Using this data, the computer can determine how much fuel is needed.
A typical MAF sensor has a sensing wire. This wire heats up during operation and is further cooled by the airflow. The cooling initiates a decrease in resistance leading to an increase in voltage.
Therefore, the more air is coming, the higher the MAF’s output voltage. The number usually ranges from 0.5v to 5v.
What Happens When The MAF Sensor’s Output Voltage Is Lower Than 0.2v?
The MAF sensor’s voltage being lower than 0.2v is telling the computer that there is little to no air entering the engine.
Of course, the computer does not believe in this number as it knows it’s an irrational number.
So, what data does the computer take to adjust the air-fuel mixture?
The answer is O2 sensors!
The problem is that O2 sensors are located after where the combustion takes place. For that reason, there is a delay in the air-fuel ratio adjustment. As the result, your car can run just fine when cruising but it will hesitate when you suddenly accelerate.
Other codes related to the P0102 code are P0100 and P0101.
P0102: Causes, Symptoms, And How To Fix
Symptoms
Here are some common symptoms of P0102 that you should look out for:
- Check engine light on
- Hard starts
- Engine stalling
- Rough idle
- Hesitate when accelerating
Causes
Cause #1: Dirty Air Filter
The accumulation of dirt in your air filter will restrict airflow. Therefore, the MAF reports there is not enough air coming.
If this is your problem, your car can’t start (because there is actually no air for combustion.)
P0102 caused by a dirty air filter should be resolved by cleaning out the clogged air filter. This is an easy task and you can totally do it by yourself.
Cause #2: Faulty MAF Sensor
When the sensing wire inside the MAF gets dirty, airflow can not cool it down properly. This leads to the MAF’s voltage drop and it underreports the intake air mass.
The decision to replace your MAF sensor should be taken after a proper diagnosis.
Cause #3: MAF Sensor Wiring Harness Problems
Damaged MAF sensor wiring harness can contribute to your P0102 error code. The wiring could also be near components that consume higher voltage, such as alternators, ignition wires, etc. These could lead to false voltage readings as well.
Cause #4: PCM Issues (rare)
Finally, the Powertrain Control Module (PCM) will rarely be the source of your error code. A faulty PCM causes the vehicle to require multiple attempts before starting up. It may also result in the engine’s failure to start.
Replacing PCM should fix the problem. Installing this module will take about half an hour and require professional assistance to ensure proper operations.
P0102 Causes Identification: How to Diagnose
Following the recommended diagnostics process is the first step in resolving the P0102 code.
Diagnose Air Filter
First, open the hood and inspect the air filter to confirm if it is clogged or contaminated with debris. If it is the case, have your air filter cleaned with recommended cleaners.
Alternatively, when the air filter gets severely damaged, replacing it is the best option.
Diagnose MAF Sensor
After making sure that the air filter is clean, the MAF sensor is your next target.
The sensor is located between the air filter and the intake manifold. While the car is idling, unplug the MAF sensor, and the car should stall.
If it doesn’t, the MAF need to be cleaned or replaced.
Diagnose MAF Sensor Wiring Harness
Now, ensure you check the wiring of your MAF sensor thoroughly to inspect any broken, loose, frayed, or pinched cables and connections. Verify that the wiring harness is perfectly coupled to the MAF sensor.
Diagnose PCM
After eliminating all of the above possibilities, the last thing you should check is the PCM.
Up to this point, I recommend you have a mechanic inspect the PCM. This is a complicated and expensive process.
But don’t worry, this is a very rare case.
How Much Does It Cost To Fix The Code P0102?
Most of the time, replacing the MAF sensor will fix P0102. This is an easy fix and costs you about $30 to $150 to buy a new sensor.
The Estimated Repair Cost Of P0102
| Solutions | Repair Cost |
|---|---|
| Replace faulty MAF sensor | DIY: $30 to $150 Mechanic: $80 to $380 |
| Clean dirty air filter | DIY: a few bucks Mechanic: $15 to $85 |
| Replace PCM | DIY: not recommended Mechanic: $1,000 to $3,000 |
Note: The data in this table was collected in June 2022. The actual price depends on many factors, such as your car’s make and year, mechanic’s rate, etc.
You Ask, I Answer
The P0102 code is not as serious as you worry, but ignoring it could lead to further damages that cost an arm and a leg to repair.
Share your story with us if you have encountered the P0102 code and fixed it before.
Also, if you have any other questions related to this error code, feel free to leave a comment below, I’ll answer them all!
See ya!
Read more: The 9 Best OBD2 Scanners for 2024: The Only Review You Need
P0463 – Fuel Level Sensor “A” Circuit High
P0463 – Fuel Level Sensor “A” Circuit High
P0463 Code Definition
What Does P0463 Mean?
What Are The Symptoms Of The P0463 Code?
What Are The Causes Of P0463?
How Serious Is The P0463 Code?
How To Diagnose And Fix The P0463 Code
Tools You’ll Need:
Method:
Common Mistakes To Avoid While Diagnosing The P0463 Code
P04DB Code: Crankcase Ventilation System Disconnected Fixed!
P04DB Code: Crankcase Ventilation System Disconnected Fixed!
If you’ve encountered the P04DB code during a diagnostic scan, don’t worry; you’re in the right place. In a nutshell, the P04DB code points to a potential issue with the crankcase ventilation system. In this article, In this article, we provide detailed information on the symptoms, causes, diagnosis, and repair solutions associated with this code.
Whether you own a Ford Mustang Ecoboost, a 6.7L Powerstroke, or a Cummins-powered vehicle, this article will provide valuable insights tailored to your specific engine model.
Let’s start!
P04DB Code: A Quick Overview
Take a quick look at the key information of the P04DB Code!
- Definition: Crankcase Ventilation System Disconnected
- Severity: Medium
- DIY Skill Level: Intermediate
- Continue To Drive?: Yes
- Estimated Repair Cost: $100 – $400
What Does The P04DB Code Mean?
The P04DB code is an OBD-II diagnostic trouble code pointing to a “Crankcase Ventilation System Disconnected” error. This means that the Crankcase Ventilation (CCV) system is either disconnected or experiencing a malfunction, such as a faulty or damaged component.
The CCV system plays a crucial role in maintaining the engine’s proper functioning. It consists of various components, including the PCV (Positive Crankcase Ventilation) valve, hoses, and the breather system. The PCV valve regulates the flow of gases between the crankcase and the intake manifold, preventing excessive pressure buildup and removing harmful vapors.
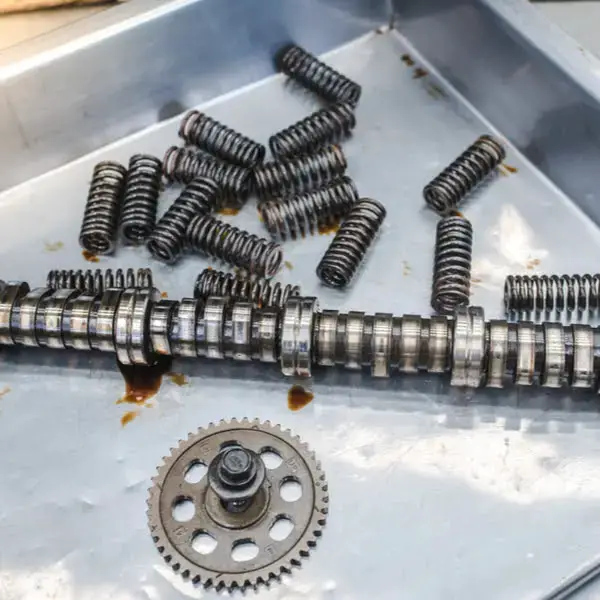
(Image credit: Engine Basics)
The P04DB code is typically triggered when the crankcase pressure readings deviate significantly from the historic trends stored in the Powertrain Control Module (PCM). In Ford vehicles equipped with a 6.7L diesel engine, the hall effect sensor is responsible for detecting the connection status of the crankcase ventilation system, triggering the code.
In some cases, the P04DB code may be accompanied by related codes like P04E2 (Crankcase Ventilation Hose Connection Sensor Circuit Low) and P04E3 (Crankcase Ventilation Hose Connection Sensor Circuit High), which help diagnose the specific issue with the system.
It’s important to note that the P04DB code is a known issue in the 6.7 Powerstroke engine, as well as other engines such as Cummins, Ecoboost, and 6.7 Diesel. Furthermore, it appears in various vehicle models, including popular ones like the Ford F150, F250, F350, Ford Focus, Ford Escape, and Dodge Ram.
Attention – P04DB Code On Ford 6.7L Diesel Engine
For owners of Ford vehicles affected by the P04DB code: Check if your car is covered under the customer satisfaction program 17M04. This program provides free repairs or replacements to address the issue.
P04DB Severity Explained: Is Immediate Attention Required?
The P04DB code is considered a moderate-level issue that does not require immediate attention but should not be ignored for an extended period. While you can still drive your vehicle with the code present, it is important to address the issue promptly.
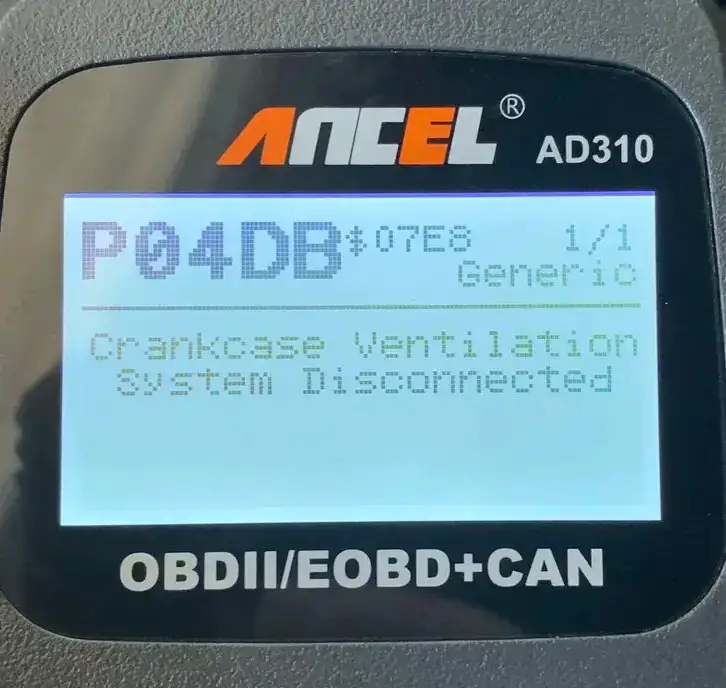
(Image credit: Explorer Forum)
Ignoring the P04DB code can lead to potential long-term consequences such as engine damage or decreased fuel efficiency. Seeking professional assistance and resolving the underlying cause of the code as soon as possible is recommended to ensure your vehicle’s longevity and optimal performance.
Signs Of The P04DB Code
The P04DB code manifests itself through various symptoms that can alert you to the underlying issue, such as:
- Check Engine Light (CEL) illuminated
- Reduced engine performance or power
- Engine misfires or rough idle
- Increased oil consumption
- Oil leaks or visible oil residue
- Unusual engine noise
- Remote start failure
- Poor acceleration
- Abrupt vehicle stops
- Shifting problems with jerking transmission
Read more: Misfire OBD2 codes – P0301, P0302, P0303, P0304, P0305
Common Causes Of The P04DB Code
There are several possible causes of the P04DB code:
- Disconnected or damaged CCV hoses
- Faulty PCV valve
- Clogged crankcase breather filter
- Incorrect placement of CCV
- Malfunctioning CCV sensors
Diagnosing And Fixing The P04DB Code
In this section, we will guide you through the process of diagnosing and fixing the P04DB code. Additionally, we will cover the necessary tools and parts, provide a step-by-step procedure, discuss the level of repair suitable for DIY enthusiasts, and give you an estimate of the potential cost involved.
Essential Tools And Parts
- OBD-II scanner
- Socket set
- Replacement PCV valve
- Crankcase ventilation hoses
- Crankcase breather filter
- Gaskets or seals (if necessary)
- Torque wrench
- Safety gloves and goggles
Step-by-Step Procedure
Reminder: Check the customer satisfaction program 17M04 if you own a 6.7 Powerstroke Ford. However, if your vehicle is not covered under the program and you would like to attempt a DIY fix, please follow the guide below:
Step 1: Begin by ensuring that the CCV components, including sensors and valves, are correctly positioned according to the manufacturer’s specifications.
Step 2: Inspect the CCV hoses for any disconnections or damage. Ensure all hoses are correctly connected and free from leaks or cracks. Repair or replace if necessary.
Step 3: Proceed to check the crankcase breather filter for clogs or restrictions. Clean or replace the filter as needed.
Step 4: Next, test the PCV valve for proper functioning. Replace the valve if necessary.
Step 5: Check the functionality of the CCV sensor. Replace it if it’s faulty.
Note:
In some vehicles, particularly certain 6.7 Powerstroke Ford models, if the CCV sensor fails, it might be necessary to replace the entire crankcase vent filter housing along with the sensor. This is due to the sensor being a pickup sensor that registers its connection.
It is advisable to consult the vehicle’s service manual or seek professional assistance to confirm the specific requirements and options for your vehicle’s CCV system.
DIY Repair Level And Estimated Costs
The level of DIY repair for the P04DB code is generally considered medium overall. Still, it can vary based on factors such as your mechanical experience and access to tools. While some individuals may feel comfortable performing the inspection and replacing components, others may prefer seeking the assistance of an expert or certified mechanic.
The estimated costs for repairing the P04DB code can differ depending on factors such as the vehicle model, the extent of the issue, and labor rates in your area. Here is a rough estimate of the main repair tasks:
| Repair Task | Estimated Cost |
| Crankcase breather filter replacement | $50 – $100 |
| PCV valve replacement | $60 – $150 |
| CCV sensor replacement | $100 – $250 |
Remember, these costs are approximate and may vary. Furthermore, if you’re uncertain or require additional assistance, consult a qualified professional who can accurately diagnose and repair the issue to ensure optimal results and avoid any potential complications.
Wrap Up
Congratulations! You’ve now gained valuable insights into the P04DB code and its implications for your vehicle’s CCV system.
With a better understanding of the P04DB code and its implications for your vehicle’s CCV system, you’re better equipped to address the issue promptly. Remember, taking action promptly when encountering the P04DB code can prevent further engine damage and ensure optimal performance.
If you found this guide helpful, share it with fellow car enthusiasts or anyone who may benefit from it. Feel free to leave comments or questions below; we’d love to hear from you.
To learn more about other trouble codes your car may face, use our OBD Code Lookup tool.
Stay proactive in maintaining your vehicle’s health, and happy driving!
Reference Sources
- Mopar1973Man.Com LLC, P04DB – Crankcase Ventilation System Disconnected – OBDII Error Codes.
- Ford-Trucks Forum, P04DB Code – Crank Case Vent.
- Ford Motor Company, Diagnostic Trouble Code (DTC) Descriptions.
- National Highway Traffic Safety Administration, 2018, Technical Service Bulletin: MC-10143112-9999.
P0305 – Cylinder 5 Misfire Detected
P0305 – Cylinder 5 Misfire Detected
The P0305 code triggers when cylinder #5 records a misfire. In general, misfires are the cause of major concern. Not only do they reduce your engine’s power, but they can lead to long-term damage (and subsequent costly repairs).
The severity of the P0305 trouble code depends on the frequency of the misfires and their ultimate cause. Use the steps below to help you diagnose the problem before it becomes more serious.
P0305 Code Definition
P0305 Code Definition (Generic): Cylinder #5 Misfire Detected
P0305 BMW Code Definition: #5 Cylinder Miss Fire
P0305 Ford Code Definition: Fault Cylinder ‘E’ – Misfire Detected
P0305 Nissan Code Definition: Cylinder #5 Misfire Detected
What Does P0305 Mean?
The cylinders in your engine are what produces the power. Fuel is injected into the cylinder and is combusted by the spark from the spark plug. The energy released in the combustion turns the crankshaft, generating power.
The cylinders in your engine work together to provide constant power to the crankshaft. When things are working correctly, they fire in sequence so smoothly the crankshaft’s RPM is consistent. A single misfire won’t have much impact on your system. Repeated or chronic misfires, however, will lead to significant loss of engine power.
Code P0305 triggers when the #5 cylinder misfires. On Fords, this is defined as Cylinder ‘E’. You’re likely to see it in combination with P0300, the general misfire code. Driving with a misfiring engine can damage its internal components, so this isn’t a code you want to ignore.
What Are The Symptoms Of The P0305 Code?
You can use the symptoms present with the P0305 code to guide your diagnosis. The most common symptoms include:
- Activation of the check engine light. If the light is solid, the misfire may be random or sporadic. A flashing check engine light indicates repeated misfires and is cause for more concern.
- Rough idle
- Hard starts
- Shaking or stumbling engine
- Jerks and hesitations during acceleration
- Reduced engine power
- Fuel odors in the exhaust
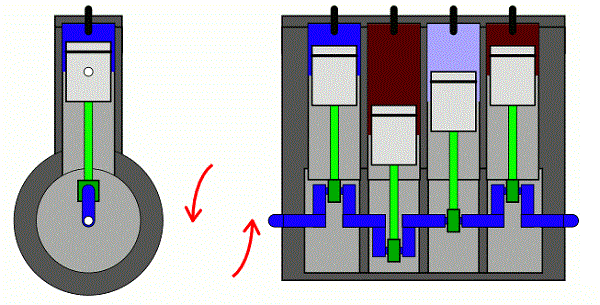
What Are The Causes Of P0305?
The most common causes of the P0305 OBD2 code are:
- Faulty or worn-out spark plugs
- Faulty wiring around the spark plugs
- Faulty ignition coils
- Faulty fuel injector
- Failed distributor
Other possible causes include:
- Leaks in the vacuum system
- Low fuel pressure
- Defective camshaft or crankshaft sensor
- Engine timing issues
- Faulty catalytic converter
- Fuel quality too low
- Fuel level too low
How Serious Is The P0305 Code?
The P0305 OBD2 code is severe. The drivability issues associated with the code can make it unsafe to operate your vehicle. Repeated misfires can also cause long-term engine damage. Stop driving your car immediately, and don’t use it again until you’ve repaired the cause.
How To Diagnose And Fix The P0305 Code
If the check engine light is solid and there are no drivability issues, clear the codes and test drive your car. The code may not return if the misfire was an isolated incident. Monitor your engine performance and continue with repairs if the code returns.
Tools you’ll need:
- OBD2 scan tool
- Basic tool kit (screwdriver, a ratchet set, socket set, etc.)
- Digital multimeter
- Fuel pressure gauge
- Compression tester
Method:
- Read the freeze frame data using the OBD2 scanner. Identify the conditions in which the code is initially triggered. If any other trouble codes are present, fix those first, which may be the root cause of the misfire.
- Check the wiring around the spark plugs and wiring harness. Re-connect any that are loose, and replace any that are frayed or damaged.
- Inspect the vacuum hoses in your engine for damage and leaks, feeling for issues in any hidden areas. If you find any leaking hoses, replace them. Please pay close attention to the ends, as well, and ensure they’re firmly connected.
- If you have individual coil packs, swap the cylinder 5 pack with the cylinder 4 pack. Clear the codes, then test drive and scan your vehicle. If the misfire moved to cylinder 4, you’ve identified the coil pack as the issue. Replace the coil pack, clear the codes, and test your vehicle again.
- Inspect the spark plugs. If they’re shiny with oil, carefully wipe them clean and replace them. Replace any spark plugs with black carbon build-up or visible corrosion.
- Test the spark plug wires with a digital multimeter. Remove each wire, connecting each multimeter lead to an end. Compare it with the specified reading in your vehicle’s manual. If more than 2 wires fail, replace the entire harness.
- Perform a compression test to check for mechanical issues. Burned valves, worn valve guides, and similar mechanical failures can lead to misfires.
- Check the timing chain. Ensure it’s properly aligned and that it hasn’t skipped any teeth.
- Verify that you’re using the grade of fuel specified in your vehicle’s manual. While this is a rare cause of the P0305 trouble code, fuel quality issues can cause misfires. If the fuel is incorrect, drain and flush your system, then refill it with the correct fuel type.
- Use a digital multimeter to check the fuel injectors. If the reading doesn’t match the specifications in your vehicle’s manual, replace them.
- Should the P0305 code return, the issue is most likely with your fuel system. Check the fuel pressure with a fuel pressure gauge. If it’s too low, your fuel pump may be failing. Take your vehicle to a mechanic for further diagnosis.
Common Mistakes To Avoid While Diagnosing The P0305 Code
Many mechanics immediately replace the spark plug or ignition coils when a misfire code triggers. While these are often the cause, you want to conduct a thorough diagnosis before jumping to any conclusions.
Tips To Avoid P0305 In The Future
Many times, misfires are caused by issues with the air-to-fuel ratio. Leaks in the vacuum system can cause these, as can be clogged or leaking components in the exhaust system. Periodic inspection of the hoses, wires, and valves in your system can help you stop problems before they happen.
Read more:
P1399 Honda – Random Cylinder Misfire Detected
P0440: Meaning, Symptoms, Causes, Diagnostics, and Fixes
P2096 – Post Catalyst Fuel Trim System Too Lean
P2096 – Post Catalyst Fuel Trim System Too Lean
P2096 is one of the many codes related to the engine’s air to fuel ratio. In the case of the P2096 OBD2 code, it indicates a lean condition downstream of the catalytic converter. Many different factors can cause this, from vacuum leaks to a damaged fuel pump.
The good news is, most of these components have their own trouble codes, which will also trigger when there is a problem. This makes your OBD2 scanner an essential tool in your arsenal when it comes to clearing a P2096 trouble code.
P2096 Code Definition (Generic): Post Catalyst Fuel Trim System Too Lean Bank 1
P2096 BMW Code Definition: Index 150
P2096 Dodge Code Definition: Downstream Fuel Trim System 1 Lean
P2096 Ford Code Definition: Post Catalyst Fuel Trim System Too Lean Bank 1
P2096 Jeep Code Definition: Downstream Fuel Trim System 1 Lean
P2096 Nissan Code Definition: Post Catalyst Fuel Trim System Bank 1

What Does P2096 Mean?
The right mix of air and fuel is crucial to maintaining your engine’s proper operation. And it’s a particular ratio: 14.7 parts air to each 1 part fuel. The oxygen sensors measure the air to fuel ratio in your exhaust stream to verify it’s in keeping with these specifications.
Most modern engines use two oxygen sensors.
- The one upstream of the catalytic converter is labeled oxygen sensor 1.
- A second sensor is positioned downstream of the catalytic converter and is referred to as sensor 2.
Usually, oxygen sensor 1 will report a higher fuel ratio than oxygen sensor 2.
When the air ratio to fuel is too high, it’s a lean condition. Depending on how lean the engine is running, this could reduce your engine performance and lead to misfires. Because of this, the powertrain control module (PCM) or engine control module (ECM) regularly monitors and adjusts the air to fuel ratio throughout the drive cycle.
Fuel trim is the term for these adjustments made by your engine’s computer. When the PCM or ECM detects that more fuel needs adding to the mix, it will trigger the P0505 and make the necessary adjustments.
There are two main reasons your vehicle could run lean. Either too much air is being introduced to the system or not enough fuel is being released. Identifying which is the case is critical for an accurate diagnosis.
What Are The Symptoms Of The P2096 Code?
Depending on the source of the P2096 trouble code, you may not experience any drivability symptoms. The code’s most common symptoms include:
- Activation of the check engine light
- Rough idle
- Knocking from the engine
- Engine misfires
- Difficulty accelerating
- Reduced gas mileage
- Reduced engine performance
- Catalytic converter glowing red
- Sulfur or rotting egg smell in the exhaust
What Are The Causes Of P2096?
- Vacuum or exhaust leaks
- Damaged gaskets and o-rings in the exhaust system
- Cracked or rusty exhaust manifold
- Clogged filter
- Clogged catalytic converter
- Faulty or damaged fuel pumps
- Damaged fuel pressure regulator
- Defective or damaged oxygen sensor or oxygen sensor circuit
- Defective or damaged mass airflow sensor
How Serious Is The P2096 Code?
The P2096 trouble code is of moderate severity. A vehicle registering this code can often continue to drive safely in the short term. However, misfires and other issues caused by an incorrect air to fuel ratio can lead to lasting engine damage. You should identify and repair the problem as soon as possible.
How To Diagnose And Fix The P2096 Code
Tools you’ll need:
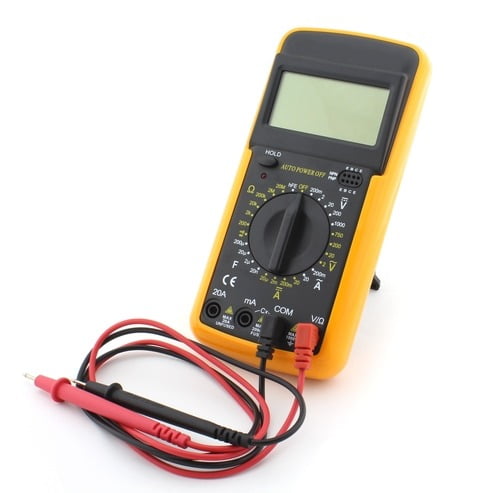
- Check for any technical service bulletins related to this code for your vehicle. Many makes and models have a history of issues with a specific component. Follow any vehicle-specific repair steps recommended before beginning with the general diagnosis below.
- Use an OBD2 scanner to check for other trouble codes. These can help to guide your diagnosis. Codes related to the catalytic converter, such as P0420, suggest this is the faulty component. You may also see codes related to the oxygen sensors or mass airflow sensor (especially P0100) if they are failing. Address these codes first, then clear the codes and test drive your vehicle to see if the P2096 code returns.
- While the car is running, look beneath it for the catalytic converter. If it is glowing red, this likely means it’s clogged. Try taking a hard drive, pushing your vehicle over 50 MPH (miles per hour) for at least 15 minutes at a time, then slowing down quickly. Stop and recheck your catalytic converter. If it’s still red, remove and clear it.
- Visually inspect the vacuum lines and exhaust system. Check for any cracks, damage, or visible leaks and ensure all the ends are secured. Also, keep your eye out for cracks in the gaskets, missing gaskets, or rust holes. Replace or tighten components as necessary.
- Inspect the electrical connectors for the oxygen sensors and mass airflow sensors. Also, check the wiring for damage or disconnects. Jeeps and Chryslers are especially known for using electrical connectors that wear easily, which is often the source of the P2096 code in these vehicles.
- Test the downstream oxygen sensor with a digital multimeter. If it’s faulty or shorted, replace it.
Common Mistakes To Avoid While Diagnosing The P2096 Code
Don’t forget to clear the codes before starting your diagnosis to verify that a problem exists. Since this code triggers concurrently with the ECM or PCM’s fuel trim adjustments, the lean condition may no longer be an issue in some cases.
Tips To Avoid P2096 In The Future
The connectors, wires, and hoses in your engine are all susceptible to damage if not cared for properly. You should check them as part of your regular maintenance routine. Ensure no hoses or wires are touching engine components that could cause damage. If you notice rust or corrosion damage, identify and fix the source of the moisture. These small steps can help extend the life of these components
Read more: P0505 Code: Meaning, Symptoms, Causes, Diagnostics, And Fixes
P0302 Code: Cylinder 2 Misfire Detected
P0302 Code: Cylinder 2 Misfire Detected
Engine misfires reduce your engine’s power and can lead to serious complications. The P0302 OBD2 code triggers when cylinder 2 experiences misfires. Knowing which cylinder is having problems is very beneficial when you’re preparing to make repairs.
The P0302 trouble code is potentially quite serious and warrants repair the moment it appears. Read on below to learn more about what this code means and how to diagnose it.
P0302 Code Definition
P0302 Code Definition (Generic): Cylinder 2 Misfire Detected
P0302 BMW: “Misfiring Of Cylinder 2, Damages TWC”
P0302 Dodge: Cylinder 2 Misfire Detected
P0302 Ford Focus: Cylinder #2 Misfire Detected
P0302 Honda: Cylinder 2 Misfire Detected
P0302 Jeep: Cylinder 2 Misfire
P0302 Nissan: Cylinder #2 Misfire Detected
P0302 Toyota: Cylinder 2 Misfire Detected
P0302 VW: Cylinder 2 Misfire
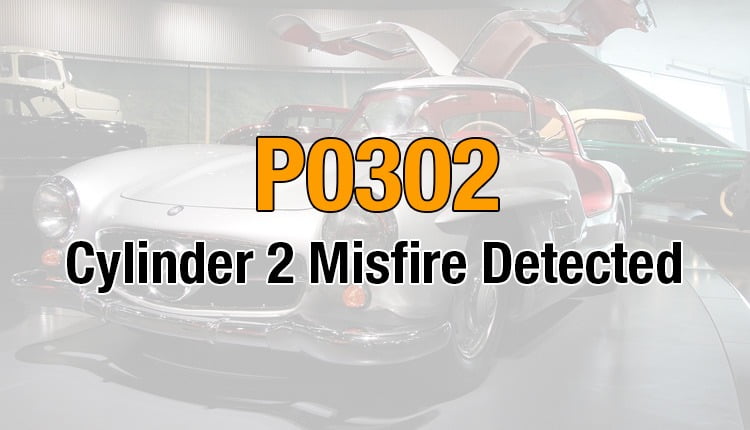
What Does P0302 Mean?
The P0302 OBD2 trouble code triggers when there’s a misfire in your engine. You’ll likely see it along with P0300, which is a more general misfire-related code. P0302 points you to the specific cylinder that’s misfiring: cylinder 2. If you’re not sure which cylinder this is, check your vehicle’s repair manual.
The cylinders are what give your engine its power. Each is topped with a spark plug that ignites the air/fuel mixture in your engine. When your vehicle’s running correctly, each cylinder fires in sequence, providing continuous power to the crankshaft.
If the crankshaft’s RPM changes by more than 2% because of a misfire in cylinder 2, the P0302 trouble code is triggered. You will likely notice significant driving issues if these misfires persist.
What Are The Symptoms Of The P0302 Code?
Engine misfires usually cause significant drivability issues. These symptoms often include:
- Activation of the check engine light. If the light is solid, the change in the crankshaft’s RPM is between 2% and 10%. A blinking or flashing check engine light indicates a change of more than 10%.
- Rough driving. Your car may especially jerk or hesitate when you accelerate. It may also shake or run roughly in other conditions, such as while idling.
- Difficulty starting or failure to start
- Stalling while idling
- Smell of fuel from the exhaust
- Reduced engine power
- Reduced fuel economy
What Are The Causes Of P0302?
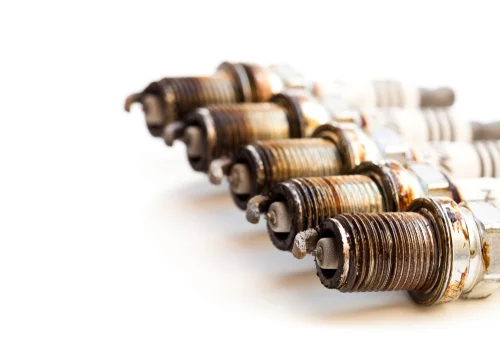
The most common causes of a cylinder 2 misfire are:
- Cylinder 2 spark plug is faulty or worn
- Damaged or faulty coils
- Damaged or faulty wires around the spark plugs
- Failed distributor
- Faulty fuel injector
There are other issues that can lead to misfires, including:
- Low fuel pressure
- Leaks in the vacuum system
- Clogged EGR valves, tubes, or ports
- Leaking head gasket
- Malfunction in the fuel system (fuel pump, fuel filter, etc.)
- Defective sensor (camshaft sensor, crankshaft sensor, MAF sensor, oxygen sensor, etc.)
- Fuel quality too low for the system
- Faulty distributor cap or rotor button (if applicable)

How Serious Is The P0302 Code?
The P0302 OBD2 code is very severe. You should not drive your car until you’ve identified the source of the problem. Misfires can cause long-term damage to your catalytic converter and ignition system. The erratic driving they cause also makes your vehicle unsafe to operate.
How To Diagnose The P0302 Code
Tools you’ll need:
- OBD2 scan tool
- Screwdriver and socket set
- Digital multimeter
- Fuel pressure gauge
- Compression tester
- Leakdown tester
- Scan your system for other codes using the OBD2 scan tool. If any other codes come up other than P0300 and other misfire-related codes, fix those first. The other code may be pointing you to the root cause of the misfire.
- Check the wires around the spark plugs to make sure none are loose or damaged. Be sure to also check for loose engine ground wires. Replace or tighten as necessary.
- If your vehicle has individual coil packs in the cylinders, swap the coil from cylinder 2 with the one in cylinder 4. Clear the codes and test drive your car. If the misfire moves to cylinder 4, replace the coil pack.
- Visually inspect the cylinder 4 spark plug with a new spark plug on-hand for comparison. If the plug looks dirty or has carbon build-up, remove and clean it.
- Test the resistance of the spark plug wires using a multimeter. The typical resistance is between 10,000 and 15,000 ohms. You can find the specific resistance in your vehicle’s manual. If the resistance is higher, replace the wire.
- Use a multimeter to test the ignition coils. Remove the coil and touch the leads of the multimeter to both the primary and secondary ignition circuits. The primary ignition circuit should read between .4 and 2 ohms, and the secondary between 6,000 and 10,000 ohms. A 0 reading on either indicates an internal short.
- Test your fuel system using a fuel pressure gauge. The correct readings for your engine should be listed in your manual.
- Use a multimeter to check the fuel injectors. First, unplug the injector from the engine, then use the multimeter leads to probe the terminals. Check your vehicle manual for the correct resistance.
- Perform a leak down test and an engine compression test. Mechanical problems can often lead to engine misfires. Common things to look for are a burned valve, a broken piston ring or valve spring, a worn valve guide, or skipped teeth on the timing chain.
Common Mistakes To Avoid While Diagnosing The P0302 Code
It’s easy to overlook small issues like a broken wire or a loose electrical connection. Be thorough in the inspection of your engine. If you’re lucky, you’ll only need to make a minor repair.
What Should You Do To Fix The Code P0302?
If you’re not experiencing any drivability issues, clear the trouble code. A single misfire may not be cause for significant concern. Take a test drive to see if the code comes back. If it does, continue with the steps below.
- Replace any damaged wires, connectors, or tabs found in your inspection.
- Replace any components that failed the diagnostic tests above.
- Clean the fuel injectors using a fuel injector cleaning kit. You can find these at any auto parts store.
- If the problem persists, test your engine’s sensors, including the crankshaft sensor, camshaft sensor, oxygen sensors, and MAF sensor. Replace or clean them as necessary.
Tips To Avoid P0302 In The Future
Replacing your ignition system’s minor components as part of your regular maintenance can prevent problems before they occur. Verify the recommended lifespan of your spark plugs, rotor, and distributor cap. Replace them before they’ve exceeded this lifespan.
Read more: P0325 Code: Meaning, Symptoms, Causes, Diagnostics, and Fixes
P0122 – Throttle/Pedal Position Sensor/Switch “A” Circuit Low
P0122 – Throttle/Pedal Position Sensor/Switch “A” Circuit Low
The P0122 code triggers when the “A” circuit on your vehicle’s throttle position sensor gives too low of an input voltage.
This sensor is used by your engine control module to track the position of the throttle.
When it fails, your engine will activate the failsafe mode.
This makes any TPS code very important to clear as soon as possible.
For as serious as this code can be, the repairs are often relatively inexpensive and easy to make, even for a home mechanic.
While you may need to replace the sensor, it may also only be a problem with the wiring around it.
Read on below to learn more about why this code triggers and how you can resolve the problem.
P0122 Code Definition
P0122 Code Definition (Generic): Throttle Position Sensor/Switch A Circuit Low Input
P0122 Dodge Code Definition: Throttle/Pedal Position Sensor/Switch “A” Circuit Low
P0122 Ford Code Definition: (TP) sensor circuit low input
P0122 Jeep Code Definition: Throttle/Pedal Position Sensor/Switch “A” Circuit Low
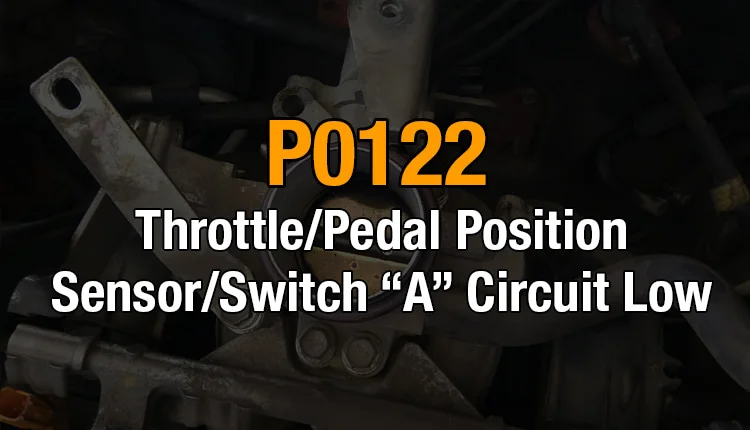
What Does P0122 Mean?
The throttle position sensor (TPS) monitors the movement of your throttle. When the throttle opens, it generates a voltage. The more open the throttle, the higher the voltage should be. This data is sent from the TPS to the engine control module (ECM), which monitors the overall engine performance.
The TPS has two circuits, labeled “A” and “B”. Each of these has a certain voltage range that it should report. When the “A” circuit output drops below the minimum voltage threshold, the P0122 trouble code is triggered.
Your exact TPS “A” circuit voltage range will vary depending on your vehicle’s manufacturer. Typically the lower limit should be around .2 volts, but you can find the specific voltage in your car’s manual. You’ll likely see this code appear alongside P0121 if the “B” circuit is operating correctly.
What Are The Symptoms Of The P0122 Code?
The symptoms of P0122 can vary. It will activate your engine’s failsafe mode in most vehicles, cutting power to the actuator and reducing how far the throttle can open. This will limit your maximum speed and overall engine performance.
Other common symptoms include:
- Activation of the check engine light
- Rough idling
- Low or high idling
- Stalls
- Reduced acceleration or failure to accelerate
- Engine surges
What Are The Causes Of P0122?
- Incorrectly mounted TPS
- Faulty or damaged wiring on the TPS
- Short in the TPS ground
- Faulty TPS
- Damaged or faulty ECM
How Serious Is The P0122 Code?
The P0122 trouble code is serious. When your vehicle’s failsafe mode activates, you will have a lot of trouble accelerating and may experience frequent stalls. This makes your car unsafe to drive, as well as raising the potential risk for internal engine damage. You should avoid driving your vehicle until you’ve cleared this code.
How To Diagnose And Fix The P0122 Code
While P0122 is a generic powertrain code, the exact fixes may vary depending on your car’s make, model, and manufacturer. Check your manual for any recommended repair steps. You may also find technical service bulletins that have been released for your vehicle, suggesting specific repairs. Follow these first before proceeding with the generic diagnosis below.
Tools You’ll Need:
Method:
- Scan your vehicle with an OBD2 scan tool to see if any other codes are present. You may see other trouble codes related to the TPS (P0120-P0124). Also, read the freeze frame data to check what conditions were present when the code activated.
- Check the throttle position sensor to make sure it’s installed correctly. Very often, the P0122 code triggers if you don’t rotate the TPS when you’re installing it. The inside tab of the TPS must contact the throttle body’s rotating pins to operate.
- Once you’ve correctly installed the TPS, verify all the connections are secure. Clear all codes using your OBD2 scanner and test drive your vehicle. Very often, this will fix the issue. If it doesn’t, continue with the diagnosis.
- Visually inspect all the wiring around the TPS. Replace any that are damaged or corroded. Also, check the connectors to make sure they’re not damaged.
- Compare the “A” and “B” circuit readings from your throttle position sensor. If they don’t match, check your vehicle manual for specific steps and tests to follow.
- Use a multimeter to check the voltage of the TPS. You can find the correct voltage in your vehicle’s manual. If it is too low, replace the TPS.
- Test the ground for the throttle position sensor using a digital multimeter; if the reading indicates an open or short, repair or replace it.
In some cases, the P0122 trouble code is an intermittent problem. You may find the code clears initially, only to recur a few days or weeks down the line. In these cases, drivers often don’t experience any symptoms aside from those associated with the failsafe mode. This typically indicates a wiring issue. Re-check all the wiring around the TPS. If you can’t identify the specific problem, you may want to replace the entire harness.
Common Mistakes To Avoid While Diagnosing The P0122 Code
Many inexperienced mechanics simply replace the throttle position sensor before they’ve verified this is the problem. Make sure you thoroughly inspect all the wires and connectors around the sensor before you replace any components. This will ensure you fix the entire problem.
Tips To Avoid P0122 In The Future
This code most commonly triggers after the throttle position sensor is replaced or adjusted due to incorrect installation. Make sure you’re careful to install any new components correctly. This includes checking that all wires and connections are secure. The wires of the throttle position sensor can be damaged by rubbing against the wiring harness. Double-check the placement of the wires every time you install, replace, or adjust the sensor. Damaged wires are one of the main causes of TPS trouble codes, including P0122.
Read more: P0017 Code: Meaning, Symptoms, Causes, Diagnostics, and Fixes
P0171: System Too Lean (Bank 1)
P0171: System Too Lean (Bank 1)
The P0171 code generally tells you too much air is getting into your engine. While this fault code isn’t severe on its own, it can lead to further damage that is more serious.
Let’s take a quick look at a brief of the P0171 code below.
- P0171 Definition: System Too Lean (Bank 1)
- Code type: Generic – P0171 indicates the same problem whether you’re having a Chevy, Ford, or Toyota, etc.
- Can I drive with the P0171 code? Yes, but you should not drive your vehicle for a long time.
- Is it easy to fix? Intermediate level.
- Cost: $10 – $200 (common)
To help you fully understand the P0171 code and find the right fix, I divided the article into 4 parts.
Click on the images below to jump right into it!
What Does The P0171 Code Mean?
Diagnostic trouble code (DTC) P0171 stands for “System Too Lean” (Bank 1). The air-fuel mixture with too much air and little gasoline could trigger this trouble code.
Lean Mixture = Too much air, not enough fuel
Further Explanation
In normal conditions, the combustion engine operates effectively with an air-fuel ratio of 14.7:1. Specifically, every 14.7 grams of air combines with 1 gram of fuel.
In case Bank 1 receives too much air or/and too little fuel, the engine would be running lean. A vacuum leak or faulty fuel system can be the problem for this.
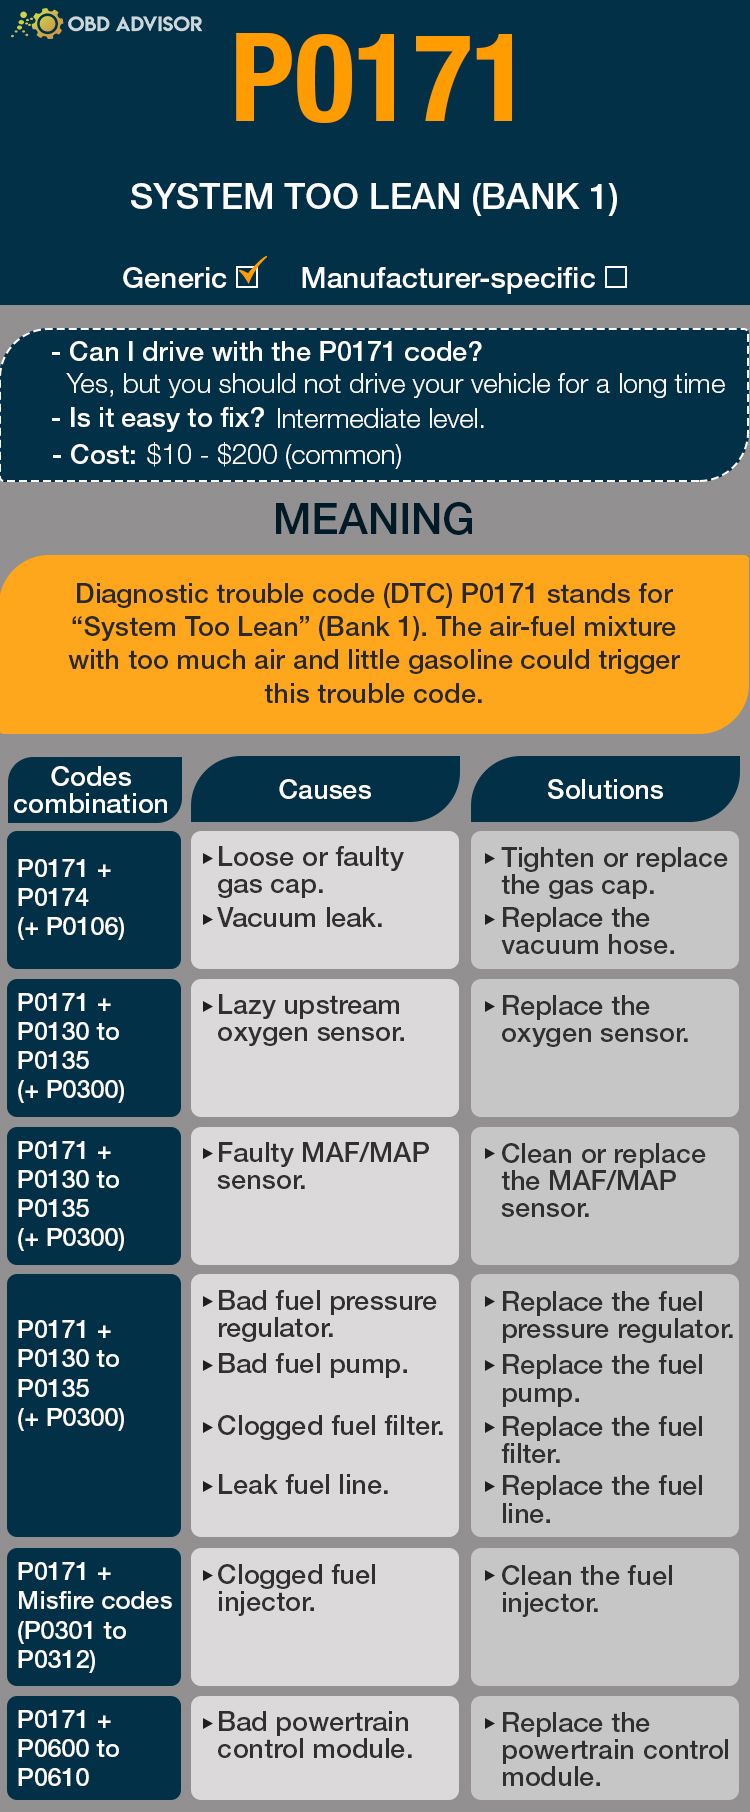
P0171 Causes Identification: Quick View
Usually, your scan tool throws P0171 with other codes.
This could be a bit challenging to determine the cause. So, I compiled this table to make it easier for you to diagnose the problems and fix them.
| Codes Combination | Causes | Solutions |
|---|---|---|
| P0171 + P0174 (+P0106) | Loose or faulty gas cap. Vacuum leak. | Tighten or replace the gas cap. Fix the vacuum leak. |
| P0171 + P0130 to P0135 (+P0300) | Lazy upstream oxygen sensor. | Replace the oxygen sensor. |
| P0171 + P0100 to P0104 | Faulty MAF/MAP sensor. | Clean or replace the MAF/MAP sensor. |
| P0171 + P0174 (+P0087/P0089) | Bad fuel pressure regulator. Bad fuel pump. Clogged fuel filter. Leak fuel line. | Replace the fuel pressure regulator. Replace the fuel pump. Replace the fuel filter. Replace the fuel line. |
| P0171 + Misfire codes (P0301 to P0312) | Clogged fuel injector. | Clean the fuel injector. |
| P0171 + P0600 to P0610 | Bad powertrain control module. | Replace the powertrain control module. |
Note: The causes for each code combination are the most common ones. There can be some uncommon issues hidden under those codes
P0171: Causes, Symptoms, and How To Fix
Did you find your problem? To further ensure that you actually find the right one, you need to match your car’s symptoms with the cause.
If you don’t want to be a part changer, read on and understand your problem from the inside!
Cause #1: Loose Or Faulty Gas Cap
Checking the gas cap is the very first thing you need to do.
A loose or faulty gas cap will mess up the fuel system, leading to check engine light on and the lean conditions codes popping up.
Make sure the gas cap is not the problem, and you can move on to further diagnosis.
Cause #2: Vacuum Leak
A leak in the air intake system allows air to enter the combustion chamber without the car computer knowing that.
As a result, the amount of fuel that needs to be injected into the engine could be miscalculated by the PCM.
This leads to too much air in the air-fuel mixture.
Try to find and fix it with this video.
Symptoms of vacuum leak:
- P0171 arises with P0174 (sometimes with P0106)
- Hissing sound
- Check Engine Light on
- Rough idle
- Car stalling
- Long-term fuel trim (LTFT) > 10% (check-in “Live data” category)
A smoke test to locate the leak is the first thing you need to do.
Cracked hoses or loosened clamps are usually the reasons for vacuum leaks. In those cases, replacing the hose or tightening the clamp should fix the problem.
Cause #3: Lazy Upstream Oxygen Sensor
The upstream oxygen sensor helps adjust the air and fuel ratio in the engine to its PCM.
The oxygen sensor may be “lazy” because it’s old or dirty, leading to an incorrect air-fuel ratio.
Symptoms of a bad upstream O2 sensor:
- A combination between P0171 and faulty oxygen sensor codes (P0130 to P0135) or in some rare cases, P0300 appears
- Check engine light on
- Bad fuel economy
To make sure your upstream O2 sensor is bad, check the voltage chart on your bank 1 upstream sensor (using the “Live Data” function in your scan tool).
If the value is constantly higher than 0.45v, that’s the wrong data telling the PCM to reduce the fuel (while it’s not supposed to).
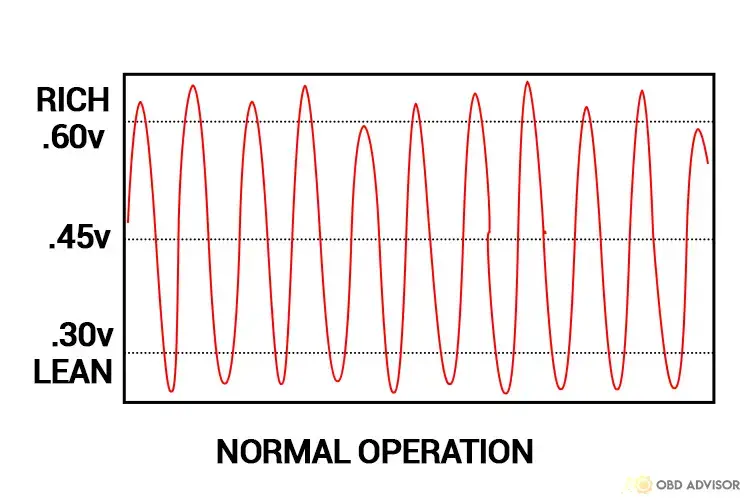
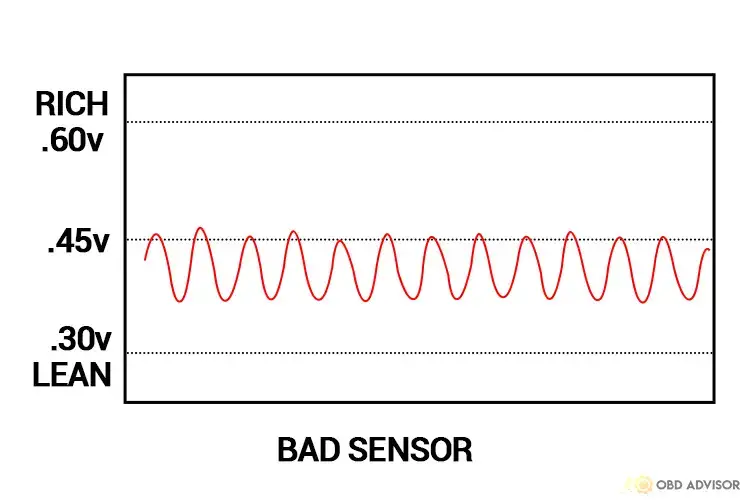
In this case, replace the O2 sensor.
Here’s how you can do it.
Cause #4: Faulty MAF/MAP Sensor
The PCM uses the Mass Airflow (MAF)/ Manifold Absolute Pressure (MAP) data to adjust the air-fuel ratio.
Therefore, when the MAF/ MAP sensor fails, the ratio is off. Then, the combination between P0171 and P0100 to P0104 will appear.
Symptoms of a faulty MAF/ MAP sensor:
- P0171 and faulty MAF/ MAP sensor codes (P0100 to P0104) activate
- Check engine light on
- Engine stalling, rough idle, misfires
- Bad fuel economy
Clean or replace your MAF/ MAP sensor when you find out it has the issue.
Installing the new MAF/ MAP sensor is straightforward so you can do it by yourself.
Watch this video to know how to replace the MAF sensor.
Cause #5: Fuel Pressure Too Low
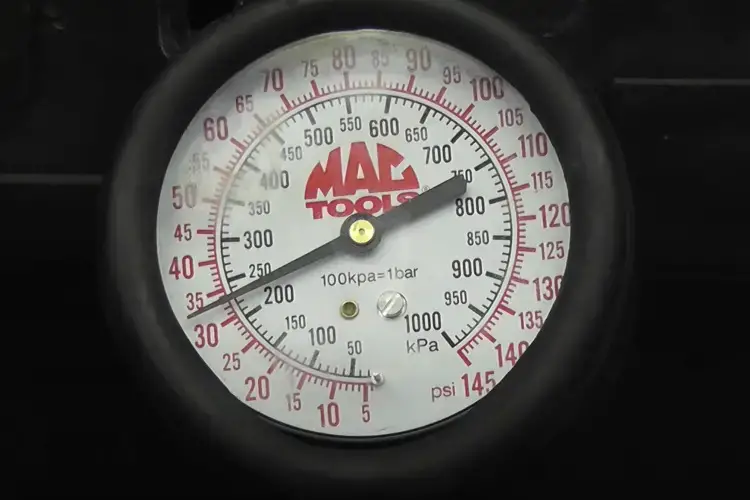
The fuel requires a certain amount of pressure to get into the engine (55psi as common). When the fuel pressure gets low, less fuel is injected into the combustion chamber.
This problem always leads to lean conditions in both bank 1 and bank 2. Therefore, you will get P0171 and P0174 at the same time.
There are several reasons for low fuel pressure:
- Bad fuel pump: once the pump is defective, it can not create enough pressure for the whole fuel system.
- Clogged fuel filter: limit fuel flow in the system
- Bad fuel pressure regulator (FPR): if this component goes faulty, the fuel goes back to the fuel tank without any obstacles, leading to the fuel pressure decreasing.
- Leak fuel line: if there is a fuel leak in the fuel line, you’ll start smelling a strong fuel odor, or your car may experience a stall because of a fuel shortage.
Symptoms of bad fuel pressure:
- A combination between P0171 and P0174 (sometimes P0087/P0089) appears
- Hard starting
- Poor performance
- Engine stalling
- Poor throttle response
- Fuel smell (in case of external leak fuel line)
Several things could be causing the low fuel pressure. So you have to diagnose first to detect which is the cause of this problem. Then find the solution for each cause.
Here are the solutions to fix the poor fuel pressure: replace the fuel pressure regulator, the fuel pump, the fuel filter, or the fuel line.
Cause #6: Clogged Fuel Injector
If your fuel injectors are clogged, they will prevent fuel from flowing through them. Then, the amount of fuel in the engine will reduce.
You need to maintain the fuel injectors regularly. If not, the fuel injectors can become clogged, resulting in the P0171 code being triggered with misfire codes (P0301 to P0312).
Therefore, you need to look out for signs of a bad fuel injector and fix it by cleaning the fuel injector.
Symptoms of clogged fuel injector:
- P0171 combines with misfire codes (P0301 to P0312)
- Misfires
- Rough idle and engine stalls
- Bad fuel economy
Here’s the way to clean the clogged fuel injector.
Cause #7: Bad Powertrain Control Module
The PCM has the function of calculating the exact amount of fuel added to the air-fuel ratio when air enters the engine. The engine computer uses data from different engine sensors to adjust the air-fuel ratio.
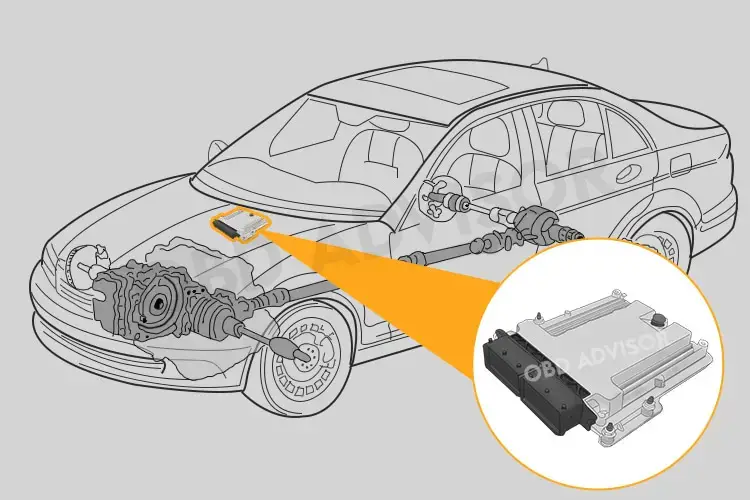
So when the PCM fails, it won’t be able to calculate the ratio correctly, leading to the P0171 code being activated with P0600 to P0610.
Symptoms of a bad PCM:
- The combination between P0171 and P0600 to P0610 appears
- Check engine light on
- Car won’t start
- Bad fuel economy
- Emissions test failure
- Engine stalls
The faulty PCM is a rare situation causing the P0171. Fixing the PCM is expensive, complicated, and we don’t recommend replacing it yourself.
How Much Does It Cost To Fix The Code P0171?
The common fixing cost of the P0171 code can be $10 or $200, based on the components that need to be replaced and the labor cost in case you cannot DIY.
A vacuum leak is one of the common causes of the P0171, and the cost to replace it is $10 – $200.
The cost to replace an oxygen sensor is around $20 – $130 when changing it yourself or $70 – $250, including the component and labor costs.
The estimated repair cost of P0171
| Solutions | Estimated Cost |
|---|---|
| Replace the gas cap | DIY: $10 – $20 Repair shop: $25 – $40 |
| Fix the vacuum leak | DIY: $10 – $200 Repair shop: $150 – $1,000 |
| Replace the oxygen sensor | DIY: $20 – $130 Repair shop: $70 – $250 |
| Clean the MAF/MAP sensor | DIY: $15 Repair shop: $50 – $100 |
| Replace the MAF/MAP sensor | DIY: $30 – $300 Repair shop: $80 – $380 |
| Replace the fuel pressure regulator | DIY: $50 – $200 Repair shop: $150 – $350 |
| Replace the fuel pump | DIY: $95 – $850 Repair shop: $220 – $1,100 |
| Replace the fuel filter | DIY: $10 – $70 Repair shop: $50 – $175 |
| Replace the fuel line | DIY: $10 – $150 Repair shop: $200 – $500 |
| Clean the fuel injector | DIY: $10 Repair shop: $60 to $100 |
| Replace the PCM | DIY: not recommend Repair shop: $1,000 – $3,000 |
Note: The data in this table is collected in June 2022. The price depends on many factors, such as your car’s make and year, mechanic’s fee, etc.
You Ask, I Answer
If the P0171 code appears, don’t ignore it. Because there would be some severe damage that your vehicle is likely to incur, including reduced gas mileage, loss of performance, or struggling start.
After reading this article, I hope it helps you to save some money from mechanics.
Any other questions about P0171? Don’t hesitate to leave a comment below, I’ll answer them all.
If you have had the code and fixed it before, share your story and you’ll help lots of folks having this problem.
See ya!
Read more: The 9 Best OBD2 Scanners for 2024: The Only Review You Need
P0131 – O2 Sensor Circuit Low Voltage
P0131 – O2 Sensor Circuit Low Voltage
The P0131 code triggers when the voltage output of your upstream bank 1 oxygen sensor is too low. Your engine computer uses this sensor to control the air to fuel ratio. Since maintaining the correct rate is key to proper engine operation, you should note when this trouble code activates.
Fixing the P0131 OBD2 code may require replacing the oxygen sensor, but damaged wires and hoses can also cause it. A thorough diagnosis is essential to find and address the true root of the problem. Read on below for more details about this code and what to do if it’s active.
P0131 Code Definition (Generic)
Oxygen O2 sensor circuit low voltage (Bank 1, Sensor 1)
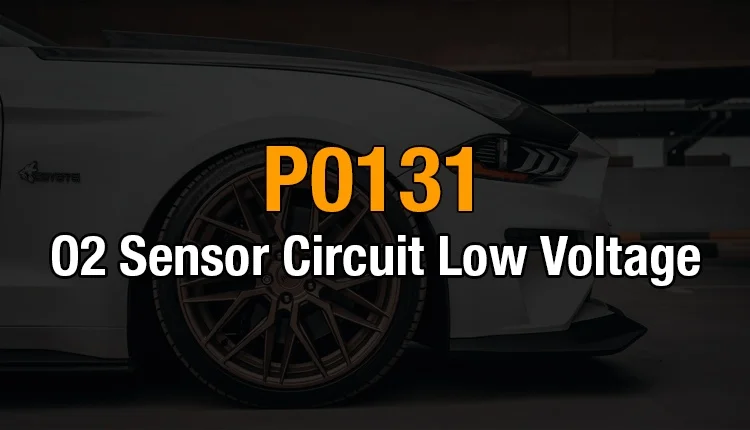
What Does P0131 Mean?
The oxygen sensors in your engine are how the power control module (PCM) or engine control module (ECM) monitors the air-to-fuel ratio in your exhaust. Comparing this data with the air outside the engine can determine when to inject more fuel or open the system to allow more air to enter.
There are two oxygen sensors in the vehicle. The upstream oxygen sensor, called sensor 1, is positioned before the catalytic converter. It is different from the downstream oxygen sensor, called sensor 2, which measures the air coming out of the catalytic converter.
The P0131 trouble code triggers when the ECM or PCM detects a low voltage from the upstream oxygen sensor. Usually, the voltage must be below the threshold for a certain length of time before the code will trigger. Typically this is two minutes, but it can vary depending on your vehicle.
While P0131 is a generic trouble code, applying to all OBD2 vehicles, the specific fixes can vary depending on your make and model. It’s always a good idea to consult your manual and check for any technical service bulletins before beginning your diagnosis and repair.
Other diagnostic trouble codes related to the oxygen sensors include P0136 and P0137. These codes also warn of a low oxygen sensor voltage, although for a different sensor.
What Are The Symptoms Of The P0131 Code?
In some cases, there are no drivability issues with the P0131 trouble code. This case is relatively rare, however. Typically, you’ll experience one or more of the following symptoms:
- Activation of the check engine light
- Smoke in the exhaust
- Bad smell from the exhaust
- Rough running engine
- Reduced fuel economy
- Stalling engine
What Are The Causes Of P0131?
- Faulty or damaged oxygen sensor heating circuit
- Defective oxygen sensor
- Faulty or damaged wiring around the oxygen sensor
- Shorts, open, or high resistance in the oxygen sensor signal circuit
- Leaks in the vacuum system
- Fuel pressure too low or too high
- ECM or PCM software requires an update
- Faulty ECM or PCM (not as common)
How Serious Is The P0131 Code?
While the severity of the P0131 code can vary, it can be of high severity. Therefore, you should stop driving your vehicle as soon as possible and identify the root of the problem. Failure to do so could lead to more serious engine damage.
How To Diagnose And Fix The P0131 Code?
Tools you’ll need:
- Use an OBD2 scan tool to check for other trouble codes, then clear codes and test drive your vehicle to see if the code recurs. In some cases, P0131 is an intermittent problem. Especially if you haven’t experienced any drivability symptoms, the code may clear without issue.
- Read the freeze frame data for oxygen sensor 1. Pay attention to the miles per hour (MPH), revolutions per minute (RPM), and load readings. Also, read the engine temperature sensor readings and the oxygen sensor 2 readings to look for any inconsistencies.
- Visually inspect the wiring around the oxygen sensor. Replace any wires that are damaged or corroded, and check the connectors for damage, as well. Ensure all the wires are firmly connected and clear of any other engine components that could cause future damage.
- Inspect the wiring harness. Perform a wiggle test to make sure it’s not chafing or grounding.
- Check the vacuum hoses around the bank 1 upstream oxygen sensor for leaks. Make sure to feel along with hidden areas of the hoses for damaged or weak spots you can’t see. Pay close attention to the ends of the hoses, as well, making sure there’s no fraying or damage and that all hoses are secured tightly.
- Use a digital multimeter to check the voltage output of oxygen sensor 1 on bank 1. Your vehicle’s manual can tell you what the voltage reading should be. If it’s giving a null or infinite reading, you likely have an open or short in the oxygen sensor. Any variance from the designated range is a sign your oxygen sensor probably needs to be replaced.
- Check the signal wire at the PCM or ECM using the digital multimeter. Check for shorts and open circuits, and replace the connector or wire as necessary.
- If the code still doesn’t clear, you may need a software update or have a more significant electrical issue. In either case, your best option is to take your vehicle to a professional mechanic for further diagnosis.
Common Mistakes To Avoid While Diagnosing The P0131 Code
Many people replace the oxygen sensor before they search for other potential causes for the trouble code. While a defective oxygen sensor may be the issue, make sure you check for wiring issues and vacuum leaks, as well. These are equally likely to trigger the P0131 trouble code.
Tips To Avoid P0131 In The Future
Two potential causes of the P0131 trouble code are damaged or loosened wires and vacuum leaks in the exhaust system. You can avoid both through preventative maintenance. Consider applying an anti-corrosive treatment to your engine. Also, be careful when installing hoses and wires. Make sure they’re firmly connected and that they’re not rubbing engine components that could damage them.
Read more: P0135 Code: Meaning, Symptoms, Causes, Diagnostics, and Fixes
P0137: O2 Sensor Circuit Low Voltage (Bank 1 Sensor 2)
P0137: O2 Sensor Circuit Low Voltage (Bank 1 Sensor 2)
Concerned about the P0137 code popping up and not sure what it means?
Let’s give you a quick rundown of what to expect.
- P0137 Definition: Oxygen Sensor Circuit Low Voltage (Bank 1, Sensor 2.)
- Code type: Generic – P0137 indicates the same problem whether you’re having a Chevy, Toyota, or Honda, etc.
- Can I drive with the P0137 code? Yes, in the short run. However, extended driving periods may cause engine damage.
- Easy to fix? Beginner to intermediate level.
- Cost: $20 – $95 (common.)
In this article, I will go over what the code means, possible causes, solutions, and repair costs.
Let’s get started!
What Does The P0137 Code Mean?
The P0137 is triggered when the downstream O2 sensor (bank 1) voltage is lower than 0.21V for longer than 2 minutes. In many cases, it can be because your downstream O2 sensor is faulty.
Downstream oxygen sensors (located after the catalytic converter) monitor the conditions of the catalytic converter.
The more air in the exhaust gas (after passing the cats), the lower the downstream O2 sensor’s output voltage.
Because the catalytic converter already processed the exhaust gas, the oxygen level is stable. Therefore, a normal working downstream O2 sensor stays around 0.45 volts.
For some reason, the sensor may detect an abnormally high percentage of oxygen in the exhaust gas (or it thinks so.) This leads to a drop in the sensor’s voltage. And when it’s below 0.21v, P0137 is set.
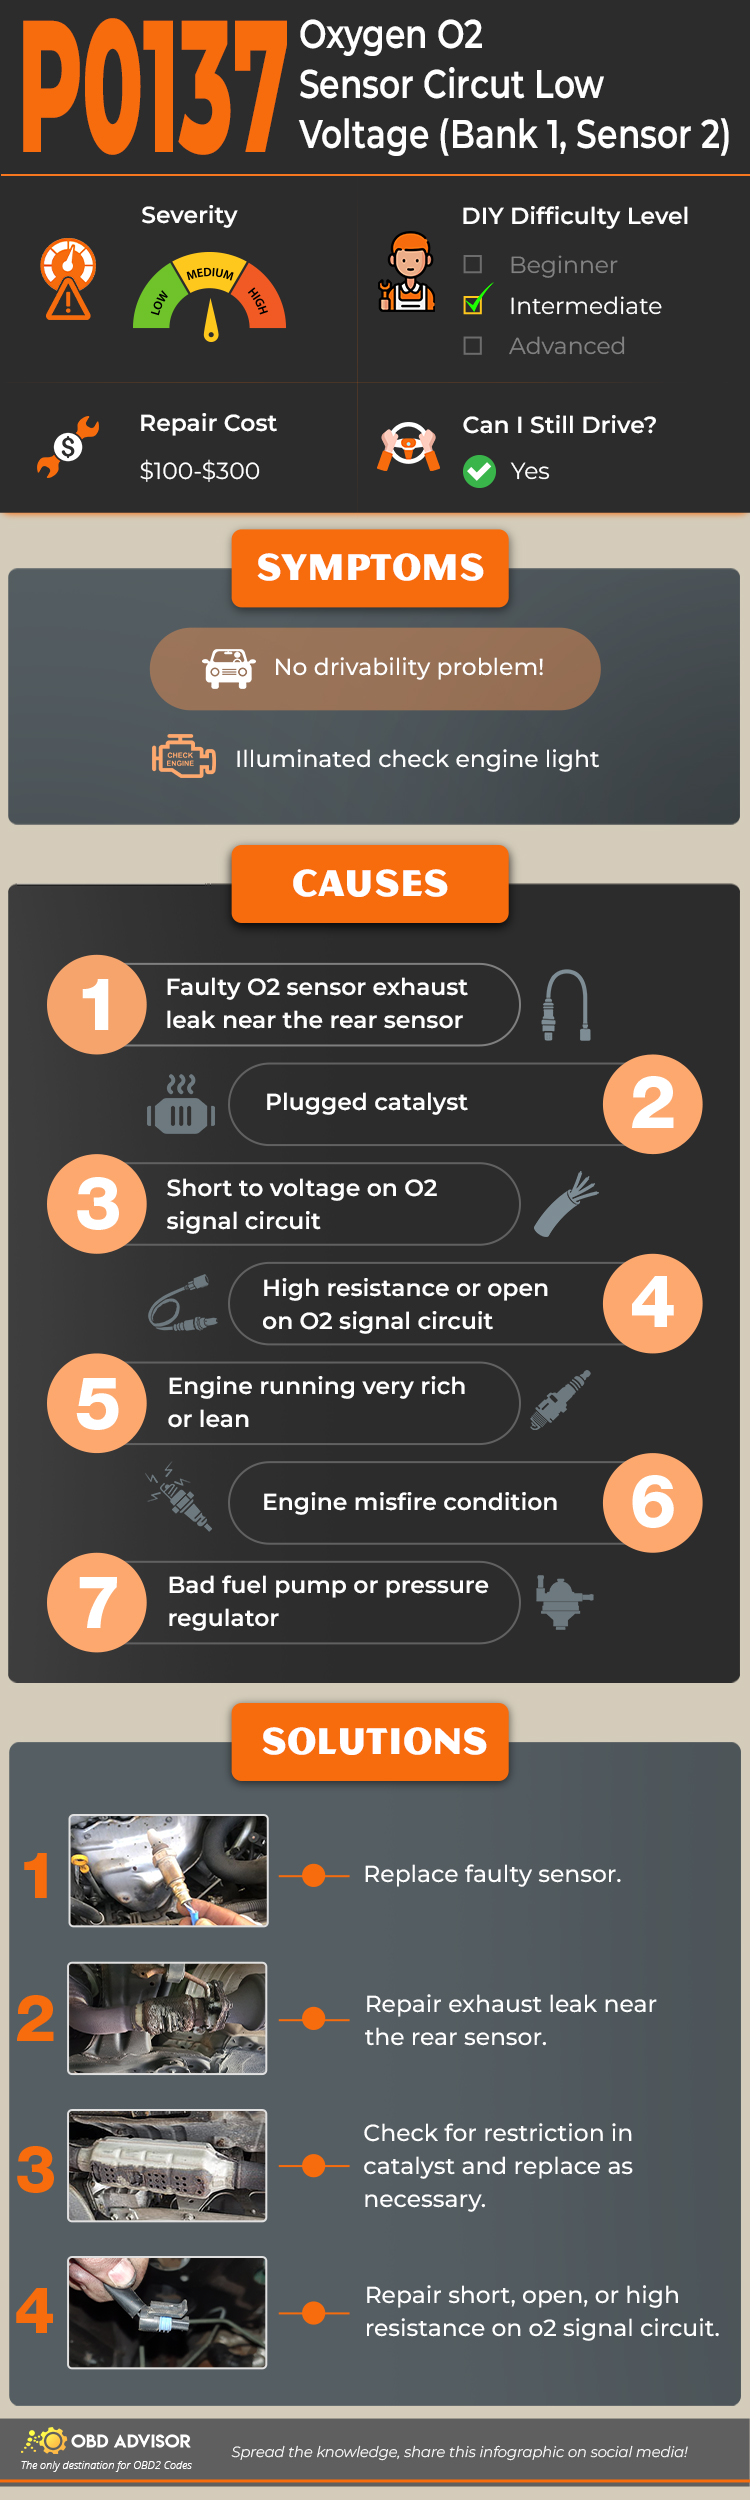
P0137 Causes Identification: Quick View
The most common cause of P0137 is a faulty downstream oxygen sensor. However, there may be other reasons.
To make the information more digestible, here is a table with the code combinations, their causes, and solutions.
| Codes combinations | Causes | Solution |
|---|---|---|
| P0137 only (no symptom); P0137 + P0420 | Bad downstream O2 sensor Faulty O2 sensor’s circuit | Replace downstream O2 sensor Fix the short or open circuit |
| P0137 + noisy exhaust | Exhaust leak near downstream O2 sensor | Apply epoxy bond (small leak)/welding (large leak) |
| P0137 + P0141 | Bad downstream O2 sensor | Replace downstream O2 sensor |
| P0137 + P0171; P0137 + P0157 | Vacuum leak Lazy upstream O2 sensor | Smoke test & Seal vacuum leak Replace upstream O2 sensor |
| P0137 + P0138 | Bad PCM | Replace PCM |
Note: The causes for each code combination are the most common ones. There can be some uncommon issues hidden under those codes.
P0137 Causes, Symptoms, and How to fix
Depending on the underlying problem, there may be different symptoms to look out for.
However, there is one common symptom that remains the same, and that is an illuminated check engine light.
Let’s explore the different causes of the P0137 error code and any unique symptoms you may experience.
Causes #1: Bad Downstream O2 Sensor
A faulty downstream O2 sensor would report false info to the PCM, which would think there is something wrong with the catalytic converter.
If this is the case, P0137 may appear alone or come with other codes like P0420, and P0141.
A bad downstream O2 sensor does not result in any symptoms with your car’s performance. This is because downstream sensors are not used to adjust the air-fuel ratio (like upstream.)
Check the O2 sensor with a multimeter. If this fails, replace it.
Causes #2: Short Or Open In Downstream O2 Sensor Wiring
Sometimes, the problem is not the downstream sensor itself.
After making sure the O2 sensor is ok, check its wiring harness for any short, high resistant, or open.
Again, this cause will not lead to any symptoms.
Causes #3: Exhaust Leak Near Downstream O2 Sensor
When the exhaust gas is pushed out of the system, it forms a pulse. The front end of the pulse has a high pressure while the negative pressure is behind.
When there is a leak, some of the gas in the front end of the pulse escapes. However, the low pressure at the end of the pulse sucks the air in.
The changes in the exhaust gases cause an inaccurate reading on the downstream O2 sensor.
The most obvious symptom of an exhaust leak is the buzz or hum sounds when the engine is running. You can rev the car intermittently to hear the sound more clearly.
After finding the leak, you would need to repair it by applying epoxy to seal a small leak or performing welding for a larger one.
Causes #4: Lean Condition (Bank 1)
If your engine is running lean (too much air), the exhaust gas will contain more oxygen than usual. When the catalytic can not handle all of this, some of the oxygen is still left in the exhaust gas after passing the cats.
As mentioned above, an abnormally high percentage of air will decrease downstream O2 sensors voltage, triggering P0137.
There are many reasons for the lean condition. However, vacuum leaks and lazy upstream O2 sensors (in this case, the bank 1 sensor) are the most common causes.
Vacuum leak symptoms:
- Hissing sounds
- Rough idle
- Often stalls when stopping
- Long-term fuel trim (ltft1)>10%
Lazy upstream O2 sensors symptom:
- The sensor’s output voltage slightly fluctuates above .45v (below image)
First, conduct a smoke test to make sure there is no leak in the intake system.
If there are no leaks, then the problem could be in the upstream O2 sensor. Replacing it with a new one should fix the issue.
Causes #5: Bad PCM (Rare)
Bad PCM is a rare case and it should be your last conclusion.
If your car throws a combination of P0137 and the P0138 (low voltage and high voltage on one downstream O2 sensor,) this can be the cause.
Depending on the make and model, the replacement costs of a PCM may vary. But it will not be cheap!
I suggest heading to a local mechanic for replacing the PCM as it’s a complicated process.
How Much Does It Cost To Fix The Code P0137?
The most common solution to the P0137 error code is replacing the downstream O2 sensor, which can cost between $20 and $95.
The table below will help break down repair costs (DIY and mechanic) according to the different solutions.
The Estimated Repair Cost Of P0137
| Solutions | Repair cost |
|---|---|
| Replace O2 sensor | DIY: $20 – $95 Mechanic: $100 – $450 |
| Repair O2 sensor circuit | DIY: $10 – $20 Mechanic: $130 – $140 |
| Repair exhaust leak | DIY: $20- $50 Mechanic: $130 – $190 |
| Replace PCM | DIY: Not recommended Mechanic: $1,000 to $3,000 |
Note: The data in this table is collected in May 2022. The actual price depends on many factors, such as your car’s make and year, mechanic’s rate, time, market price, etc.
You ask, I answer
Thank you for sticking with me to the end.
Although a P0137 fault code is not dangerous to drive, having the annoying CEL disappear with a few bucks is a no-brainer.
If you are still feeling confused or have any questions about P0137 or any other related codes, please do not hesitate to comment below. I’ll try my best to help you out.
See ya!
Read more: The 9 Best OBD2 Scanners for 2024: The Only Review You Need
P0013 – “B” Camshaft Position – Actuator Circuit/Open
P0013 – “B” Camshaft Position – Actuator Circuit/Open
The P0013 code relates to your engine’s variable valve timing (VVT) system, a crucial system found in all modern vehicles. Its primary purpose is to alter your camshaft’s speed to give you the right power your engine needs.
Your engine won’t always manifest symptoms when something goes wrong in the VVT system, but this doesn’t mean it can be taken lightly. Issues with your engine’s timing can lead to potentially significant engine damage, including damage to your ECM.
Luckily, the fix for P0013 is often a relatively easy and affordable one. Something as simple as a loose wire can be the culprit in many cases. It’s also one of the codes you’re likely to see if you’ve neglected your regular oil change.
Isolating the problem is often a relatively quick and easy process if you know the right steps to follow. Read the information below to learn more about this code and how you can fix it.
P0013 Code Definition
P0013 Code Definition (Generic): “B” Camshaft Position Actuator Circuit (Bank 1)
What Does P0013 Mean?
Modern engines don’t run at the same speed all the time. Instead, they use a variable timing system, adjusting the valve timing based on the sensors’ signals. This feature makes the engine’s operation more efficient, improves performance, and gives you better fuel efficiency.
When the engine control module (ECM) needs to adjust the camshaft’s timing, it does so through the camshaft position actuator. If the RPM (revolutions per minute) of the camshaft doesn’t change in response, the P0013 trouble code is activated.
Specifically, two main conditions will trigger the P0013 code. The first is when the ECM reduces the camshaft’s speed, but the oil control valve (OCV) output remains 100%. The second is when the ECM increases the camshaft’s speed, but the OCV output is 2% or less.
There are two circuits connected to the camshaft position (CMP) actuator. The high control circuit sends a 12-volt signal to the actuator, while the low reference circuit serves as a return circuit. Issues with either of these can lead to the activation of the P0013 code, as can wiring problems elsewhere in your timing system.
While P0013 is a generic code, it is only found in vehicles that use variable valve timing, including most vehicles made in the past decade, regardless of manufacturer. Exactly where you find the CMP actuator will vary depending on your engine, but the P0013 trouble code will always point you to bank 1. This is the side of the engine that contains cylinder 1.
What Are The Symptoms Of The P0013 Code?
The P0013 trouble code symptoms vary depending on what position the camshaft is in when the problem starts. Potential symptoms include:
- Activation of the check engine light
- Hard starts
- Reduced gas mileage
- Rough running
- Reduced engine performance
- Engine hesitation and stalls
What Are The Causes Of P0013?
- Faulty VVT actuator
- Damaged or loose wires around the VVT system
- Open or short in the VVT system
- Faulty oil control valve
- Faulty or damaged ECM
How Serious Is The P0013 Code?
The P0013 code is of moderate severity. Driving with this trouble code active for an extended time can cause damage to your ECM. Even if you’re not experiencing significant drivability issues, you should repair the issue as soon as possible to avoid further problems.
How To Diagnose And Fix The P0013 Code
While this is a generic powertrain code, the specific fix may differ depending on your car. Check for any specific repair steps in your vehicle’s manual before beginning the generic diagnosis and repair steps below.
Tools You’ll Need:
Method:
- Scan your vehicle using an OBD2 scanner. Check the freeze frame data and the conditions present when the code was set. Also, check if any other trouble codes are present. You may see other powertrain-related codes, such as P0011, P0012, or P0020-P0022.
- Visually inspect all the wires around the VVT system. Replace any that are damaged or broken due to corrosion, and ensure that all wires are securely connected.
- Check the level and quality of your oil. Make sure the oil level is correct. Also, check the viscosity and quality of the oil. If it’s old or dirty, drain the oil, replace your oil filter, and refill your system with new oil.
- Clear the codes and test drive your vehicle, replicating the conditions under which the code was first set. If the code comes back, continue with your diagnosis.
- If the OCV is stuck open, this is often the result of an internal short. You can find out if this is the case using a digital multimeter. Measure the resistance of the terminals of the camshaft oil control valve. It should measure somewhere between 6.9 and 7.9 ohms. Your vehicle’s manual will tell you the specific reading. If they don’t match, replace the OCV.
- Remove the connectors on the oil control valve. Use a multimeter to test the wires. If you get a null or infinite reading, there is an open circuit or a short. Replace the wire.
- If the code still doesn’t clear, you may have a more serious electrical problem. Take your vehicle to a mechanic for further diagnosis.
Common Mistakes To Avoid While Diagnosing The P0013 Code
Many mechanics fail to do a visual inspection of the VVT system, assuming the problem is with the valve or circuit. Make sure you conduct a thorough diagnosis before replacing any components. The issue might be a simple and affordable one to repair.
Tips To Avoid P0013 In The Future
Preventative maintenance is the best way to stave off the P0013 trouble code. Make sure your oil is always filled to the proper level and changed when needed. Visually inspecting the wires of your system for frays and loose connections can also prevent P0013 and other trouble codes related to the variable valve timing system.
P0172: System Too Rich (Bank 1)
P0172: System Too Rich (Bank 1)
Was the P0172 code activated on your scan tool? Do you wonder whether it is dangerous to keep driving?
Read on to have a first evaluation of your situation!
- P0172 Definition: System Too Rich (Bank 1)
- Code Type: Generic – P0172 indicates the same problem whether you’re having a Chevy, Honda, or Toyota, etc.
- Can I drive with the P0172 code? Yes, but you should drive for a short period. Extending driving will cause more severe damage to your engine.
- Easy to fix? Beginner-Intermediate level.
- Cost: $30 – $280 (common)
Now, you know this code is not that dangerous.
If you don’t want to waste your money, let’s dive into 7 causes that might trigger the P0172 code and the corresponding solutions.
What Does The P0172 Code Mean?
P0172 is an OBD-II generic code triggered when the engine control unit (ECU) detects too much gasoline and not enough oxygen in the air-fuel mixture.
Further Explanation
The ECU monitors the engine’s air-fuel ratio through mass airflow sensor (MAF), oxygen sensors, and manifold absolute pressure (MAP).
The ideal air-fuel mixture (air-fuel ratio) is always following the rate of 14.7:1; 14.7 grams of air are required for every 1 gram of fuel. This specific ratio was chosen because of its highest power output but lowest fuel consumption rate.
When the air-fuel ratio goes below 14.7, the amount of fuel in the combustion chamber is much more than the oxygen.
This is called a “rich” mixture, and then the ECU triggers the P0172 code.
P0172 Causes Identification: Quick View
When your scanner tool displays the P0172 code, sometimes the screen will show another code following P0172.
Here is a detailed table helping you identify which one is the culprit and find out the solutions immediately.
| Codes Combination | Causes | Solutions |
|---|---|---|
| P0172 + P0101 /P0100/P0102 | Dirty, obstructed, or faulty MAF/MAP sensor. | Clean or replace the MAF/MAP sensor. |
| P0172 + P0089 | Failed fuel pressure regulator. | Replace the fuel pressure regulator. |
| P0172 + P0130-P0135 | Faulty oxygen sensor. | Replace the oxygen sensor. |
| P0172 + P0402 | Stuck-open exhaust gas recirculation (EGR) valve. | Replace (preferred) the EGR valve. |
| P0172 + P0116/P0117/P0118 | Bad coolant temperature sensor. | Replace the coolant temperature sensor. |
| P0172 + P0128 | Stuck-open thermostat. | Replace the thermostat. |
| P0172 + Fuel odor, Hard starts, Increased fuel consumption | Leaking fuel injectors. | Replace the injector filter. Replace the O-ring. Replace the fuel injector. |
Note: The causes for each code combination are the most common ones. There can be some uncommon issues hidden under those codes.
P0172: Causes, Symptoms, And How To Fix
Cause #1: Faulty MAF/MAP Sensor
The mass airflow (MAF) and manifold absolute pressure (MAP) sensor are essential to your car’s electronic fuel injection system.
Their function is to help the PCM determine the required fuel delivery for a perfect rate of 14.7:1.
You can find them near the engine’s intake manifold.
Over time, the MAF/MAP sensor can be contaminated for many reasons, such as dirt, air, and debris in the sensor.
That’s why they failed, leading to overstating the number of air flowing into the engine.
Hence, drivers should pay attention to any of the following symptoms in their vehicle’s performance:
- P0172 and P0101/P0100/P0102 code activated.
- Check engine light on.
- Black exhaust smoke.
- Rough idle.
- Poor fuel economy.
- Poor acceleration.
You can easily fix the P0172 code by cleaning the dirty MAF/MAP sensor or replacing it if the MAF/MAP sensor is faulty.
Cause #2: Faulty Fuel Pressure Regulator
A fuel pressure regulator regulates the fuel pressure (35-65 psi) going to the fuel injectors.
Suitable fuel pressure (air to fuel ratio) helps your vehicle run with maximized power and fuel economy. If the fuel regulator goes wrong, the fuel pressure is too high, resulting in a rich air-fuel ratio.
A ruptured diaphragm inside the regulator and a stuck closed regulator are two reasons causing a rich running condition.
If you notice these symptoms, your vehicle may have a bad fuel pressure regulator:
- A combination of P0172 and P0089 codes appeared.
- Poor engine performance.
- A fuel leak in the regulator’s vacuum line.
- Black smoke.
- Soot on spark plugs.
Replacing the fuel pressure regulator with a new one will solve this problem.
Cause #3: Faulty Oxygen Sensor
An oxygen sensor (upstream) is a device used to help the engine keep a specific air-fuel ratio that balances power, fuel economy, and emissions.
When the O2 sensor is defective, it might detect the wrong amount of air and send it back to the ECU, making the air-fuel ratio not follow the standard rate.
If you don’t want more damage to your car, take a look at these signs:
- P0172 and faulty O2 sensor codes (P0130-P0135) appeared.
- Check engine light on.
- Poor fuel efficiency.
- Smell and black smoke from the exhaust.
- “Lazy” O2 sensor voltage chart.
“Lazy” O2 Sensor Voltage Chart
Replacing a faulty oxygen sensor is an effective way to fix the P0172 code if it is the problem.
Cause #4: Stuck-Open EGR Valve
Exhaust Gas Recirculation (EGR) is a system used for reducing automotive nitrogen oxide (NOx) emissions.
It works by taking a small quantity of the exhaust gas back to the engine’s combustion chambers through the intake manifold.
After a long time, carbon deposits build-up inside the EGR valve, sticking it open.
The endless exhaust gas takes the air’s place, making the amount of air decrease dramatically. Consequently, the air-fuel ratio is not balanced anymore.
Stuck-open EGR will bring you a lot of bad situations, and you should look for these signs to clean or replace the EGR valve as soon as possible:
- P0172 and P0402 code triggered.
- Poor performance.
- Rough idle.
- Increased fuel consumption.
- Smell of exhaust gas.
- Engine knock.
- More emissions.
With a stuck-open EGR valve, it is recommended to replace it as the EGR valve is not too pricey.
If you have a low budget, try to clean the build-up inside with this video.
Cause #5: Bad Coolant Temperature Sensor
As evident from its name, an engine coolant temperature sensor (ECT) measures the engine coolant’s temperature.
An inaccurate coolant temperature can cause a rich condition because they will report that the engine is still cold, which will cause the PCM to keep the mixture rich long after the engine is at proper operating temperature.
Here are some significant symptoms of a faulty coolant temperature sensor:
- P0172 and P0116/P0117/P0118 codes activated.
- Check engine light on.
- Overheated engine.
- Poor fuel efficiency.
- Poor engine performance.
- Black smoke from the exhaust pipe.
In addition to these symptoms, you can take a small test to compare the coolant temperature with a thermal gun and the ECT’s temperature in the Live Data function. If the number on the thermal gun is different from the one on the scan tool (>190ºF), maybe your ECT sensor is broken down.
A coolant temperature sensor is not too expensive, you can erase this code from your car by replacing the ECT sensor.
Cause #6: Stuck-Open Thermostat


The engine thermostat is a valve that can open and close to let the coolant flow into the radiator, lowering the engine’s temperature.
A stuck-open thermostat can make your engine still cold and take more time to warm up. Therefore, your car’s engine may not be likely to reach proper operating temperature and need a richer fuel mixture, leading to more fuel than air.
To avoid any further damage, you should notice these obvious signs:
- A combination of P0172 and P0128 pops up.
- Long warm-up time.
- Lack of heat.
- Poor gas mileage.
It’s not easy to unstick the stuck-open thermostat as it seems. I suggest you should replace the thermostat with a new one since it’s inexpensive.
Cause #7: Leaking Fuel Injectors
Fuel injectors spray the fuel as mist into a car’s engine through a small nozzle.
Leaking fuel injectors appeared in older cars with high mileage. A fuel injector can leak due to two primary causes:
- The body of the injector
- The O-ring
When the fuel injector leaks, it will spray excess fuel in liquid form, not mist. Keeping the fuel injector leaking constantly will create a rich air-fuel mixture.
Be careful with these symptoms if they appear on your car:
- Hard starts.
- Fuel odor.
- Hesitation or shaking while idling.
- Increased fuel consumption.
- Increased exhaust.
- Thinning oil.
- Hydrolocking.
There are three ways you can use to fix the leaking fuel injectors, you can replace the injector filter, the injector O-ring, or the fuel injector itself.
How Much Does It Cost To Fix The Code P0172?
Repair and replacement costs to fix the P0172 code can vary a lot if you choose to fix it yourself or go to a mechanic shop.
For DIYers, it will cost you around $300 for the most expensive part.
If you can’t handle it on your own, you have to pay from $70-$500 for a mechanic.
The Estimated Repair Cost Of P0172
| Solutions | Cost |
|---|---|
| Clean MAF/MAP sensor | – DIY: $15 – Repair shop: $50 – $100 |
| Replace MAF/MAP sensor | – DIY: $30 – $200 – Repair shop: $80 – $280 |
| Replace the fuel pressure regulator | – DIY: $50 – $200 – Repair shop: $150 – $350 |
| Replace the injector filter | – DIY: $15 – $20 – Repair shop: $200 – $300 |
| Replace the injector O-ring | – DIY: $1 – $20 – Repair shop: $150 – $400 |
| Replace the fuel injector | – DIY: $70 – $280 – Repair shop: $200 – $500 |
| Replace (preferred) the EGR valve | – DIY: $190 – $270 – Repair shop: $250 – $350 |
| Replace the ECT sensor | – DIY: $20 – $80 – Repair shop: $70 – $330 |
| Replace the thermostat | – DIY: $20 – $80 – Repair shop: $140 – $300 |
| Replace the oxygen sensor | – DIY: $20 – $130 – Repair shop: $70 – $250 |
Note: The data in this table is collected in May 2022. The actual price depends on many factors, such as your car’s make and year, mechanic’s rate, etc.
You Ask, I Answer
Although the P0172 code is not that severe, it will bring you a lot of troubles, such as poor fuel economy, hard starts, and poor engine performance.
I hope this article will help you save your budget from visiting the mechanic.
Any other questions about P0172, don’t hesitate to leave a comment below, I’ll answer them all.
If you have had the same issue and fixed it before, share your story with us.
See ya!
Read more: The 9 Best OBD2 Scanners for 2024: The Only Review You Need
P0171: System Too Lean (Bank 1)
P0121 – Throttle/Pedal position sensor/switch “A” circuit
P0121 – Throttle/Pedal position sensor/switch “A” circuit
The P0121 code triggers when the “A” and “B” circuits of your vehicle’s throttle position sensor don’t match, which can be a severe problem, activating your car’s failsafe mode and limiting engine performance.
While the throttle position sensor failures are the most common cause of the P0121 trouble code, you don’t want to replace it. There may be issues with the wiring or more extensive electrical problems. Conducting a full diagnosis is essential to make sure the code doesn’t return.
In many cases, the P0121 trouble code can be quickly cleared in a home garage. Read on below to learn more about what causes it and how you can identify and eliminate the problem.
P0121 code definition
P0121 code definition (generic): Throttle position sensor/switch A circuit range/performance problem
P0121 Dodge code definition: Throttle Pos. Exceed (Short Time)
P0121 Ford code definition: (TP) sensor circuit performance problem
P0121 Nissan code definition: (TP) sensor circuit performance problem
P0121 Toyota code definition: Throttle Pedal Position Sensor/Switch “A” Circuit Range/Performance
What does P0121 mean?
The sensor that monitors your throttle’s movement is the throttle position sensor (TPS). This sensor is a potentiometer, measuring the current that passes through to indicate the throttle position. As the throttle opens, the voltage goes up.
The TPS circuit has a designated output voltage for both the “A” and the “B” circuit. This voltage is monitored by the engine control module (ECM) to make sure the throttle position is staying where it should be. The ECM also sends a 5-volt reference signal to the sensor. Usually, the sensor will measure around .5 volts when idling and as much as 4.5 volts when at full throttle.
The “A” and “B” circuits of the TPS sensor should maintain a particular relationship with each other. When the P0121 OBD2 code triggers, the ECM has detected a TPS “A” circuit voltage that’s either too high or too low compared to the “B” circuit.
P0121 is a generic powertrain code, so it applies to any vehicle equipped with OBD2. You may want to follow different steps for the diagnosis and repair depending on your vehicle manufacturer, however. Check for any technical service bulletins for this code for your vehicle.
What are the symptoms of the P0121 code?
When the P0121 trouble code activates, the engine will go into failsafe mode, limiting the throttle’s response, which prevents your car from driving above a certain speed. In addition to the failsafe mode, you’ll likely notice some of the following symptoms:
- Activation of the check engine light
- Knocking sounds in the engine
- Engine stalling or refusing to start
- Vehicle accelerating slowly
- Smoke in the exhaust when accelerating
- Engine stumbling and jerking when changing speeds
- Lower maximum speed

What are the causes of P0121?
- Open or short in TPS
- Open or short in the TPS wiring
- Faulty or loose connections on the TPS
- Corrosion or moisture in sensor connections
- Failed or faulty ECM (rare)
How serious is the P0121 code?
The P0121 trouble code is very severe. Only the activation of failsafe mode will make your car difficult to drive. It may also prevent your car from starting or lead to stalling if it does run. You should stop driving your vehicle when this code activates and fix the problem immediately.
How to diagnose and fix the P0121 code
Tools you’ll need:

Method:
- Scan the TPS data using an OBD2 scan tool. Compare the readings for circuit “A” and circuit “B.” If there’s a variance, check your manual for manufacturer tests for the TPS.
- Scan your system to see if any other trouble codes have been triggered. You may see other codes related to the throttle position sensor (P0120-P0124).
- Use the OBD2 scan tool to read the idle and wide-open throttle (WOT) readings. Compare them with the specifications in your vehicle’s manual. If they’re not, this indicates an issue with the TPS, wiring, or connectors.
- Visually inspect all the wiring and connections of the TPS system. Replace any wires that are damaged or corroded, and make sure all connections are secure. Also, inspect the TPS connections for corrosion or moisture damage. After your inspection, clear the codes and test drive your vehicle. If the code returns, continue with your diagnosis.
- Use an oscilloscope to check for an open or short in the signal sent by the TPS. The signal should go up and down smoothly. If you see sharp drops or spikes, the sensor should be replaced.
- Use a digital multimeter to check the reference voltage at the connector. It should read 5 volts. If it doesn’t, check the ground circuit. It may have an open or short. If the signal circuit reads 12 volts, trace the circuit to find the source of the short and repair it.
- If the code still doesn’t clear, take your vehicle to a mechanic for further diagnosis. In rare instances, the P0121 triggers because of a more serious electrical problem. A professional will be able to determine if this is the case.
Common mistakes to avoid while diagnosing the P0121 code
Many mechanics immediately replace the TPS before visually inspecting the system for corroded wires, loose connections, and other simple fixes. Make sure you conduct a full, thorough diagnosis before replacing any components. If the wiring is the problem, replacing the sensor won’t fix it.
Tips to avoid P0121 in the future
If the TPS wires aren’t installed carefully, they can rub against the wiring harness., which leads to damaged wires, one of the primary causes of the P0121 trouble code. Ensure the wires in your system aren’t touching anything that could damage them to prevent shorts and other electrical issues. Moisture also damages electrical components, like sensors. If you see signs of moisture on the TPS or its connections, figure out how it’s getting into your engine. Identifying and fixing the source of the leak will prevent future damage to the TPS.
Read more: P0335 Code: Meaning, Symptoms, Causes, Diagnostics, and Fixes
P0014 – “B” Camshaft Position – Timing Over-Advanced or System
P0014 – “B” Camshaft Position – Timing Over-Advanced or System
The P0014 OBD2 code tells you the timing of your engine is off. It specifically points you to the B camshaft on bank 1, making this code easier to diagnose than many OBD2 trouble codes. This code can typically be fixed by replacing a valve or solenoid. It may also be an indication that you’re using the wrong kind of oil. Read on to find out how to diagnose and repair this code correctly.
P0014 Code Definition
P0014 Code Definition (Generic): “B” Camshaft position – timing over-advanced or system performance (Bank 1)
P0014 Equinox (Chevy) Code Definition: Camshaft Position B – Over Advanced – Bank 1 (common)
P0014 Hyundai Code Definition: Camshaft Position B – Over Advanced – Bank 1 (common)
P0014 Kia Code Definition: “B” Camshaft position timing over-advanced
P0014 Peugeot Code Definition: “B” Camshaft position timing over-advanced
P0014 Trailblazer (Chevy) Code Definition: Camshaft Position B – Over Advanced – Bank 1 (common)
What Does P0014 Mean?
The P0014 OBD2 code indicates that the timing of your exhaust camshaft is too advanced. Your engine doesn’t operate the same way all the time. The engine control unit varies the valves’ timing, pistons, and other components depending on how much the engine is revving. Each component has an associated sensor that sends information to the ECU. The ECU then uses this data to determine when to power certain systems and how much power to send them. The goal is to keep the engine running as smoothly and efficiently as possible, with minimal emissions. If the ECU detects that the B camshaft on bank 1 has advanced more than it should, the P0014 trouble code will activate. Bank 1 is the side of the engine that contains cylinder 1. Depending on your vehicle, the B camshaft could be called the rear camshaft, the right camshaft, or the exhaust camshaft.
What Are The Symptoms Of The P0014 Code?
The symptoms of this code can change based on the position of the camshaft when it became over-advanced. Some common symptoms include:
- Activation of the check engine light
- Engine is hard to start
- Engine idles rough or stalls while idling
- Increased fuel consumption
- Increase in harmful emissions
What Are The Causes Of P0014 OBD2 Code?
Two systems could be the origin point of P0014: The camshaft and its components or the oil system. Specific causes include:
- Failure of camshaft variable timing solenoid
- Bad timing in camshaft
- Faulty wiring in the intake timing system
- Stuck or faulty camshaft phaser
- Short in the oil control solenoid
- Excessive oil viscosity
- Clogged passages around the camshaft phasers
How Serious Is The P0014 OBD2 Code?
The drivability issues associated with P0014 can cause further damage to your engine if allowed to go on for too long. While it is not unsafe to drive with this code active, you should repair it as soon as possible to avoid additional complications.
How To Diagnose The P0014 OBD2 Code
More often than not, the P0014 OBD2 code results from a mechanical failure in your engine. You should check your vehicle’s manual for suggestions before beginning your diagnosis. This trouble code often has specific fixes depending on what kind of car you drive.
Tools You’ll Need:
Method:
- Scan your system for other trouble codes. If you detect related trouble codes like P0010, P0011, P0012, P0020, P0021, or P0022, diagnosing those could help you identify the specific problem.
- Inspect the wiring and solenoids around the oil control valve and bank 1 B camshaft. Replace any that are frayed or damaged, and ensure all connections are secure.
- Check the level and viscosity of your oil. Your vehicle’s manual should contain information on the correct viscosity for your system.
- Use an OBD2 scan tool to read the live freeze frame data for the bank 1 B camshaft. Disconnect the oil control valve connected to the camshaft. If the valve is functional, the data should change. If it doesn’t, the valve should be replaced.
- Find the cam phaser and inspect it for sludge or damage. Also, inspect the oil passages around the camshaft phasers for build-up.
Common Mistakes To Avoid While Diagnosing The P0014 OBD2 Code
Some people replace their sensors before checking to see if there’s a mechanical problem. P0014 is rarely electrical in nature. Run a full diagnosis before you replace any components.
What Should You Do To Fix The P0014 OBD2 Code?
Use an OBD2 scan tool to clear the trouble codes after each repair, then conduct a test drive to see if they recur. While this might seem tedious, it will prevent you from making unnecessary fixes and is the best way to identify the root cause definitively.
- Replace any damaged wires or solenoids found in your diagnosis.
- If your oil is old, dirty, or too thick, you should replace it. Drain the oil, then replace the oil filter. If you noticed deposits clogging the oil passages, flush the system before adding new oil.
- Replace the cam phaser if it’s dirty or damaged.
- Replace the oil control valve if it failed the freeze-frame test in step 4 of the diagnosis.
- If none of these fixes clear the code, the problem is likely an electrical malfunction in the engine control unit. Take your vehicle to a mechanic for further diagnosis.
Tips To Avoid P0014 OBD2 Code In The Future
More often than not, this problem is the result of a dirty engine. The best way to avoid problems with your camshaft timing is to prevent sludge and other deposits from accumulating in the first place. You can take a few easy steps to keep your engine clean:
- Drive your engine hard. Getting your engine hot is the best way to remove deposits from your system. This naturally happens if you do a lot of fast driving, so engine build-up is more common for cars mostly driven in cities. When your engine starts feeling sluggish, go out on the highway and push your engine harder than usual for a few miles.
- Use the right oil. A high-quality oil of the correct viscosity will keep your system running its best.
- Replace your oil regularly. The older your oil, the less effective it is at lubricating your system. Any dirt or debris in the oil can also stick to components and clog them. Make sure to change your oil as soon as your car is due.
Read more: P0303 Code: Meaning, Symptoms, Causes, Diagnostics, and Fixes
P2002 – Diesel particulate filter efficiency below threshold
P2002 – Diesel particulate filter efficiency below threshold
The P2002 code applies to diesel engines. They contain an additional filter to remove soot and contaminants from the exhaust. This limits harmful emissions and allows your vehicle to meet state standards.
The activation of P2002 indicates the inefficient filtering of your exhaust. This problem can be intermittent, and in some cases, will go away on its own with no driver intervention. You shouldn’t ignore it if it does stick around, though, as this affects both the environment and your engine’s performance.
Certain driving conditions and vehicles are more likely to activate the P2002 trouble code than others. Read on below to learn what you should do if this code triggers in your car or truck.
P2002 Code Definition (Generic): Diesel Particulate Filter Efficiency Below Threshold Bank 1
What does P2002 mean?
This code relates to diesel engines made in 2007 and later. These vehicles use an emission control device to lower the soot content of the exhaust. It does this by heating the engine enough to burn off pollutants, with an additional reductant catalyst to start the process.
The diesel particulate filter (DPF) removes about 98% of the soot in the exhaust when functioning correctly. If the emission control system has been activated, but the particulates in the exhaust don’t burn off, the P2002 trouble code activates.
When the DPF is in operation, it generates backpressure. Pressure feedback sensors allow the engine control module (ECM) or powertrain control module (PCM) to monitor its operation. A discrepancy in the pressure limits indicates there’s an issue with the filter.
While this code is a generic powertrain code, applicable to any diesel engine, the specific fixes can vary depending on your make and model. P2002 is most common in Dodge, Chevy, Ford, and GMC pickups. It can also trigger diesel cars, such as those made by Audi, Lexus, and VW.
This code is similar to P2003. The difference is P2002 relates to bank 1 of your engine, while P2003 points to bank 2. Bank 1 is the side of the engine that contains cylinder 1.
P2002 is what is considered a “soft code.” This means it reports an issue in real-time and can clear itself if the fault is corrected. If this happens once, you don’t need to worry about it. Repeated instances of P2002 warrant diagnosis. You should also consider repairs if the code does not turn itself off after a completed drive cycle.
What are the symptoms of the P2002 code?
The check engine light may stay illuminated with P2002, or it may come on intermittently. In many cases, there are no drivability issues associated with this code. If there are symptoms, they include:
- The activation of the check engine light
- Reduced fuel economy
- Sluggish acceleration
- Diluted oil
What are the causes of P2002?
- Fouled or faulty DPF.
- The exhaust back pressure sensor is faulty.
- Leaks in the exhaust system.
- Fuel quality is too low for the engine.
- The engine is not reaching high enough speeds/temperatures.
- Aftermarket components are not suitable for vehicles.
- The air cleaner element is dirty.
- Faulty PCM/ECM or components.
How serious is the P2002 code?
The P2002 trouble code is moderately severe. Although you may not experience drivability issues, your engine may go into failsafe mode if you don’t clear the code. Because of this, it’s essential to find the source of the issue as soon as possible.
How to diagnose and fix the P2002 code
Tools you’ll need: OBD2 scan tool
- Use an OBD2 scan tool to read the codes. If other codes are present, fix those first.
- If you mostly drive in a city or at low speeds, your engine may not be reaching high enough temperatures to burn off the soot. Take your car for a hard drive. Ensure you get at least 55 miles per hour for 20-30 minutes, then reduce speed quickly. Clear the codes and rescan with the OBD2 scan tool.
- If you have recently modified your vehicle, replace it with the original part. Certain modifications, including cat-back exhaust kits or cold air intake kits, can trigger this code. You can also check with the manufacturer to see if this is a known issue for your vehicle.
- Check for loose connections around the bank 1 DPF. Also, check for any burnt or loose wires, and make sure there’s no corrosion on the connectors.
- Look for exhaust leaks around the DPF. Pay close attention to the ends and connections, making sure everything is connected securely.
- Verify that you’re using fuel that is the correct quality for your engine. The fuel that contains too much sulfur leads to clogs in the DPF. Consult your manual if you’re not sure what the ideal diesel quality is for your engine.
- Check the DPF for dirt and clogs. In some cases, these filters may become too fouled to clear with a hard drive. Replace the filter, then clear the codes and test drive your vehicle.
- Should the code still not clear, take your car to a mechanic for further diagnosis. Advanced scan tools like the Tech II can determine if there is an issue with the ECM or PCM.
Common mistakes to avoid while diagnosing the P2002 code
If the issue causing the P2002 trouble code is a fouled filter, it may be a temporary problem. Make sure you take a test drive, reaching at least 55 miles per hour before replacing any components. DPF filters generally last a long time, so don’t assume the filter is failing until you’ve checked for other issues.
Tips to avoid P2002 in the future
Wires touching the DPF can be burnt and damaged by the high temperatures generated. Ensure all of the wires for the sensor are positioned away from engine components that could damage them.
If you drive mostly at low speeds, P2002 could be a recurring problem. You may want to consider taking your vehicle to a mechanic for a modification. They can reprogram the computer and remove the PDF, solving the issue.
Read more: P2096 Code: Meaning, Symptoms, Causes, Diagnostics, And Fixes
P0304 – Cylinder 4 misfire detected
P0304 – Cylinder 4 misfire detected
The cylinders in your engine are what provide its power. When they don’t fire correctly, your car will drive rough and be at risk for further damage. The P0304 OBD2 code is your first warning sign of misfires in your engine.
The P0304 code can be severe, so it’s not one you want to ignore. Read on below to learn more about what it means and how you can correctly diagnose it.
P0304 code definition
P0304 Code Definition (Generic): Cylinder 4 misfire detected
P0304 BMW: “Misfiring Of Cylinder 4, Damages TWC”
P0304 Dodge: Cylinder 1-10 Misfire Detected
P0304 Honda: Cylinder 4 Misfire Detected
P0304 Nissan: Cylinder #4 Misfire Detected
P0304 Subaru: #4 Cylinder Miss Fire
What does P0304 mean?
The cylinders provide the power in your engines. This is where the spark plugs ignite the air/fuel mixture, generating the energy that turns the crankshaft. A misfire occurs when there isn’t enough fuel burning in a cylinder.
When the engine functions correctly, the cylinders fire in sequence to provide continuous power to the crankshaft. If the RPM of the crankshaft changes by more than 2%, this is when the engine will trigger the P0304 code.
The P0304 OBD2 code explicitly indicates a misfire in cylinder 4. You can use your car’s manual to locate this cylinder. It is common to also see P0300 and other misfire-related codes as well with P0304.
What are the symptoms of the P0304 code?
You will often experience serious drivability problems when the P0304 trouble code activates. These include:
- The check engine light activates. If the light is solid, the change in the crankshaft RPMs is between 2% and 10%. A flashing or blinking light indicates a variance over 10%.
- The engine runs rough. The engine may shake while idling. You may also notice jerking or hesitation from the engine while accelerating.
- There’s difficulty starting or failure to start.
- There’s a smell of fuel in the exhaust.
- Engine power reduces.
- Fuel economy reduces.
What are the causes of P0304?
The most common causes of the P0304 trouble code are:
- Faulty or worn-out spark plugs
- Faulty wires around the spark plugs
- Faulty spark plug coils
- Failure of the distributor
- Faulty fuel injector
Engine misfires can also be a result of:
- Leaks in the vacuum system
- Fuel pressure is too low
- Timing issues in the engine
- Defective sensors (camshaft, crankshaft, oxygen, MAF, etc.)
- Leaking head gasket
- Fuel is too low quality for the engine
How serious is the P0304 code?
The P0304 OBD2 code is severe. Repeated misfires can damage your catalytic converter, ignition system, and other parts of your engine. The erratic performance also makes your vehicle a potential safety hazard. Stop driving your car when this code triggers, and refrain from driving until you’ve repaired the problem.
How to diagnose the P0304 code
Tools you’ll need:
- OBD2 scan tool
- Screwdriver and socket set
- Digital multimeter
- Fuel pressure gauge
- Compression tester
- Leakdown tester
- Scan your system for other OBD2 trouble codes. Fix any that come up other than P0300-P0308.
- Inspect the wires around the spark plugs for damage and loose connections.
- If your engine has individual coil packs, switch the cylinder 4 pack with the one in cylinder 1. Clear the codes and test drive your car. If the misfire jumps to cylinder 1, the pack is faulty and should be replaced.
- Visually inspect the spark plug for carbon build-up or other signs of fouling. It’s easiest to see if you have a new spark plug for comparison. Remove and clean the spark plug. If the build-up can’t be removed, replace the spark plug. A spark plug that’s shiny or blackened likely indicates the fuel mix is too rich.
- Use a multimeter to measure the resistance of the spark plugs. Replace the wires if the reading is higher than 15,000 ohms.
- Check the ignition coils. Remove the coil and touch the multimeter leads to both the primary and secondary ignition circuit. The primary ignition circuit typically reads between .4 and 2 ohms, and the secondary circuit between 6,000 and 10,000 ohms. Your vehicle’s manual can give you a more exact specification. If you get a 0 reading, the coil has an internal short.
- Use a fuel pressure gauge to test the fuel pressure. Compare the reading to the specifications in your vehicle’s manual.
- Unplug the fuel injector from your engine and probe the terminals with a multimeter. Compare the resistance reading to the specifications in your manual. A variance could indicate a faulty fuel injector.
- Perform both an engine compression test and a leak down test. Mechanical problems like worn valve guides, burned valves, skips in the timing chain, and broken valve springs or pistol rings can lead to misfires. These tests will identify any failing components.
Common mistakes to avoid while diagnosing the P0304 code
Ensure you don’t overlook small issues, like loose connections and vacuum leaks. Be thorough in your engine inspection to make sure you’ve caught every potential source of the misfire.
What should you do to fix the code P0304?
If you’re not experiencing any symptoms, clear the code and test drive your vehicle. A single misfire may not indicate long-term problems. If the code does come back, continue with the steps below.
- Replace any damaged wires found in your inspection, as well as any other components that failed diagnosis. Ensure all newly-installed items are functioning and all connections are secure.
- Check the EGR system and fuel injectors for clogs. Clean out any that you find.
- Test the sensors in your fuel and exhaust systems, including the crankshaft sensor, camshaft sensor, mass airflow sensor, and oxygen sensors. Inspect them visually for dirt or damage, then use a multimeter to ensure they’re receiving a charge. Replace any that are damaged.
Tips to avoid P0304 in the future
Issues with your air-to-fuel ratio may cause misfires. Check all the hoses in your system for leaks as part of your regular preventative maintenance. Air that gets into your system can make your air/fuel mix too lean. Alternatively, oil or carbon build-up on the spark plugs indicates a mix that’s too rich.
Using the wrong fuel can also cause engine misfires. More expensive fuel isn’t always the answer. Only use the grade recommended for your engine in your vehicle’s manual.
P0138: O2 Sensor Circuit High Voltage (Bank 1, Sensor 2)
P0138: O2 Sensor Circuit High Voltage (Bank 1, Sensor 2)
Did your scan tool show the P0138 code? Do you wonder what it means and whether you can continue to drive?
Keep reading to have a first evaluation of the situation.
- P0138 Definition: O2 sensor circuit high voltage (Bank 1, Sensor 2)
- Code Type: Generic – P0138 indicates the same problem whether you’re having a Jeep, Toyota, or Dodge etc.
- Can I drive with the P0138 code? Yes, but keep driving will cause internal engine damage.
- Easy to fix? Intermediate level.
- Cost: $20 – $95 (common)
Luckily, P0138 is safe to drive in a short period!
But to avoid more harm to the engine, let’s read on to know the causes and how to fix these problems!
What Does The P0138 Code Mean?
The P0138 is triggered when the downstream O2 sensor (bank 1) voltage is too high (>1.2 volts) for more than 10 seconds. This high voltage indicates that the oxygen level in the exhaust gas is abnormally low.
What Is The O2 Downstream Sensor’s Function?
Downstream oxygen sensors (located after the catalytic converter) monitor the conditions of the catalytic converter.
The less air in the exhaust gas (after passing the cats), the higher the downstream O2 sensor’s output voltage.
Because the catalytic converter already processed the exhaust gas, the oxygen level is stable. Therefore, a normal working downstream O2 sensor stays around 0.45 volts.
What Can Trigger The P0138 Code?
The sensor voltage being too high can be explained by two scenarios:
- The reading is incorrect – results from the sensor’s wiring harness or the sensor itself
- The reading is correct – results from rich conditions
I’ll explain the details in the below parts.
But first, let’s navigate your cause.
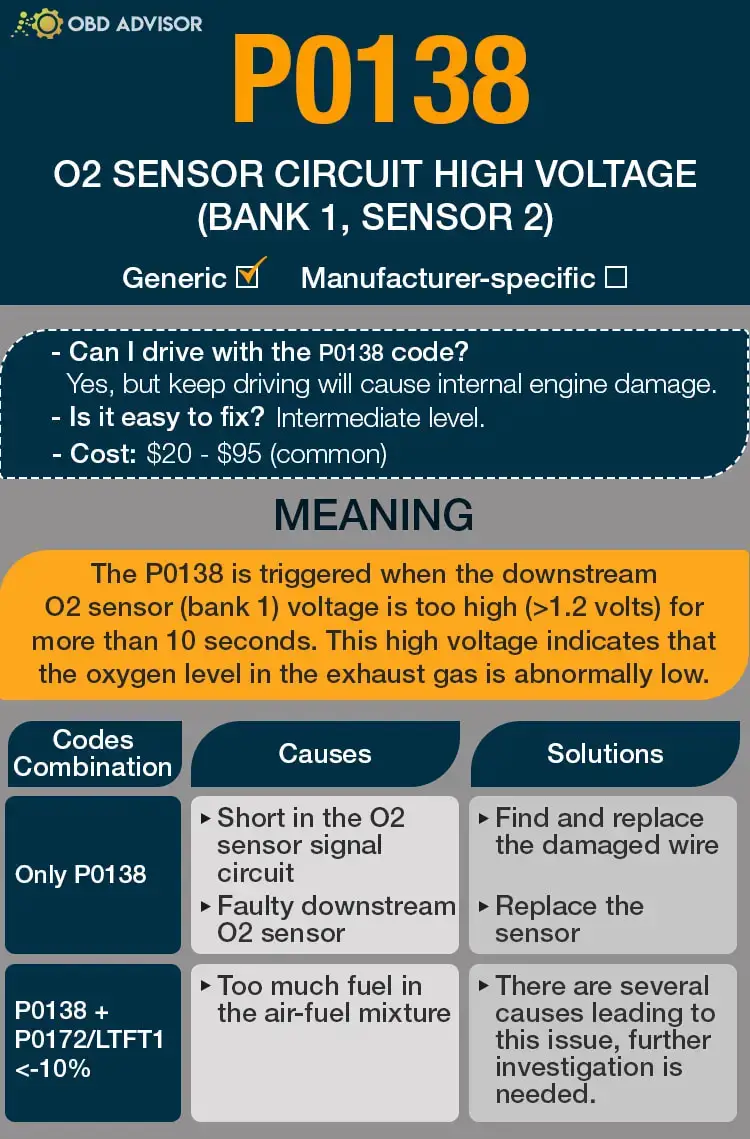
P0138 Causes Identification: Quick View
P0138 can appear alone or with other related codes. This table will help you navigate the root causes as well as the solutions for them.
| Codes Combination | Causes | Solutions |
|---|---|---|
| Only P0138 | Short in the O2 sensor signal circuit Faulty downstream O2 sensor | Find and replace the damaged wire Replace the sensor |
| P0138 + P0172/LTFT1<-10% | Too much fuel in the air-fuel mixture | There are several causes leading to this issue, further investigation is needed. |
Note: The causes for each code combination are the most common ones. There can be some uncommon issues hidden under those codes.
P0138: Causes, Symptoms, and How to Fix
Now, you may have a general idea of what causes the P0138 error code.
Read on to learn how to pinpoint the root problem and stop being a part-changer!
Cause #1: Short In The O2 Sensor Signal Circuit
This is the first thing you need to check.
Short to battery voltage in the O2 sensor signal circuit will make the sensor’s output voltage increase, triggering P0138.
If the wiring is the problem, there is no symptom other than the Check Engine Light. This is because downstream O2 sensors are not used to adjust the air-fuel ratio (like upstream.)
And there will be no effect on the engine performance.
Cause #2: Faulty Downstream O2 Sensor
After making sure all the wiring is good, a faulty downstream sensor is very likely to be the cause of P0138.
Again, there will be no symptoms in this case.
How to fix it?
All you have to do is to replace the sensor.
Bank 1 sensor 2 is located right after the catalytic converter. The replacement process is straightforward and the part itself is inexpensive. So, you can totally do it by yourself.
Tips: You will need a hammer and a wrench to break the sensor loose.
Cause #3: Rich Condition
A rich condition indicates that there is more than enough fuel in the air-fuel mixture,
This leads to a very low level of oxygen level in the exhaust gas, causing the computer to set P0138.
Symptoms of rich conditions causing P0138:
- Poor fuel economy
- Smell of gasoline
- Slow acceleration
- Negative long-term fuel trim on bank 1 (LTFT1<-10%)
- Combination of P0138 and P0172
There are many different causes that can lead to this condition.
How to know which problem your car is having?
First, you need to monitor the long-term fuel trim on both bank 1 (LTFT1) and bank 2 (LTFT2.)
- If Both LTFT1 and LTFT2 < -10%, the fuel pressure is too high (which is usually caused by bad FPR, fuel pump, fuel rail, etc.)
- If LTFT<-10% and -5%<LTFT2<5%, a sensor (on bank 1) is causing rich mixture (upstream O2 sensor, MAF, MAP, IAT, etc.)
After all, rich conditions causing P0138 are not something you should worry about. Most of the time, replacing an inexpensive sensor will fix the problem. The hard part is to know which one needs to be replaced.
For further diagnosis, I wrote an article about the code P0172. Read it and you can exactly pinpoint your problem!
How Much Does It Cost To Fix The Code P0138?
9 out of 10 times, you can just spend less than 100 bucks to fix the issues related to the bank 1 downstream O2 sensor.
If you get negative long-term fuel trim (rich conditions,) there can be many different solutions depending on the causes.
The Estimated Repair Cost Of P0138
| Solutions | Cost |
|---|---|
| Repair O2 sensor circuit | DIY: $10 – $20 Mechanic: $130 – $140 |
| Replace (downstream or upstream) O2 sensor | DIY: $20 – $95 Mechanic: $100 – $450 |
| Replace MAF/MAP sensor | DIY: $30 – $200 Mechanic: $80 – $280 |
| Replace the IAT sensor | DIY: $20-$150 Mechanic: $40-$250 |
| Repair IAT sensor wiring | DIY: $0-$20 Mechanic: $20-$75 |
| Replace the fuel pressure regulator (FPR) | DIY: $50 – $200 Mechanic: $150 – $350 |
| Replace the fuel pump | DIY: $50 – $850 Mechanic: $220 – $1,100 |
Note: The data in this table was collected in July 2022. The actual price depends on many factors, such as your car’s make and year, mechanic’s rate, etc.
You Ask, I Answer
Through this article, you will find it easier to identify the causes and the corresponding solutions to avoid more unnecessary expenses.
So, did you find out the reason causing P0138 on your car? Please leave a comment below.
And if you successfully erase this code by another way, don’t hesitate to share us your method. I am looking forward to know your ideas.
See ya!
Read more: The 9 Best OBD2 Scanners for 2024: The Only Review You Need
P0304 – Cylinder 4 misfire detected
P0304 – Cylinder 4 misfire detected
The cylinders in your engine are what provide its power. When they don’t fire correctly, your car will drive rough and be at risk for further damage. The P0304 OBD2 code is your first warning sign of misfires in your engine.
The P0304 code can be severe, so it’s not one you want to ignore. Read on below to learn more about what it means and how you can correctly diagnose it.
P0304 code definition
P0304 Code Definition (Generic): Cylinder 4 misfire detected
P0304 BMW: “Misfiring Of Cylinder 4, Damages TWC”
P0304 Dodge: Cylinder 1-10 Misfire Detected
P0304 Honda: Cylinder 4 Misfire Detected
P0304 Nissan: Cylinder #4 Misfire Detected
P0304 Subaru: #4 Cylinder Miss Fire
What does P0304 mean?
The cylinders provide the power in your engines. This is where the spark plugs ignite the air/fuel mixture, generating the energy that turns the crankshaft. A misfire occurs when there isn’t enough fuel burning in a cylinder.
When the engine functions correctly, the cylinders fire in sequence to provide continuous power to the crankshaft. If the RPM of the crankshaft changes by more than 2%, this is when the engine will trigger the P0304 code.
The P0304 OBD2 code explicitly indicates a misfire in cylinder 4. You can use your car’s manual to locate this cylinder. It is common to also see P0300 and other misfire-related codes as well with P0304.
What are the symptoms of the P0304 code?
You will often experience serious drivability problems when the P0304 trouble code activates. These include:
- The check engine light activates. If the light is solid, the change in the crankshaft RPMs is between 2% and 10%. A flashing or blinking light indicates a variance over 10%.
- The engine runs rough. The engine may shake while idling. You may also notice jerking or hesitation from the engine while accelerating.
- There’s difficulty starting or failure to start.
- There’s a smell of fuel in the exhaust.
- Engine power reduces.
- Fuel economy reduces.
What are the causes of P0304?
The most common causes of the P0304 trouble code are:
- Faulty or worn-out spark plugs
- Faulty wires around the spark plugs
- Faulty spark plug coils
- Failure of the distributor
- Faulty fuel injector
Engine misfires can also be a result of:
- Leaks in the vacuum system
- Fuel pressure is too low
- Timing issues in the engine
- Defective sensors (camshaft, crankshaft, oxygen, MAF, etc.)
- Leaking head gasket
- Fuel is too low quality for the engine
How serious is the P0304 code?
The P0304 OBD2 code is severe. Repeated misfires can damage your catalytic converter, ignition system, and other parts of your engine. The erratic performance also makes your vehicle a potential safety hazard. Stop driving your car when this code triggers, and refrain from driving until you’ve repaired the problem.
How to diagnose the P0304 code
Tools you’ll need:
- OBD2 scan tool
- Screwdriver and socket set
- Digital multimeter
- Fuel pressure gauge
- Compression tester
- Leakdown tester
- Scan your system for other OBD2 trouble codes. Fix any that come up other than P0300-P0308.
- Inspect the wires around the spark plugs for damage and loose connections.
- If your engine has individual coil packs, switch the cylinder 4 pack with the one in cylinder 1. Clear the codes and test drive your car. If the misfire jumps to cylinder 1, the pack is faulty and should be replaced.
- Visually inspect the spark plug for carbon build-up or other signs of fouling. It’s easiest to see if you have a new spark plug for comparison. Remove and clean the spark plug. If the build-up can’t be removed, replace the spark plug. A spark plug that’s shiny or blackened likely indicates the fuel mix is too rich.
- Use a multimeter to measure the resistance of the spark plugs. Replace the wires if the reading is higher than 15,000 ohms.
- Check the ignition coils. Remove the coil and touch the multimeter leads to both the primary and secondary ignition circuit. The primary ignition circuit typically reads between .4 and 2 ohms, and the secondary circuit between 6,000 and 10,000 ohms. Your vehicle’s manual can give you a more exact specification. If you get a 0 reading, the coil has an internal short.
- Use a fuel pressure gauge to test the fuel pressure. Compare the reading to the specifications in your vehicle’s manual.
- Unplug the fuel injector from your engine and probe the terminals with a multimeter. Compare the resistance reading to the specifications in your manual. A variance could indicate a faulty fuel injector.
- Perform both an engine compression test and a leak down test. Mechanical problems like worn valve guides, burned valves, skips in the timing chain, and broken valve springs or pistol rings can lead to misfires. These tests will identify any failing components.
Common mistakes to avoid while diagnosing the P0304 code
Ensure you don’t overlook small issues, like loose connections and vacuum leaks. Be thorough in your engine inspection to make sure you’ve caught every potential source of the misfire.
What should you do to fix the code P0304?
If you’re not experiencing any symptoms, clear the code and test drive your vehicle. A single misfire may not indicate long-term problems. If the code does come back, continue with the steps below.
- Replace any damaged wires found in your inspection, as well as any other components that failed diagnosis. Ensure all newly-installed items are functioning and all connections are secure.
- Check the EGR system and fuel injectors for clogs. Clean out any that you find.
- Test the sensors in your fuel and exhaust systems, including the crankshaft sensor, camshaft sensor, mass airflow sensor, and oxygen sensors. Inspect them visually for dirt or damage, then use a multimeter to ensure they’re receiving a charge. Replace any that are damaged.
Tips to avoid P0304 in the future
Issues with your air-to-fuel ratio may cause misfires. Check all the hoses in your system for leaks as part of your regular preventative maintenance. Air that gets into your system can make your air/fuel mix too lean. Alternatively, oil or carbon build-up on the spark plugs indicates a mix that’s too rich.
Using the wrong fuel can also cause engine misfires. More expensive fuel isn’t always the answer. Only use the grade recommended for your engine in your vehicle’s manual.
P026A Code: Causes & Solutions for Charge Air Cooler Issues
P026A Code: Causes & Solutions for Charge Air Cooler Issues
Got a P026A DTC (diagnostic trouble code)? Don’t panic. This expert guide can help you understand the code and get it fixed with ease.
So, what does the code P026A mean? Simply put, it indicates that the Charge Air Cooler is not working as effectively as expected.
If you’re curious to learn more about this DTC and how it can affect your vehicle’s performance, read on. In this article, we will provide you with valuable insights and practical solutions to address this issue effectively. Let’s dive in!
P026A Code: An Overview
Here are the main highlights of the P026A code.
- Definition: Charge Air Cooler Low Efficiency
- Severity: Medium
- DIY Skill Level: Intermediate
- Continue To Drive?: Yes
- Estimated Repair Cost: $50 – $300
P026A Meaning: What Does It Signify?
The P026A code is an indication that the charge air cooler (CAC) efficiency in your vehicle has fallen below the threshold. This code is commonly triggered in cars equipped with Powerstroke and Cummins engines, such as Ford, RAM, and some VW models.
Let’s explore the systems and components involved to understand this code better. The charge air cooler, also known as the intercooler, is responsible for cooling down the compressed air from the turbocharger before it enters the engine’s intake manifold. It is crucial in optimizing the engine’s performance and fuel efficiency.
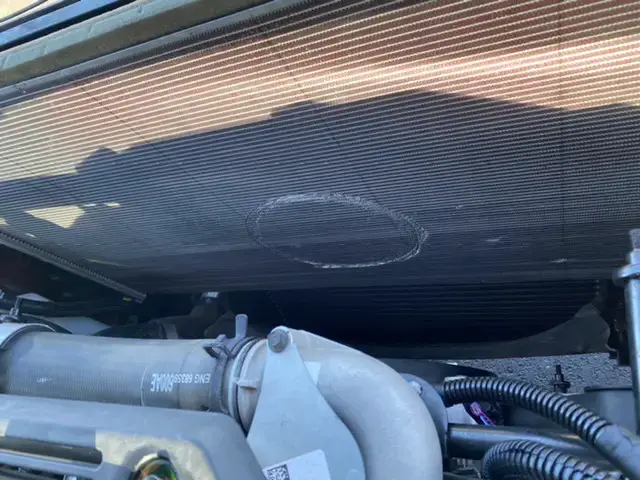
(Image credit: Cummins Forum)
In the case of Cummins engines, the Powertrain Control Module (PCM) compares the reading from the CAC Temperature Sensor to a calibrated threshold. The calibrated threshold varies based on the Ambient Air Temperature Sensor reading. If the CAC Temperature Sensor reading remains above the calibrated threshold for a cumulative total of 120 seconds, the PCM determines that the CAC is operating inefficiently, triggering the code P026A.
For Ford vehicles, the PCM sets the P026A code when it identifies that the measured CAC efficiency doesn’t match the expected efficiency, and this difference lasts for at least 10 seconds.
How Serious Is The P026A Code?
The P026A code is considered a medium severity. While it is generally safe to continue driving with this code, addressing the underlying issue promptly is crucial to avoid potential complications.
An inefficient CAC can lead to reduced engine performance and fuel efficiency. It can also place additional strain on other engine components if left unresolved. Therefore, it is recommended to have the issue diagnosed and repaired as soon as possible to restore optimal performance and prevent further damage.
Read more: Ford OBD2 Codes List for FREE Download
Note: In some cases, the P026A code may appear when towing and disappear when not towing. If you attempt to clear the code and it reappears only during towing without noticeable driveability concerns, it is generally safe to disregard it. However, it’s still important to monitor the situation and promptly address any related issues if they arise.
P026A Symptoms: Signs Of An Inefficient CAC
The P026A DTC may present the following symptoms:
- Reduced engine performance
- Decreased fuel efficiency
- Engine hesitation or rough idle
- Illuminated check engine light
P026A Causes: Uncovering The Culprits
The P026A code can be caused by various factors, including:
- Low CAC coolant level
- Restrictions or blockages in the CAC, including the fins
- Faulty CAC temperature sensor
- Faulty cooling fan
Read more: P0118: Engine Coolant Temperature Sensor Circuit High Input

Step-by-Step Diagnosis And Repair For P026A
Let’s make resolving the P026A code a breeze! Our step-by-step diagnosis and repair process will guide you smoothly through the entire procedure.
Essential Tools And Parts
- Diagnostic scan tool
- Multimeter
- Coolant level checker
- Inspection mirror
- Cooling system pressure tester
- Replacement CAC temperature sensor
- Replacement cooling fan
Step-by-step Procedure
Step 1: Scan for DTCs
Start by using a diagnostic scan tool to retrieve the P026A and any accompanying codes. Note down the DTCs for reference during the repair process.
Step 2: Check and top off the coolant level
Inspect the coolant level in the charge air cooler. If low, add the appropriate coolant and check for leaks.
Step 3: Address CAC restrictions or blockages
- Examine the CAC for any restrictions or blockages. Clear any debris or obstructions from the CAC fins using compressed air or a vacuum cleaner.
- Remove the grill and clean the radiators if the CAC fins are blocked. Use compressed air or a vacuum cleaner to remove debris from the backside, then hose off with water from the front.
- Check the coolant lines connected to the CAC for any restrictions, cracks, or misrouting. Replace or repair any damaged lines as necessary.
Step 4: Verify cooling fan functionality
Check the cooling fan for proper operation. If the fan is faulty, replace it to ensure adequate cooling.
Step 5: Test the CAC temperature sensor
Verify the functionality of the CAC temperature sensor using a multimeter. If the sensor is faulty, replace it with a new one.
Step 6: Clear codes and test drive
Clear the codes and conduct a test drive to evaluate the vehicle’s performance.
Note: Please ensure to follow safety precautions and refer to specific vehicle manufacturer instructions for detailed guidance during the repair process.
DIY Repair Level And Estimated Costs
The repair procedure for P026A can vary in complexity. In general, it’s recommended for people who have intermediate automotive knowledge and skills.
If you are comfortable working on your vehicle’s cooling system and have the necessary tools, you may be able to tackle this repair on your own. However, if you are unsure or unfamiliar with these procedures, you should seek assistance from a professional mechanic.
Here is an estimated cost breakdown for the main repair tasks:
| Repair Task | Estimated Cost |
| CAC cleaning and repair | $30 – $100 |
| Coolant lines repair/replacement | $20-$50 |
| CAC temperature sensor replacement | $50-$300 |
| Cooling fan replacement | $100-$400 |
Remember that these are rough estimates, and actual costs may vary depending on the vehicle model, labor rates, and location.
Final Thoughts
In conclusion, addressing the P026A DTC is essential to restore your vehicle’s optimal performance and prevent further damage. You can effectively diagnose and repair the issue by following the step-by-step procedure outlined in this guide and utilizing the necessary tools.
We hope this guide has provided valuable insights and practical solutions to resolve the P026A code. If you found this information helpful, please share it with others.
Stay smooth and happy driving!
Reference Sources
- Vestas Aircoil A/S, Charge Air Coolers Explained.
- Dura-Light, Charge Air Cooler Leaks: The Basics.
- ScienceDirect, Diagnosis Of Clogged Charge Air Cooler Faults In A Diesel Engine Using Singular Spectrum Analysis.
P0011 – “A” camshaft position – Timing over-advanced or system
P0011 – “A” camshaft position – Timing over-advanced or system
The P0011 OBD2 code tells you the timing is off on your “A” camshaft. When this happens, it’s most often caused by a problem with the oil viscosity. It can also result from a solenoid failure or stuck valve, however, so you want to do your due diligence and check the system thoroughly before making repairs.
The fix for the P0011 is often specific to a vehicle’s make and model. Your manual will also outline the correct oil viscosity for your system, so that’s the first thing you should find when the P0011 trouble code activates.
Issues with your engine timing can quickly snowball into more severe problems, so you’ll want to fix this trouble code as soon as you notice it. Read on below to find out how to properly diagnose and repair this problem.
P0011 code definition
- P0011 code definition (generic): “A” Camshaft position – timing over-advanced or system performance (Bank 1)
- P0011 Chevy code definition: Intake camshaft position system performance
- P0011 Kia code definition: “A” camshaft position timing over-advanced or system performance bank 1
- P0011 Nissan code definition: Intake valve timing control performance bank 1
- P0011 Subaru code definition: Camshaft position “A” timing over-advanced or performance bank 1
- P0011 Toyota code definition: Camshaft position “A” timing over-advanced or system performance bank 1
- P0011 VW code definition: “A” camshaft position timing over-advanced or system performance bank 1
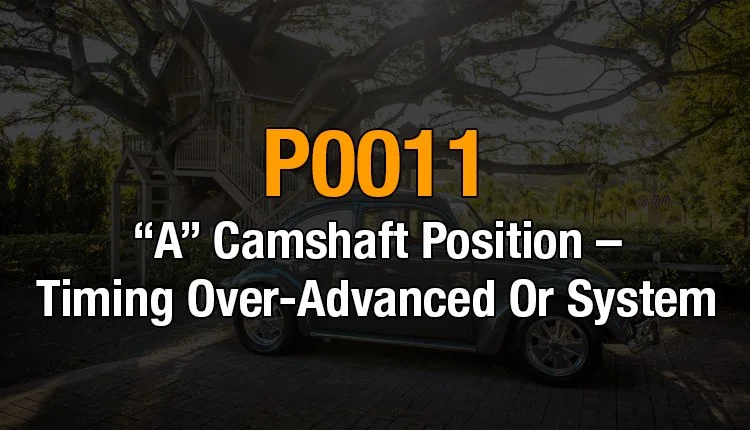
What does P0011 mean?
Generally speaking, you can interpret the P0011 OBD2 code to mean your intake camshaft’s timing is off. The engine doesn’t operate at the same level the entire time you’re driving. The timing of the valves is varied by the ECU in response to the engine’s RPM range.
When P0011 activates, it tells you the “A” camshaft in bank 1 is in a more advanced position than it should be, which is the camshaft that’s at the intake, which could be the left or the front camshaft, depending on your vehicle.
Properly diagnosing and fixing the P0011 code doesn’t just mean returning it to the proper position at the moment but also discovering what caused the timing error in the first place. That part of the process can sometimes be tricky, depending on your vehicle and the reason for the trouble code.
What are the symptoms of the P0011 code?
You will usually notice drivability issues when the P0011 code activates. These symptoms include:
- Activation of the check engine light,
- The engine is hard to start,
- The engine runs rough or hesitates,
- Reduced gas mileage,
- Increase in harmful emissions,
- Stalling.
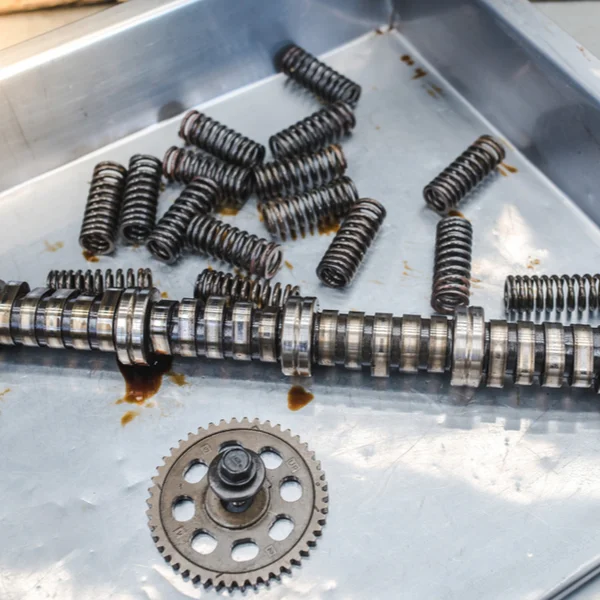
What are the causes of P0011?
- Faulty wiring around intake timing control valve system,
- Failure of camshaft variable timing solenoid,
- Seized camshaft phaser,
- Incorrect oil viscosity,
- Oil flow to the variable camshaft timing chamber is continuous.
How serious is the P0011 code?
The P0011 code is moderately serious. The rough driving caused by this trouble code can lead to further engine damage if you don’t address it promptly. While you can drive for a little while with this code active, you should repair the problem as soon as possible.
How to diagnose the P0011 code
Diagnosis and repair of the P0011 trouble code can vary depending on your vehicle’s make and model. Before you start your diagnosis, read your vehicle’s service manual. You can also check for released technical service bulletins related to this trouble code.
Tools you’ll need:
Method:
- Check for other trouble codes, specifically related codes like P0010, P0012, P0021, or P0022. If these are present, they can help you to hone in on the cause of your problem.
- Inspect the wiring and valves around the bank 1 exhaust valve and oil control valve.
- Make sure that all electrical connections within the system are secure and unimpeded.
- Check the oil. Make sure it’s at the right level, and inspect the viscosity. If it seems too thick or too thin, replace the oil. You can find the specifications for the correct oil viscosity in your vehicle’s manual.
- Check the timing chain alignment to see if it’s jumped, which could be causing your engine’s timing problems.
- Use an OBD2 scan tool to read the freeze frame data. Watch the live data while you disconnect the oil control valve on the exhaust camshaft. The data should change. If it does, the valve is functioning correctly. If it doesn’t, you may have a more serious electrical problem with your engine control module, which is rare, however, as this trouble code more often points to a mechanical issue.
Common mistakes to avoid while diagnosing the P0011 code
Don’t assume the problem is with the sensor without checking the systems themselves. Ensure that you conduct a full diagnosis and identify the problem’s actual cause before buying any new components.
What should you do to fix the code P0011?
After each step in your repair, clear the trouble codes and then take a test drive. If you’re still having symptoms or the code recurs, continue with the next step of the diagnosis. Avoid replacing any components until you’ve confirmed the problem isn’t something simple.
- Replace any damaged wires you find around the bank 1 exhaust system.
- Drain your oil, even if you don’t see any issue with the viscosity. Replace the oil filter and flush your system, then replace it with fresh oil.
- Check the camshaft variable timing solenoid. If it’s damaged, replace it.
- Check the camshaft oil control valve for the bank 1 intake camshaft to see if it’s damaged or stuck open. If you notice faults or problems, replace the valve.
- If none of these fixes clear the code, the issue may be electrical. Take your car to a mechanic for further diagnosis.
Tips to avoid P0011 in the future
The best thing you can do to avoid the P0011 trouble code is to change your oil regularly and check it for problems in between oil changes. Issues with your oil viscosity can cause issues beyond the timing of the camshaft.
You should always use the oil viscosity recommended by the manufacturer. The oil system components are designed to a specific size for a particular kind of fluid to flow through them. The oil, too thick or too thin, won’t move through the system the way it’s supposed to.
Read more: P0507 Code: Meaning, Symptoms, Causes, Diagnostics, and Fixes.
P0700 – Transmission control system (MIL request)
P0700 – Transmission control system (MIL request)
The P0700 OBD2 code is a relatively generic code—and one that you should take seriously. It indicates a malfunction in the transmission control system, preventing your car from changing gears properly, making you a hazard to yourself and others on the road.
Fixes for the P0700 code may be specific to your vehicle’s make and model. Take this into account as you’re going through your diagnosis. Follow any advice outlined in your manual over the general diagnosis steps laid out below.
The P0700 code solutions range from simply replacing your transmission fluid to an entire overhaul of your transmission system. The good news is, an OBD2 scan tool gives you all the data you need to diagnose this trouble code.
P0700 code definition
Transmission control system TCS malfunction
What does P0700 mean?
The P0700 OBD2 code triggers when a malfunction is detected in your transmission controls. Most modern cars have a specific control module for the automatic transition system called the transmission control module, or TCM.
The TCM’s role in your system is to monitor the transmission system’s sensors and send that data to the engine control module (ECM). If any issues are detected when the ECM reads this data, the P0700 trouble code is activated. Along with the check engine light, activation of this code triggers a failsafe mode. Your system will remain in this mode until the fault has been repaired and regular operation can resume.
The P0700 OBD2 code only tells you there’s some problem in your transmission system. You’ll need to dig a bit deeper to find the problem’s exact source, which makes your OBD2 scan tool your best friend when you need to fix a P0700 code.
What are the symptoms of the P0700 code?
You will likely notice drivability issues with code P0700, mainly caused by slips in the transmission. The most common symptoms include:
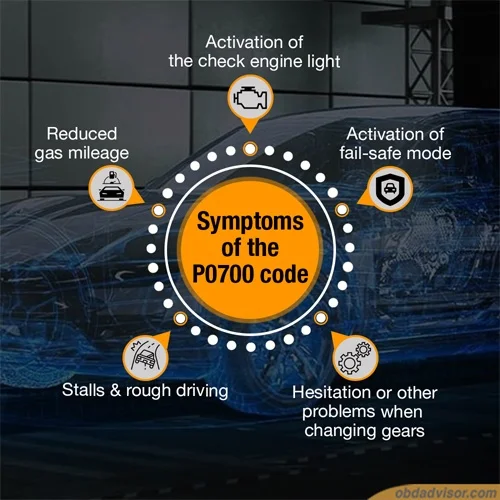
- Activation of the check engine light,
- Activation of fail-safe mode,
- Hesitation or other problems when changing gears,
- Stalls and rough driving,
- Reduced gas mileage.
What are the causes of P0700?
- Shift solenoid is defective,
- The engine coolant sensor is defective,
- Short or open circuit in TCM,
- Faults in the transmission valve body,
- TCM is faulty,
- PCM is faulty (rare).
How serious is the P0700 code?
The P0700 is very serious. Issues with your transmission control system can prevent your car from changing gears, potentially making your car dangerous to drive. You should stop immediately driving when P0700 activates and avoid driving (aside from controlled diagnostic road tests) until you’ve repaired the problem.
How to diagnose the P0700 code?
While P0700 is a generic powertrain code, the specific fix can vary depending on your vehicle. Check your car’s manual and search for technical service bulletins applicable to your make and model before starting your diagnosis.
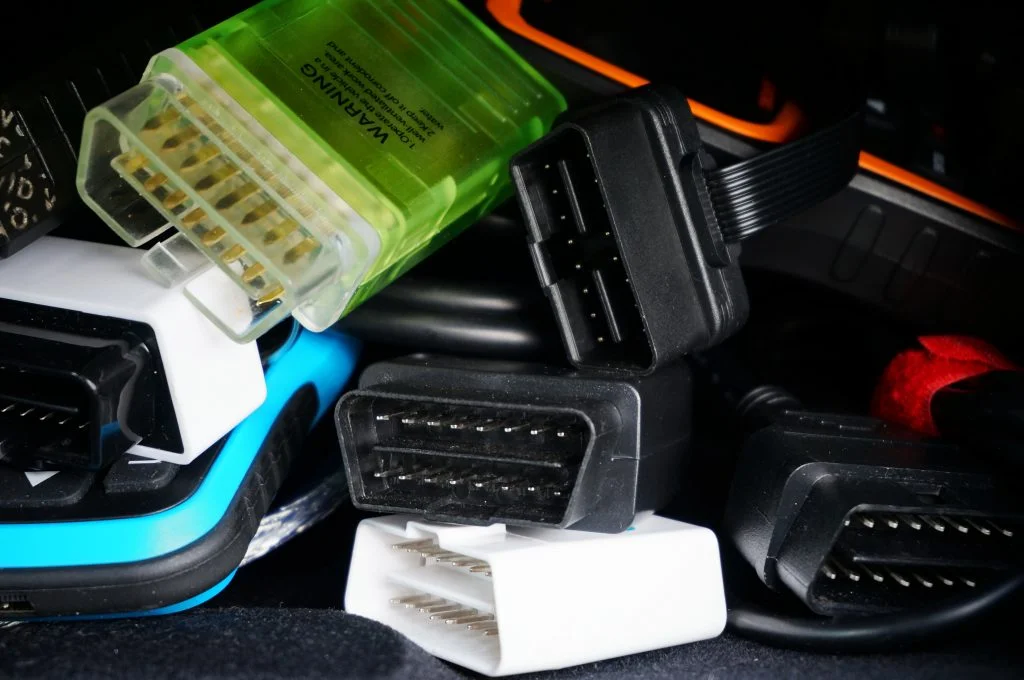
Tools you’ll need: OBD2 scan tool.
Here are the steps:
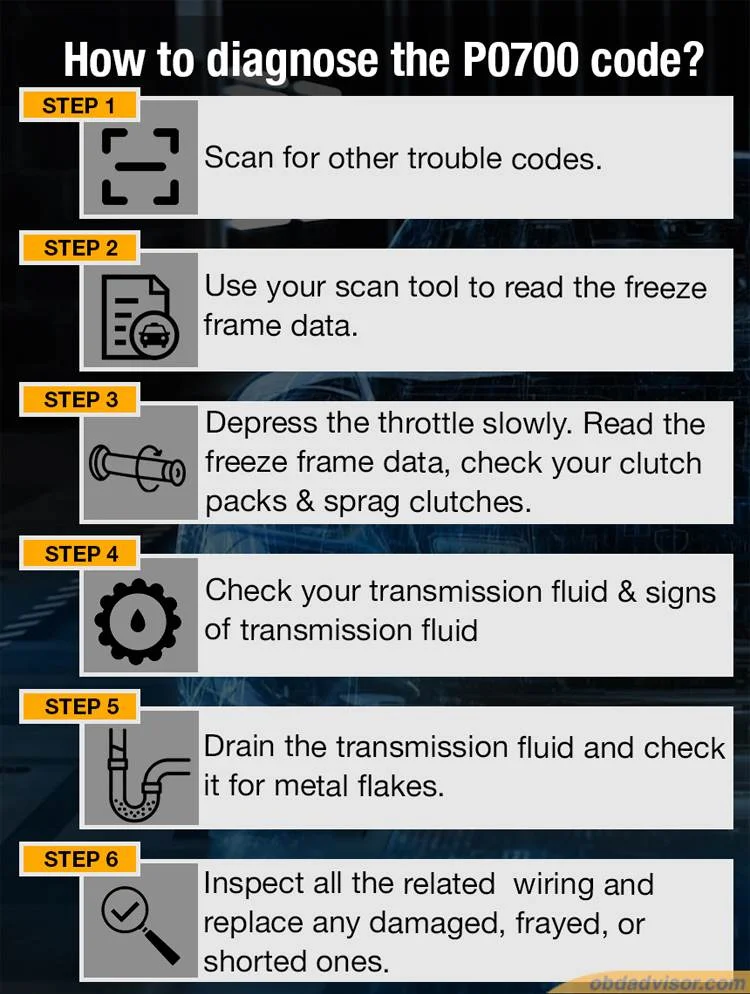
- Scan for other trouble codes. Most of the time, P0700 is activated, but it isn’t the only trouble code. You will commonly see codes related to the shift solenoid. Diagnose these codes first. Since they’re more specific, it’s often easier to locate the issue.
- Use your scan tool to read the freeze frame data. Pay particular attention to the RPM, throttle position, and engine torque readings. Compare the RPM’s input speed and output speed.
- Depress the throttle slowly, starting above 45mph. Read the freeze frame data as you do this. The Slip Speed should never go over 50rpm. If it increases, the converter clutch is slipping. Alternatively, if the Slip Speed is steady, but the output shaft speed decreases, the transmission is slipping internally. Check your clutch packs and sprag clutches for wear.
- Check your transmission fluid. It should be read and clear of debris, and the reservoir should be filled sufficiently. Also, check for signs of transmission fluid on your engine components or pooled fluid beneath your car, which could indicate a leak.
- Drain the transmission fluid and check it for metal flakes. These are from mechanical wear in the transmission and are often seen when the transmission is failing. If these flakes are present, they may have clogged the solenoid, causing it to fail. Metal flakes may also indicate your transmission needs to be rebuilt or replaced.
- Inspect all the wiring related to the transmission system. Replace any wires that are damaged, frayed, or shorted.
Common mistakes to avoid while diagnosing the P0700 code
The biggest mistake is to diagnose based on your car’s symptoms rather than reading the trouble codes. The drivability issues associated with P0700 can be misinterpreted as engine misfires. With a serious code like this, it’s crucial to conduct a thorough diagnosis using an OBD2 scan tool and ensure you’ve fixed the issue.
What should you do to fix the code P0700?
- Replace any faulty or damaged wires found during your diagnosis. Ensure all connections are secure.
- Locate the source of any transmission fluid leaks and replace the faulty component.
- Drain your transmission fluid, then remove and replace the filter. Examine both the fluid and filter for debris. If any is present, flush your system and put in fresh transmission fluid. If there are many metal flakes in your transmission fluid, take your car to a transmission expert. There is a more serious issue in your system that needs to be addressed.
- Replace the transmission shift solenoid if it is dirty or damaged.
- Clear all OBD2 codes and take a test drive, replicating the conditions of the initial failure. If the P0700 code comes back, you may have more complicated electrical problems. Take your car to a mechanic for further diagnosis.
Tips to avoid P0700 in the future
Proper maintenance of your transmission system is the best way to avoid the P0700 code. Check your transmission fluid regularly and replace it when it gets dirty. If you see drips or puddles of transmission fluid in your garage or driveway, locate and fix the leak right away, even if no trouble codes are active.
Read more: P0440: Meaning, Symptoms, Causes, Diagnostics, and Fixes.
P0303 – Cylinder 3 misfire detected
P0303 – Cylinder 3 misfire detected
The P0303 code activates whenever cylinder 3 in your engine misfires. While a single misfire may not be cause for concern, repeated misfires are a sign of a bigger problem and could lead to long-term damage.
Finding the source of the misfire isn’t always easy, even when you know which cylinder it’s affecting. If other trouble codes are active, those can be a big help in isolating the issue. If not, there are steps you can follow to correctly diagnose the P0303 OBD2 code.
Diagnosing P0303 can be a time-consuming process. The good news is, it doesn’t always mean an expensive or difficult repair. Read on below to learn more.
P0303 code definition
P0303 code definition (generic): Cylinder #3 misfire detected
P0303 Ford code definition: Cylinder 3 misfire detected
P0303 Nissan code definition: Number 3 cylinder misfire detected
P0303 Subaru code definition: Cylinder 3 misfire detected
P0303 Toyota code definition: Cylinder 3 misfire detected
P0303 VW code definition: Cylinder 3 misfire detected
What does P0303 mean?
The generic powertrain code P0303 tells you there’s been a misfire in cylinder 3. You’ll usually see it along with the broader P0300 OBD2 code, which activates for a random misfire. Other trouble codes might come up, as well, including those relating to the air/fuel mixture.
While this code is generic, the fixes can vary depending on your car’s make and model. Always check your vehicle’s manual for recommended repairs before starting your diagnosis. Check for any technical service bulletins, as well, in case there’s a known issue for your car.
The exact placement of the cylinders in your engine depends on its size and style. In most V8 engines, cylinder 3 is directly behind cylinder 1, on the right side when you’re facing the engine. There are major manufacturers, however—most notably Ford—that number the cylinders from front to back, making cylinder #3 the third one back on the right side. Verify how your cylinders are numbered in your manual before starting your diagnosis.
What are the symptoms of the P0303 code?
If the misfire was a one-off problem, you may not experience any drivability symptoms. In most cases, though, they will be severe. The most common include:
- Activation of the check engine light
- Shaking or rough running from the engine
- The smell of fuel in the exhaust
- Jerking and hesitation when accelerating
- Reduced engine power
- Reduced gas mileage
- Hard starts and stalls

What are the causes of P0303?
The most common causes of the P0303 OBD2 code are:
- Worn or faulty spark plugs
- Worn or faulty wiring around the spark plugs
- Worn or faulty coil packs
- Faulty distributor
- Faulty fuel injector
Cylinder 3 misfires can also be caused by:
- Vacuum leaks in the fuel or exhaust systems
- Faulty camshaft sensor, crankshaft sensor, or oxygen sensor
- Faulty or clogged catalytic converter
- Low fuel pressure
- Low engine compression
- Fuel quality incorrect for the engine
- Faulty computer (rare)
How serious is the P0303 code?
The P0303 trouble code is potentially quite serious. Misfires in the engine can cause damage to internal systems. The erratic driving that’s often a symptom of this trouble code also makes the vehicle unsafe to drive. Avoid driving your vehicle until you’ve repaired the issue.
How to diagnose the P0303 code
Tools you’ll need:
- OBD2 scan tool
- Basic tool kit (a screwdriver, a ratchet set, a socket set, etc.)
- Digital multimeter
- Fuel pressure gauge
- Compression tester
Method:
- Use the OBD2 scan tool to check for other trouble codes. If any others come up, fix those first.
- Clear all codes and test drive your vehicle. If P0303 doesn’t come back and you’re experiencing no symptoms, it may have been a random misfire.
- Inspect all the vacuum hoses in your system for air leaks. Be sure to feel any spots you can’t see for hidden damage or holes.
- Inspect the ignition coils and wiring for damage and ensure the connections are secure. Check the spark plug wires for the same issues.
- If your engine has movable coil packs, swap the cylinder 3 coil pack with the one in cylinder 1. Clear the codes and rescan your vehicle. If the misfire moves, the coil pack is likely faulty.
- Visually inspect the spark plugs. If they’re coated in oil, corroded, or fouled by carbon build-up, clean or replace them.
- Use a digital multimeter to test the spark plug wires. Remove each wire and connect one multimeter lead to each end. Compare the reading with your vehicle’s specifications.
- Check the fuel injectors using a digital multimeter. Inspect the wiring for damage or loose connections.
- Use a fuel pressure gauge to check your fuel pressure. If it’s too low, either the fuel pressure regulator or the fuel pump is failing.
- Perform a compression test to check for mechanical causes of the misfire, like a burned valve or worn valve guide. This test will also tell you if the engine timing is off due to a skipped or misaligned timing chain.
Common mistakes to avoid while diagnosing the P0303 code
Many people start replacing big components before they check the little things like leaking hoses or damaged wires. Be thorough in your diagnosis so you don’t overlook potentially cheap and easy solutions.
What should you do to fix the code P0303?
- Replace any damaged wires found during your diagnosis. If you located more than 2 bad wires around the spark plugs, it’s recommended to replace the entire set.
- Repair or replace any leaking hoses or other sources of air leaks in the air intake system.
- If the coil pack failed or the spark plugs were fouled, replace them.
- Replace any fuel injectors that failed step 8 of the diagnosis. If your fuel pressure is still too low, replace your fuel pump.
Tips to avoid P0303 in the future
Problems with the air-to-fuel ratio often lead to misfires. Leaks in the vacuum system make the mix too lean. Inspect your vacuum hoses periodically for leaks and ensure they’re fastened securely, away from any engine components that could cause damage.
Read more:
P1399 Honda – Random Cylinder Misfire Detected
P0300 Code: Meaning, Symptoms, Causes, and Fixes
P0017: Crankshaft Position – Camshaft Position Correlation (Bank 1 Sensor B)
P0017: Crankshaft Position – Camshaft Position Correlation (Bank 1 Sensor B)
Imagine starting your car engine or driving down the road and you notice the “check engine light” on. After an OBD2 scan, the P0017 pops up. But, what’s the next move?
Let’s find out.
- P0017 Definition: Crankshaft Position – Camshaft Position Correlation (Bank 1 Sensor B)
- Code type: Generic – P0017 indicates the same problem whether you’re having a Mercedes, Hyundai, Ford, etc.
- Can I drive with the P0017 code? No, you can’t. It can cause severe damage to your engine.
- Is it easy to fix? Intermediate to advanced levels.
- Cost: $25 – $100 (common)
To understand the P0017 code better, I have narrowed this article into four parts: causes, symptoms, diagnosis, and solutions.
So, keep reading to learn more about this trouble code.
What Does The P0017 Code Mean?
Code P0017 indicates misalignment between crankshaft and camshaft position sensors (in bank 1 sensor B.) When the camshaft is greater than 9 degrees advanced, or 12 degrees retarded, compared to the crankshaft, P0017 is set.
- Bank 1: The issue occurs in the engine side having cylinder 1.
- Sensor B: The issue is found on the exhaust camshaft side.
Crankshaft vs. Camshaft
The crankshaft and camshaft are connected with a timing chain located at the end of the engine.
- Camshaft: Allow the air-fuel mixture to enter the combustion chamber and releases the burnt exhaust gas.
- Crankshaft: Harness the engine’s torque to rotate the camshaft.
These two shafts must have perfect timing for optimum control of the combustion. If the correlation is off, it leads to power loss, engine overheating, misfire, etc.
Engine timing
To prevent the correlation from going off, the engine timing must be controlled with the help of various parts:
- Timing belt/chain.
- VVT sprocket.
- Timing belt tensioner.
- Oil control valves.
- Camshafts and crankshafts solenoid.
- Camshafts and crankshafts.
In case any of the above parts goes wrong, it leads to the P0017 code popping up.
Other related trouble codes of P0017 include P0016, P0008, P0014, P0009, and P0019.
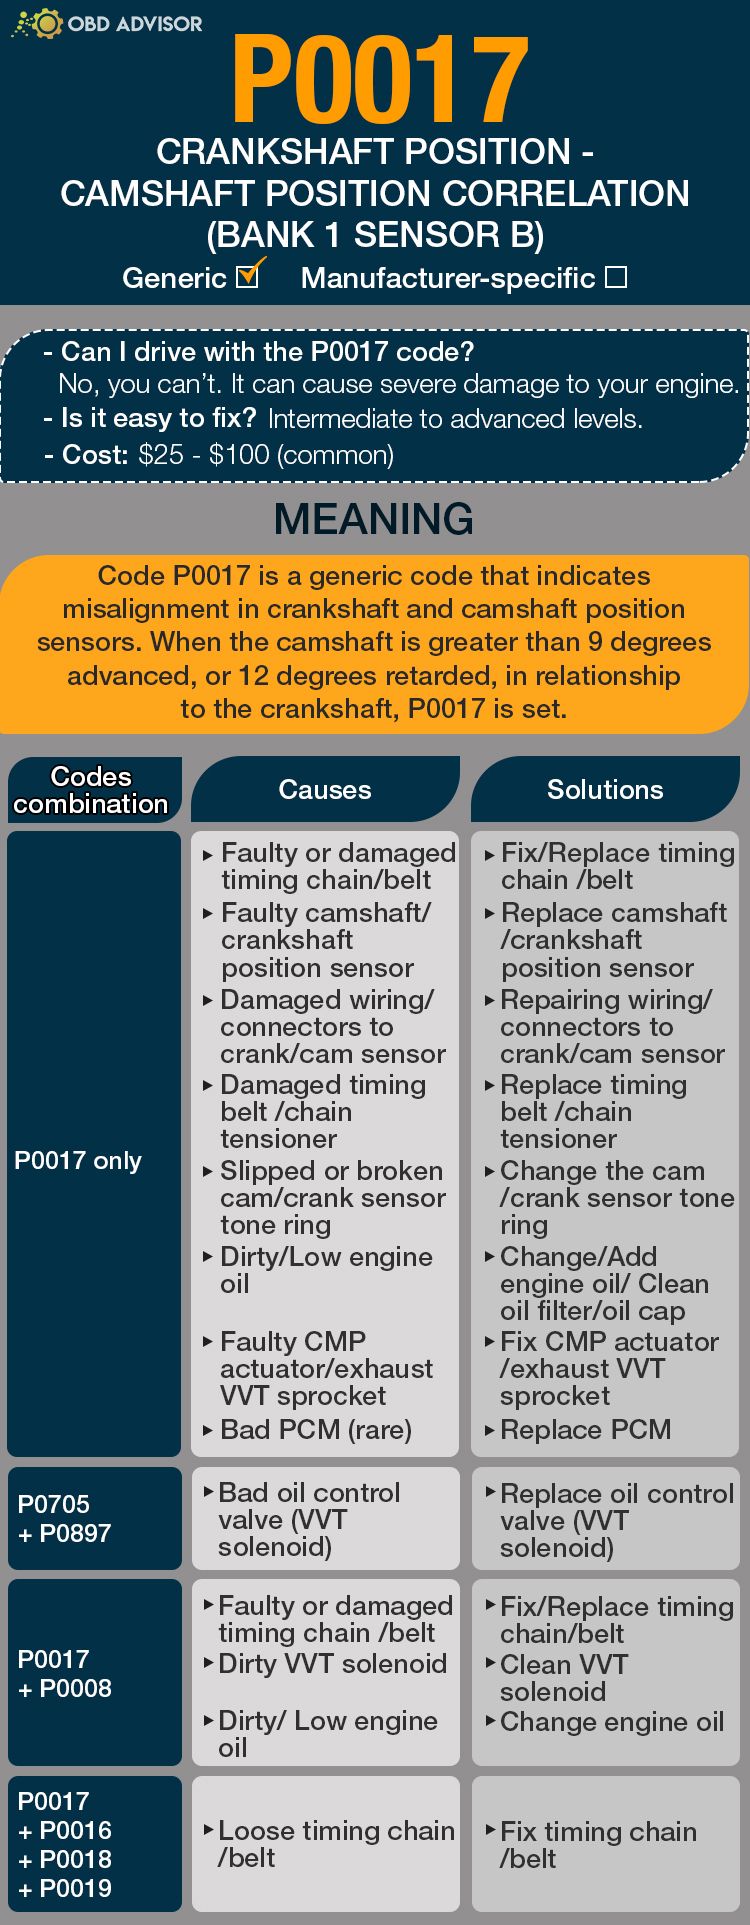
P0017 Causes Identification: Quick View
The P0017 code can occur either solely or in combinations with other related codes.
Refer to the table below to identify the root causes and solutions of P0017 and its related codes.
| Codes combination | Causes | Solutions |
|---|---|---|
| P0017 only | Faulty or damaged timing chain/belt Faulty camshaft/crankshaft position sensor Damaged wiring/connectors to crank/cam sensor Damaged timing belt/chain tensioner Slipped or broken cam/crank sensor tone ring Dirty/Low engine oil Faulty CMP actuator/exhaust VVT sprocket Bad PCM (rare) | Fix/Replace timing chain/belt Replace camshaft/crankshaft position sensor Repairing wiring/connectors to crank/cam sensor Replace timing belt/chain tensioner Change the cam/crank sensor tone ring Change/Add engine oil/Clean oil filter/oil cap Fix CMP actuator/exhaust VVT sprocket Replace PCM |
| P0017 + P0016 | Bad oil control valve (VVT solenoid) | Replace oil control valve (VVT solenoid) |
| P0017 + P0008 | Faulty or damaged timing chain/belt Dirty VVT solenoid Dirty/Low engine oil | Fix/Replace timing chain/belt Clean VVT solenoid Change engine oil |
| P0017 + P0014 | Dirty/Low engine oil Faulty camshaft position sensor Bad oil control valve (VVT solenoid) | Change engine oil Replace camshaft position sensor Replace oil control valve (VVT solenoid) |
| P0017 + P0016 + P0018 + P0019 | Loose timing chain/belt | Fix timing chain/belt |
Note: The causes for each code combination are the most common ones. There can be some uncommon issues hidden under those codes
P0017: Causes, Symptoms, And How To Fix
Regardless of the causes, the common symptoms of P0017 include:
- Check engine light on.
- Increased fuel consumption.
- Reduced engine performance.
- Engine noise and misfires (severe condition).
- Rough accelerations.
- Hard start engine problems.
Read further to identify the causes (from the most to least common) of P0017 with their relevant repairs.
Causes #1: Faulty or damaged timing chain /belt
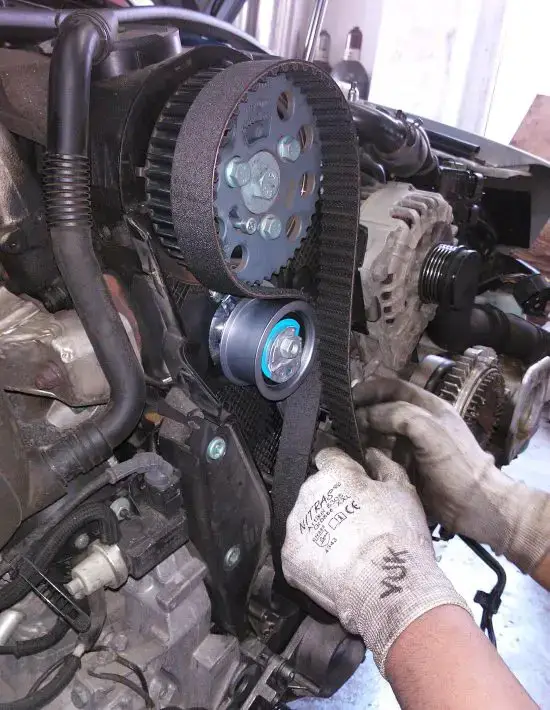
The most common cause of the P0017 code is a faulty timing chain/belt.
In this situation, the timing chain/belt affects the engine timing, causing the P0017 code to pop up.
Other related codes may sometimes show, including P0016, P0018, and P0019.
In this case, replacing the defective timing chain/belt is the best option.
You can check this video about how to change the car timing belt from the Scotty.
Causes #2: Faulty camshaft/crankshaft position sensor
Damage in the camshaft/crankshaft sensor is another possible cause of the P0017 code.
The unique symptoms you’re likely to notice in this particular cause include:
- Inconsistent sensor signals.
- Engine stalling.
- Car surging.
- “Limp mode” on, causing gear shifting problems.
Replacing the damaged camshaft/crankshaft position sensor solves this problem. This process requires an expensive scan tool to relearn the sensors (which I highly doubt that you have one.) Therefore, I suggest you bring your car to a mechanic to handle it.
Causes #3: Damaged wiring/connectors to crank/cam sensor
A damaged wiring/connector to the crank/cam sensor leads to a failing cam/crank sensor. In return, it causes intermittent problems, which the PCM detects, thus throwing the P0017 code. The symptoms for this cause are the same as for a faulty crank/cam sensor.
In some cases, a damaged crank/cam sensor wiring can also result in a combination of the P0017 and P0014 code errors.
So, it is worth inspecting the wiring connections and ensuring there are no damaged or burnt wires. If any, replace them, and you will see the code error disappearing.
Watch this video to know how to change the crankshaft/camshaft sensor connector
(by Kamal Akeel.)
Causes #4: Bad oil control valve (VVT solenoid)
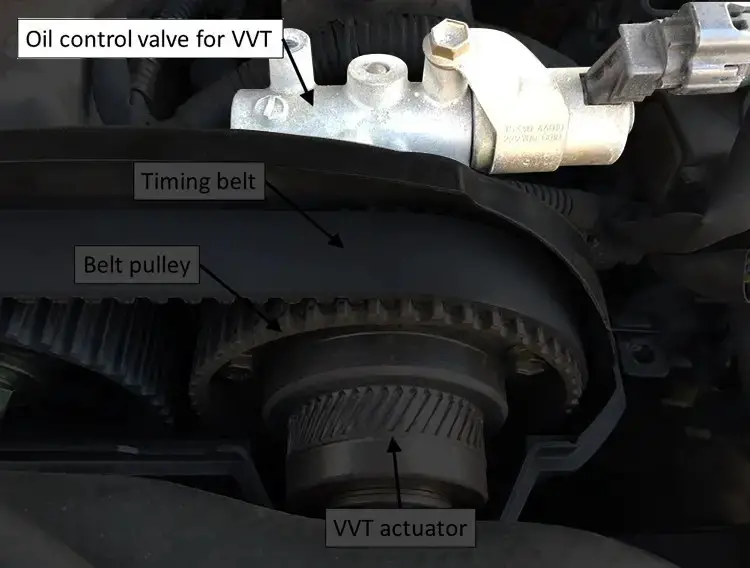
A bad oil control valve (VVT solenoid) alters retarding and advancing of the valve timing as needed. In return, the engine develops oil flow problems which lead to the P0017 code manifesting. Also, the engine exhibits performance problems such as poor acceleration and rough running.
Nevertheless, the P0017 code error will sometimes appear in combination with P0014 or P0016.
In this case, replacing the bad oil control valve (VVT solenoid) is the best action you should take to do away with P0017.
Watch this video to learn how to diagnose the oil control valve.
Causes #5: Damaged timing belt/chain tensioner

Anything going wrong with the timing belt/chain tensioner affects the timing belt. As a result, the cam and crank connection is interrupted, causing the pistons and valves to fail, thus, triggering the P0017 code. The symptoms of this issue are similar to those of a damaged timing belt/chain.
Apart from the common symptoms, the P0017 code may sometimes show in combination with the P0008 code.
The best way to solve this problem is to replace the timing belt/chain tensioner.
Causes #6: Slipped or broken cam/crank sensor tone ring
Slipped or broken cam/crank sensor tone ring interrupts the magnetic sensor from taking correct readings. As a result, the ECU indicates an inaccurate crank/cam position, thus triggering the P0017 code.
In this situation, changing the cam/crank sensor tone ring is the best solution. The process is simple as you can do it without special tools. However, you can call for mechanic assistance if you’re uncomfortable doing it yourself.
Causes #7: Dirty/ Low engine oil
The debris in an engine oil clogs the cam/crank, thus turning off the engine timing. Also, a low-quality engine oil fails to lubricate the engine parts properly. As a result, engine overheating occurs as well as breaking the rods which also turns off the engine timing.
Besides triggering the P0017 code, it can as well cause a combination of the P0017 with P0008 or P0014 codes.
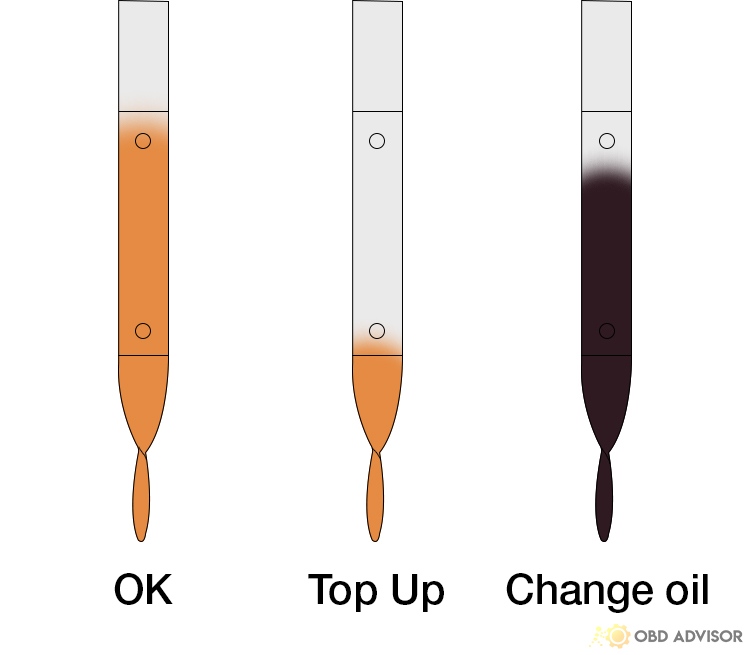
If this is the case, pouring down the engine oil and replacing it with a pure one is advisable. Also, you should develop a schedule in which you will be changing the engine oil without letting it overstay.
Before changing or adding the oil, it is advisable to clean the oil filter/oil cap. And if the oil filter/oil cap goes wrong, change it.
Watch video: How to change oil by yourself for any car in just 5 minutes by 1A Auto.
Causes #8: Faulty CMP/VVT actuator/exhaust VVT sprocket
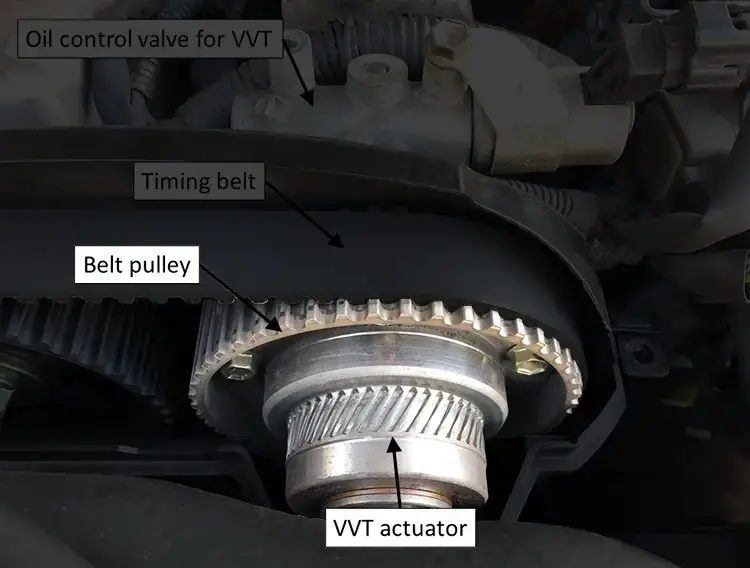
but the best option is to replace it.
Causes #9: Bad PCM (rare)
If you still see the P0017 code after solving all other causes, then check the PCM. Remember, the PCM is the main engine computer that ensures everything happening in the engine is perfect.
So, a bad PCM can trigger various trouble codes, although it rarely occurs. It can cause the P0017 code to pop up only or together with P0016.
If PCM is the problem, you should visit a mechanic shop for a replacement.
How Much Does It Cost To Fix The Code P0017?
You can fix most causes of the P0017 code by yourself with a few bucks. For instance, a new cam/crank position sensor can cost about $25-$100.
If you don’t feel comfortable replacing the parts, then a qualified mechanic comes in handy. The cost of hiring the mechanic can vary based on personal rates, but you can expect to pay between $95 and $200.
The Estimated Repair Cost Of P0017
| Solutions | Cost |
|---|---|
| Replacing the faulty timing chain / belt | DIY: $20 – $150 Mechanic: $95 – $200 |
| Replacing faulty or damaged camshaft / crankshaft position sensor | DIY: $20 -$100 Mechanic: $95 – $200 |
| Replacing damaged wiring / connectors to crank / cam sensor | DIY: $15 – $50 Mechanic: $100 – $250 |
| Replacing bad oil control valve (VVT solenoid) | DIY: $20 – $150 Mechanic: $210 – $250 |
| Replacing damaged timing belt / chain tensioner | DIY: $20 – $200 Mechanic: $500 – $2000 |
| Replacing slipped or broken cam / crank sensor tone ring | DIY: $20 – $100 Mechanic: $95 – $200 |
| Changing dirty / Add engine oil | DIY: $20 – $70 Mechanic: $40 – $120 |
| Replacing faulty CMP actuator / exhaust VVT sprocket | DIY: Not recommended Mechanic: $450 – $1630 |
| Replacing bad PCM | DIY: Not recommended Mechanic: $1000 – $3000 |
Note: The data provided in this table is dated June 2022. The exact cost of each solution can vary depending on various factors such as mechanic rates, vehicle models, etc.
You Ask, I Answer
I hope this article helps you understand why you see the P0017 code error. If so, now you can identify the causes of the code and find a quick solution that saves you time and money.
However, if you still have any disturbing questions about the P0017 code, don’t hesitate to comment in the comment box. For sure, I will respond as soon as I see it.
Similarly, you can comment and share your story if you had the P0017 code before. That way, you educate others who can apply your trick and solve these trouble codes.
See ya!
Read more: The 9 Best OBD2 Scanners for 2024: The Only Review You Need
P0016: Crankshaft Position – Camshaft Position Correlation (Bank 1 Sensor A)
P0016: Crankshaft Position – Camshaft Position Correlation (Bank 1 Sensor A)
Your check engine light turns on, throwing the P0016 code? Well, that’s an alert, signaling troubles in your car engine timing. But, what next?
Let’s take a brief look at the information below.
- P0016 Definition: Crankshaft Position – Camshaft Position Correlation (Bank 1 Sensor A).
- Code Type: Generic – P0016 indicates the same problem whether you’re having a Chevy, Dodge, or Ford, etc.
- Can I drive with the P0016 code? No, keeping driving can cause more damage to the engine.
- Easy to fix? DIY to advanced levels.
- Cost: $30 – $150 (common)
Due to its severity, most people get confused and frightened when they see the P0016 code. Stay calm, I will tackle this error code in-depth, including its causes, diagnosis, symptoms, and quick solutions in this article.
Let’s dive in for more details!
What Does The P0016 Code Mean?
P0016 code stands for Crankshaft Position – Camshaft Position Correlation (Bank 1 Sensor A). This indicates that the engine timing is having problems resulting from the misalignment in the crankshaft and camshaft positions.
- Bank 1: Means that the problem is on the engine side containing cylinder 1.
- Sensor A: Indicates that the issue is affecting the intake camshaft side.
Crankshaft Vs. Camshaft
The crankshaft and camshaft are connected with a timing chain located at the end of the engine.
- Camshaft: control the valves, which allow the air-fuel mixture to enter the combustion chamber and release the burnt exhaust gas.
- Crankshaft: Harness the engine’s torque to rotate the camshaft.
These two shafts must have perfect timing for optimum control of the combustion. If the correlation is off, it leads to power loss, engine overheating, misfire, etc.
Engine Timing
To prevent the correlation from going off, the engine timing must be controlled with the help of various parts:
- Timing belt/chain.
- VVT sprocket.
- Timing belt tensioner.
- Oil control valves.
- Camshafts and crankshafts solenoid.
- Camshafts and crankshafts.
In case any of the above parts goes wrong, it leads to the P0016 code popping up.
Other related trouble codes of P0016 include P0017, P0008, P0014, P0009, and P0019.
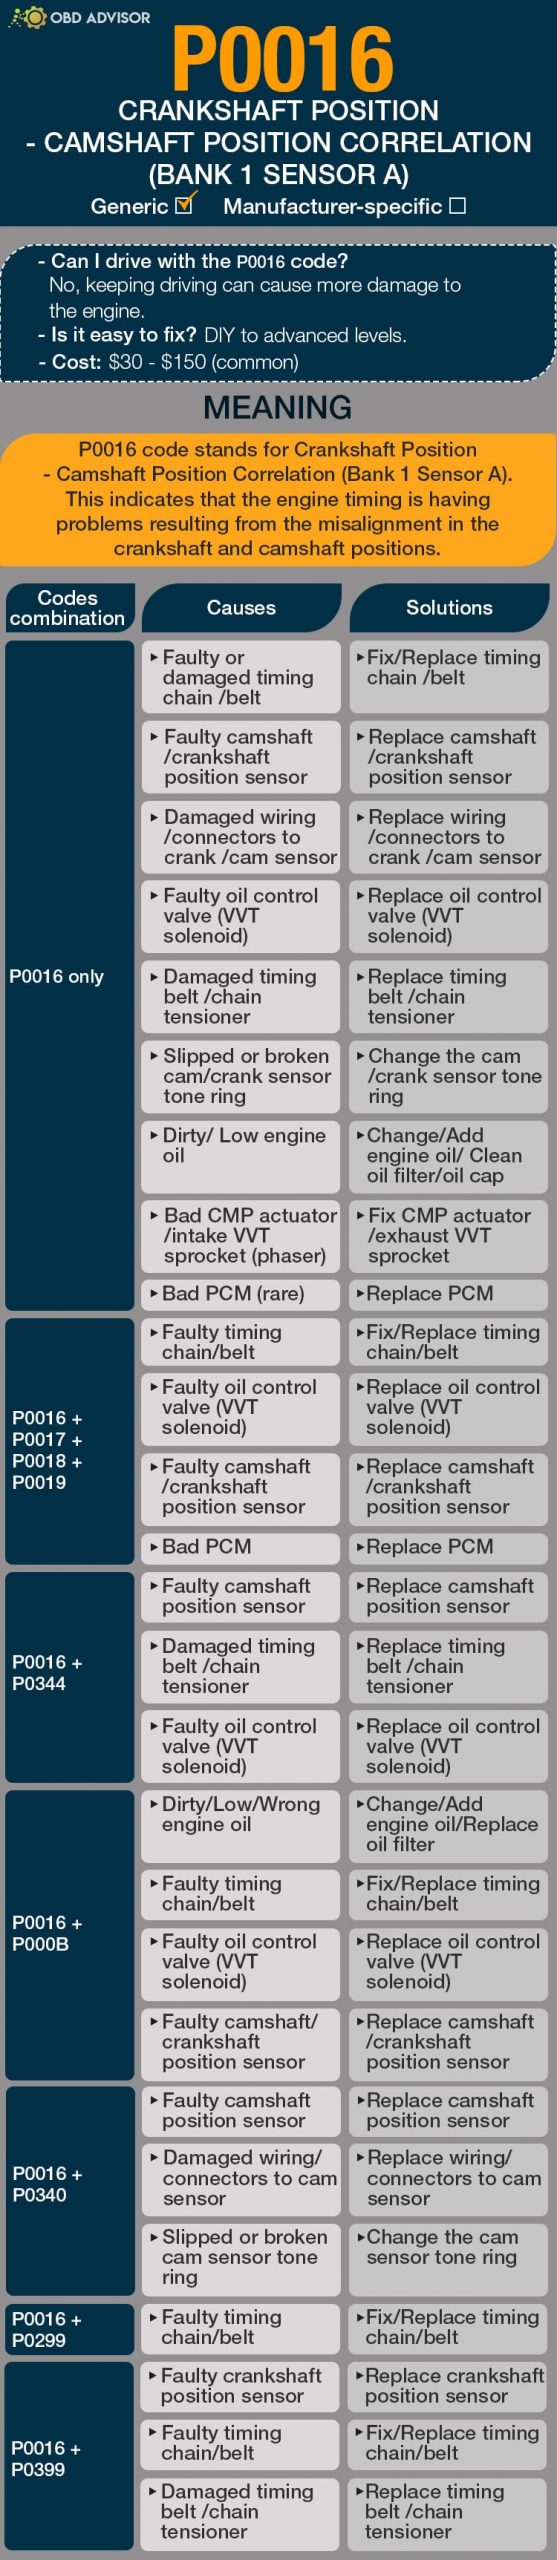
P0016 Causes Identification: Quick View
There are various causes of the P0016 DTC. Usually, a faulty camshaft/crankshaft position sensor is the main one.
In most cases, you may see the P0016 only, but sometimes, it may occur in combination with other related codes. Check the table below to understand those specific combinations and their specific causes.
| Codes Combination | Causes | Solutions |
|---|---|---|
| P0016 only | Faulty or damaged timing chain /belt Faulty camshaft/crankshaft position sensor Damaged wiring/ connectors to crank /cam sensor Faulty oil control valve (VVT solenoid) Damaged timing belt /chain tensioner Slipped or broken cam/crank sensor tone ring Dirty/ Low engine oil Bad CMP actuator/intake VVT sprocket (phaser) Bad PCM (rare) | Fix/Replace timing chain /belt Replace camshaft/crankshaft position sensor Replace wiring/ connectors to crank /cam sensor Replace oil control valve (VVT solenoid) Replace timing belt /chain tensioner Change the cam/crank sensor tone ring Change/Add engine oil/ Clean oil filter/oil cap Fix CMP actuator/exhaust VVT sprocket Replace PCM |
| P0016 + P0017 + P0018 + P0019 | Faulty timing chain/belt Faulty oil control valve (VVT solenoid) Faulty camshaft/crankshaft position sensor Bad PCM | Fix/Replace timing chain/belt Replace oil control valve (VVT solenoid) Replace camshaft/crankshaft position sensor Replace PCM |
| P0016 + P0344 | Faulty camshaft position sensor Damaged timing belt /chain tensioner Faulty oil control valve (VVT solenoid) | Replace camshaft position sensor Replace timing belt /chain tensioner Replace oil control valve (VVT solenoid) |
| P0016 + P000B | Dirty/Low/Wrong engine oil Faulty timing chain/belt Faulty oil control valve (VVT solenoid) Faulty camshaft/crankshaft position sensor | Change/Add engine oil/Replace oil filter Fix/Replace timing chain/belt Replace oil control valve (VVT solenoid) Replace camshaft/crankshaft position sensor |
| P0016 + P0340 | Faulty camshaft position sensor Damaged wiring/ connectors to cam sensor Slipped or broken cam sensor tone ring | Replace camshaft position sensor Replace wiring/ connectors to cam sensor Change the cam sensor tone ring |
| P0016 + P0299 | Faulty timing chain/belt | Fix/Replace timing chain/belt |
| P0016 + P0399 | Faulty crankshaft position sensor Faulty timing chain/belt Damaged timing belt /chain tensioner | Replace crankshaft position sensor Fix/Replace timing chain/belt Replace timing belt /chain tensioner |
P0016: Causes, Symptoms, And How To Fix
Although the causes of P0016 may show varying symptoms, here are the most common ones that you should look out for.
- Check engine light on
- Poor car engine performance
- High fuel consumption
- Engine hard start
- Rattling sounds from the engine
The onset of these signs needs quick action. So, keep reading to learn more about the causes and what to do if you encounter one.
Cause #1: Faulty Timing Chain/Belt
The timing belt/chain helps in synchronizing the crankshaft and the camshaft timing.
For some reason, the timing chain/belt may skip a few teeth, putting the cam and crank out of sync.
Faulty timing chain/belt symptoms:
- Loss of power when the car is cruising (Timing chain/belt skipped one tooth).
- Knocking sounds from the engine (Timing chain/belt skipped two teeth).
- Can’t start, no pressure when doing a compression test (Timing chain/belt skipped three teeth).
- P0016 may appear alone or come along with P0299, P0399, P000B, P0017, P0018, or P0019.
If this is your case, replacing the faulty timing chain/belt will solve the problem. Having that job done is not complex because no special mechanic experience is needed.
Cause #2: Faulty Camshaft/Crankshaft Position Sensor
The camshaft/crankshaft position sensors are responsible for monitoring the cam and crank position.
When one of these sensors get faulty, it conveys inaccurate data, leading to mismatched ignition timing and fuel delivery. The PCM sets up the P0016 code to signal this problem.
Faulty camshaft/crankshaft position sensor symptoms:
- Engine vibrations and misfire
- Gear shifting problems
- Engine stalling
- Rough idling
To solve this problem, you need to replace the camshaft/crankshaft position sensor. Bear in mind that you should choose the OEM parts for the best result.
Cause #3: Damaged Wiring/Connectors To Crank/Cam Sensor
The wiring/connector linking to the crank/cam sensor can be burnt, unplugged, or shorted. As a result, the functions of the sensor and other engine timing parts are compromised, triggering P0016. Note that the DTC may appear as P0016 only or as P0016+P0344.
Damaged wiring/connectors to crank/cam sensor symptoms:
- Ignition problems
- Poor idling
- Failure in tachometer
- Engine misfiring
If the wires are unplugged, locate and plug them in to fix the issue. However, you should replace the wiring/connectors to the crank/cam sensor if they are shorted, burnt or their insulation is damaged.
Cause #4: Faulty Oil Control Valve (VVT Solenoid)
Oil control valve’s function is to alter the camshaft rotation, giving the engine better performance at different RPMs. This component is only available if your engine has the variable valve technology (VVT.)
If a faulty oil control valve is the culprit, either the car has poor gas mileage at low RPM or lack of power at WOT.
Besides, the P0016 may show alone or in combination with P000B, P0017, P0018, P0019, or P0344.
Replacing the oil control valve (VVT solenoid) should fix the problem. This process is not difficult and you can do that right in your garage.
Cause #5: Damaged Timing Belt/Chain Tensioner
Over time, the timing belt/chain material wears out and gets overstretched, causing it to fail.
For that reason, a timing chain/belt tensioner is used to keep the timing belt/chain more tightened.

If the timing chain/belt tensioner gets damaged, the timing chain/belt becomes loose. This will cause engine timing problems, which the PCM will detect and set up P0016 to send signals of the issue.
Similarly, this cause can trigger a combination of the P0016 code with P0399 or P0344.
In this case, you need to replace the timing belt/chain tensioner.
Cause #6: Slipped Or Broken Cam/Crank Sensor Tone Ring
Due to the crank rotation impact, the sensor tone ring may get loosened, damaged, or fail to shear the key aligning them. Sometimes, the DTC can occur as P0016 only or as P0016 + P0340.
If your cam/crank sensor tone ring is the culprit, replacing it is the best option to go for eradiating the code.
Cause #7: Dirty/Low/Wrong Engine Oil
Dirty engine oil is a common cause of faulty oil control valves. This happens when the debris builds up, thus blocking the valves.
Similarly, low/wrong engine oil can also affect the engine timing. If the oil has a wrong viscosity, the camshaft phaser fails to work right.
Either way, dirty/low/wrong engine oil affects the engine timing badly, which triggers the P0016 and sometimes P0016+P000B.
If this happens, flush the engine oil and ensure that you use compatible engine oil to avoid the same mistake.
Cause #8: Bad CMP Actuator/Exhaust VVT Sprocket
Most vehicles use the CMP actuators/exhaust VVT sprocket to change the cam position and advance or retard the valve timing. If it goes bad, it will cause the crankshaft and camshaft to misalign.
Since the PCM controls the VVT solenoids that apply oil pressure on the actuator, it will detect the change and set up the P0016 code. In this case, a replacement of the CMP actuator/exhaust VVT sprocket is needed to solve the P0016 code error.
Cause #9: Bad PCM (Rare)
Once every possible cause of P0016 DTC is checked out, a bad PCM remains the only culprit. Similarly, this issue can trigger a combination of P0016 with P0017, P0018, and P0019.
The problem occurs once the PCM fails to control the engine ignition and spark, though it is rare. However, if it happens, the PCM is a complicated part that requires you to have a qualified mechanic to fix it. The mechanic can decide either to reprogram the PCM or replace it, depending on the severity of the problem.
How Much Does It Cost To Fix The Code P0016?
The cost of fixing the P0016 code depends on whether you are doing it yourself or using mechanic services. DIY will cost you a few dollars. For example, replacing a camshaft/crankshaft position sensor costs $25-$100.
The mechanic services are usually charged depending on the working hours, costing about $95 – $200. However, the cost of hiring a mechanic will vary, considering factors such as mechanic rates, car model, your location, etc.
The Estimated Repair Cost Of P0016
| Solutions | Repair cost |
|---|---|
| Replacing the faulty timing chain/belt | DIY: $20- $150 Mechanic: $95- $200 |
| Replacing faulty or damaged camshaft/crankshaft position sensor | DIY: $20- $100 Mechanic: $95- $200 |
| Replacing damaged wiring/ connectors to crank/cam sensor | DIY: $15- $50 Mechanic: $100- $250 |
| Replacing bad oil control valve (VVT solenoid) | DIY: $20- $150 Mechanic: $210- $250 |
| Replacing damaged timing belt/chain tensioner | DIY: $20- $200 Mechanic: $500- $2,000 |
| Replacing slipped or broken cam/crank sensor tone ring | DIY: $20-$100 Mechanic: $95- $200 |
| Changing dirty/Low engine oil | DIY: $20- $70 Mechanic: $40- $120 |
| Replacing faulty CMP actuator/exhaust VVT sprocket | DIY: Not recommended Mechanic: $450 to $1630 |
| Replacing bad PCM | DIY: Not recommended Mechanic: $1,000 to $3,000 |
Note: The data in this table was collected in June 2022. The actual price depends on many factors, such as your car’s make and year, mechanic’s rate, etc.
You Ask, I Answer
Hopefully, this guide helps you understand why you see the P0016 code displaying on a scanner tool.
I’m willing to answer any questions you have related to this code. Keep the question coming in the comment box below.
Also, you can share your experience if you had the P0016 code before, including what you did to fix it.
Safe driving!
Read more: The 9 Best OBD2 Scanners for 2024: The Only Review You Need
U0415 Code: Understanding, Diagnosing, And Fixing
U0415 Code: Understanding, Diagnosing, And Fixing
You’re facing the U0415 code on your car’s diagnostic display? Don’t let it overwhelm you – The U0415 code is a common diagnostic trouble code that relates to the Anti-Lock Brake System Control Module in vehicles.
Understanding the meaning, symptoms, causes, and repair procedures associated with the U0415 code is essential for maintaining safe driving conditions. In this article, I will present all of them and offer insights into DIY repairs and estimated costs.
Let’s dive in!
U0415 Code: A Quick Overview
Check the U0415 code summary provided below!
- Definition: Invalid Data Received From Anti-Lock Brake System (ABS) Control
- Severity: Medium
- DIY Skill Level: Intermediate
- Continue To Drive?: No
- Estimated Repair Cost: $50 – $500
What Does The U0415 Code Mean?
The U0415 code is a generic diagnostic trouble code (DTC) that represents “Invalid Data Received from Anti-Lock Brake System (ABS) Control Module.” It is triggered when the vehicle’s Powertrain Control Module (PCM) detects an irregular or erroneous signal from the ABS control module.
The ABS control module is responsible for monitoring the rotational speed of each wheel and ensuring optimal braking performance. It receives input from individual wheel speed sensors, which measure the rotational speed of each wheel. The module compares the rotational speed of each wheel many times per second.
In normal conditions, the wheels should rotate at the same speed, especially when the brakes are applied. However, if the wheels do not slow down at the same rate, such as when some wheels are on the road surface and others are off, the ABS control module will release the braking force on the wheels that are off the road surface to maintain steering control of the vehicle.
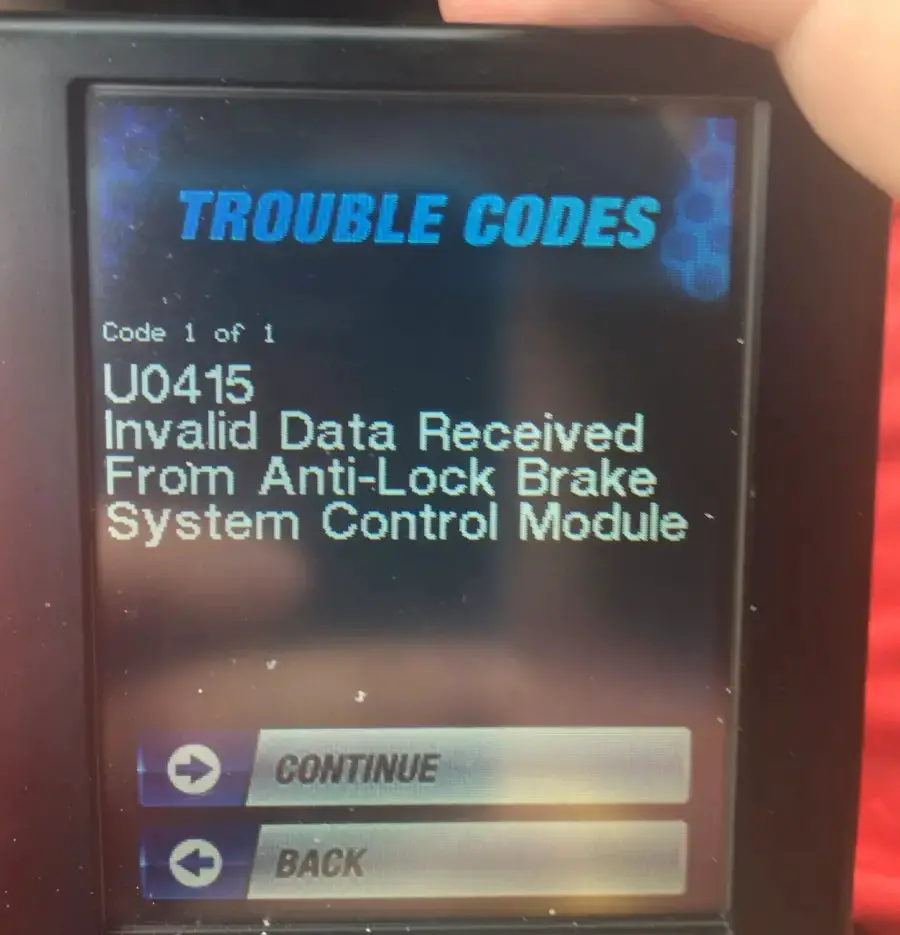
The PCM requires valid data from the ABS system via the wheel speed sensors to control the brake system effectively. If the PCM detects implausible or invalid data from the ABS, it will set the U0415 code and illuminate a warning light. In most cases, the ABS system will be disabled until the fault is corrected.
There may be additional codes related to individual wheel speed sensors, including C0544, C0031, C0045, etc. These codes can help pinpoint specific sensor issues.
While the U0415 code can occur in various vehicles, it is more commonly associated with brands such as Chevrolet, Ford, Dodge (Dart), Mazda, Honda, Jeep, Toyota, GM, Chrysler, and others. Please note that the specific definitions can vary slightly between different brands.
How Severe Is The U0415 Code?
The severity level of the U0415 code is moderate. While it does not pose an immediate safety risk, it can affect the proper functioning of the vehicle’s anti-lock brake system. The ABS system is crucial for maintaining control and stability during braking, especially in emergency situations or on slippery surfaces.
It is not recommended to continue driving with the U0415 code illuminated. When this code is present, the ABS system may be disabled, increasing the risk of wheel lock-up and potential loss of control during braking. It is advisable to have the vehicle inspected and repaired by a qualified technician as soon as possible to restore the ABS functionality and ensure safe driving conditions.
What Are The Symptoms Of The U0415 Code?
When the U0415 code is present, the following symptoms may be observed:
- Check engine light (MIL) ON
- ABS warning light illuminated
- Loss of ABS functionality
- Possible decrease in braking performance
What Are The Causes Of The U0415 Code?
The U0415 code can be caused by various factors, including:
- Wiring or connector issues in the ABS system
- Damaged or faulty ABS control module
- Malfunctioning wheel speed sensors
- Defective ABS pump or valve body
- Faulty PCM (rarely)
It is important to note that these are general causes, and a proper diagnosis is necessary to determine the exact source of the U0415 code in a specific vehicle.
Read more: P1777 Nissan Code: A Practical Repair Guide
How To Diagnose And Fix The U0415 Code In Your Vehicles?
When encountering the U0415 code, a comprehensive diagnostic and repair process can assist in resolving the problem. Here, we provide an outline of the necessary tools and components, a step-by-step guide, and an evaluation of the feasibility of DIY repair:
Essential Tools and Parts
To diagnose and repair the U0415 code, the following tools and parts may be required:
- OBD-II scanner/code reader
- Multimeter
- Wheel speed sensor(s)
- ABS control module (if necessary)
- Wiring repair kit
- Electrical connectors and terminals
- Basic hand tools (wrenches, sockets, etc.)
Step-by-Step Procedure
- Connect an OBD-II scanner/code reader and retrieve the U0415 code and any others.
- Inspect the ABS control module wiring and connectors for any visible damage or loose connections. Repair the issues, if any.
- Test the wheel speed sensors using a multimeter to check for proper resistance and signal output.
- If a faulty wheel speed sensor is identified, replace the sensor as necessary.
- If no issues are found with the wiring or sensors, further diagnosis of the ABS control module may be required.
- Consult the vehicle’s service manual to locate and remove the ABS control module.
- Install a new ABS control module, ensuring all connectors are properly connected. (It is highly recommended to locate a proficient mechanic for the execution of this type of task.)
- Clear the U0415 code with the OBD-II scanner/code reader and test the ABS system for proper functionality.
Note: Consulting your vehicle’s repair manual or seeking expert help is crucial if you have uncertainties about any step in the procedure. Furthermore, ensure to reset any trouble codes post-repairs and engage in a test drive to confirm the resolution of the problem.
Read more: C1109 Nissan Code: ABS Voltage Trouble Exposed
DIY Repair Level And Estimated Costs
The repair procedure for the U0415 code can vary in complexity. Basic tasks such as inspecting wiring and connectors, as well as replacing wheel speed sensors, can be tackled by DIY enthusiasts with intermediate mechanical skills. However, diagnosing and replacing the ABS control module may require advanced knowledge and specialized tools.
Estimated costs for repairs related to the U0415 code can vary widely depending on the specific vehicle and components involved. Here is a table outlining approximate costs:
| Repair Task | Estimated Cost |
| Wheel speed sensor replacement | $50 – $100 |
| ABS control module replacement | $200 – $500 |
| Wiring repair | $50 – $150 |
| Professional diagnosis | $100 – $200 |
Keep in mind that these are rough estimates, and actual costs may differ. Additionally, if unsure or uncomfortable with the repair process, it is recommended to seek assistance from a qualified mechanic to ensure proper diagnosis and repair of the U0415 code.
U0415 Infographic

Final Thoughts
And that’s a wrap on understanding the U0415 code! Dealing with car issues might seem tricky, but armed with the right info and tools, you can handle it.
Got questions or stories about this code? Share them in the comments – let’s chat! If this guide helped you, pass it on to pals who love tinkering with cars. Until next time, happy fixing and safe driving!
Learn more about other codes by using our OBD lookup tool!
Reference Sources
- MyCarDoesWhat.org, Anti-lock braking system
- J.D. Power, What is a front-wheel speed sensor?
C0242 Code: Traction Control Malfunction in GM Vehicles
C0242 Code: Traction Control Malfunction in GM Vehicles
Encountering the strange C0242 code while troubleshooting your vehicle can be a bit worrying. But don’t worry, I’m here to help.
In a nutshell, the C0242 code signifies a traction control malfunction. However, understanding its meaning and how it affects your vehicle requires further exploration. Read on for more details!
C0242 Code: An Overview
Below are the key points about the C0242 code!
- Definition: Engine Control Module/ Powertrain Control Module Indicated Traction Control Malfunction
- Severity: Medium
- DIY Skill Level: Intermediate
- Continue To Drive?: No
- Estimated Repair Cost: $100 – $500
What Does The C0242 Code Mean?
The C0242 code is a generic diagnostic trouble code (DTC) that commonly appears in General Motors (GM) vehicles, including Chevrolet (Silverado, Impala, Malibu, Tahoe, Traverse), Buick, Buick Enclave, Cadillac, and GMC (Acadia, Sierra, Yukon) models. This code specifically means that the Engine Control Module (ECM) detects a traction control malfunction.
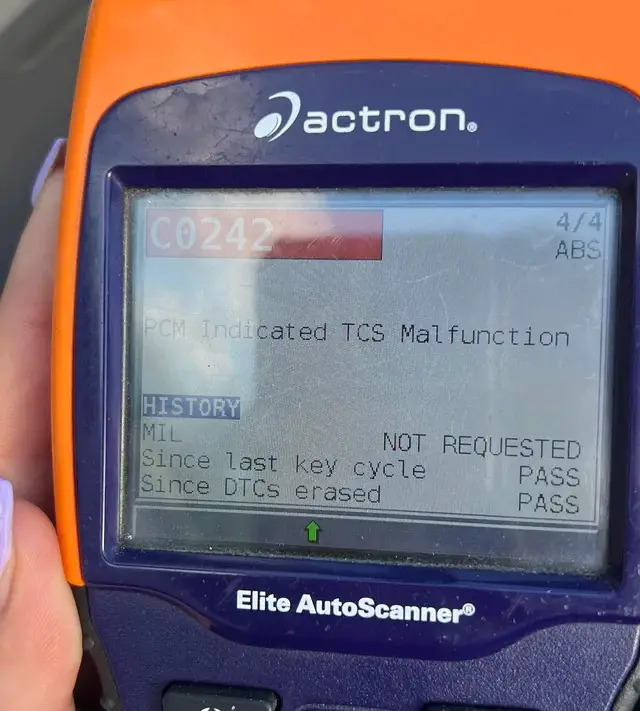
(Image credit: Reddit)
The key component related to this code is the Electronic Brake Control Module (EBCM), which is responsible for controlling the traction control system (TCS). The EBCM communicates with the ECM to monitor and regulate the vehicle’s traction control. When the ECM detects an anomaly or malfunction in the traction control system, it triggers the C0242 code.
It’s important to note that the C0242 code is sometimes accompanied by other codes, such as P0641 and P2135, which help pinpoint specific problems related to the electronic throttle control (ETC) system or other related components.
How Serious Is The C0242 Code?
The C0242 code is considered to have a medium severity level. While it may not indicate an immediate danger, it should not be ignored. The code can affect the vehicle’s stability, traction control functionality, and overall handling.
Continuing to drive with the C0242 code present is not recommended, as it may compromise the safety and performance of the vehicle. It is advisable to have the issue diagnosed and repaired promptly to restore the proper functioning of the traction control system. Ignoring the code may lead to potential safety risks and further damage to other related components.
Read more: GM OBD2 Codes List For FREE Download [Generic + Manufacturer-specific]
Warning Signs Of C0242 Code
The C0242 code typically presents with several noticeable symptoms, including:
- Illuminated warning lights: Check Engine Light, Traction control light, ABS warning light
- Service Stabilitrak message
- Reduced traction control functionality
- Increased wheel slippage during acceleration
- Decreased stability during braking
Possible Causes Of C0242 Code
The C0242 code can arise due to several underlying causes, such as:
- Poor electrical connections within the EBCM circuit
- Open or shorted harness in the EBCM circuit
- Faulty EBCM
- Issues within the traction control system sensors:
- ABS solenoid valve malfunction.
- Loose or faulty connection at the wheel speed sensors.
- Other related sensor issues.
Read more: C0035 Code: Understanding Wheel Speed Sensor Issues
C0242 Diagnosis And Repair: Step-by-Step Guide
Are you ready to diagnose and repair the C0242 code? Our comprehensive guide provides step-by-step instructions and valuable insights to deal with this code.
Essential Tools And Parts
To diagnose and repair the C0242 code, you may need the following tools and parts:
- OBD-II scanner or diagnostic tool
- Multimeter
- Wheel speed sensor(s)
- Electrical contact cleaner
- Wiring repair kit
- Torque wrench
- Socket set
Step-by-step procedure
Step 1: Retrieve the code
Use an OBD-II scanner to retrieve OBD2 codes from the vehicle’s ECM. If there are any associated codes besides the C0242, address them first.
Step 2: Visual inspection
Perform a visual inspection of the EBCM circuit and wiring harnesses. Inspect for damage, loose connections, or corrosion. Repair/replace as needed.
Step 3: Check electrical connections
Ensure that all electrical connections related to the EBCM and traction control system are secure. Clean any corroded terminals and ensure proper contact.
Step 4: Test related sensors
Inspect the wheel speed sensors for loose connections, damage, or debris. Clean the sensor surfaces and check for proper alignment.
Also, test the functionality of the ABS solenoid valve using a diagnostic tool or multimeter. Replace any faulty sensors or the ABS solenoid valve if needed.
Step 5: Inspect EBCM
If all other components check out, consider the possibility of a faulty EBCM. Consult the vehicle’s service manual for specific testing procedures to diagnose the EBCM. Replace the EBCM if necessary.
Step 6: Clear codes and test drive
After making any repairs or replacements, clear the codes using the OBD-II scanner. Take the vehicle for a test drive to ensure that the C0242 code does not reappear and that the traction control system is functioning properly.
Note: Handle wheel speed sensors carefully to avoid damage. Improper handling can cause more serious issues or damage other components.
DIY Repair Level And Estimated Costs
The level of DIY repair for addressing the C0242 code can vary depending on your automotive knowledge, skills, and access to tools. Some steps, such as visual inspections, checking electrical connections, and clearing codes using an OBD-II scanner, can be performed by individuals with intermediate DIY experience.
However, when it comes to more intricate tasks like testing wheel speed sensors, diagnosing the ABS solenoid valve, inspecting the EBCM, or repairing wiring issues, it is recommended to seek the expertise of a professional mechanic. These tasks often require specialized equipment and technical knowledge to ensure accurate diagnosis and proper repairs.
Here is a general table outlining estimated costs for the main repair tasks associated with the C0242 code:
| Repair Task | Estimated Cost |
| Wiring repair/replacement | $100 – $500 |
| Wheel speed sensor replacement | $100 – $200 |
| ABS solenoid valve replacement | $150 – $300 |
| EBCM replacement | $300 – $600 |
Note: Repair cost can vary depending on factors such as labor rates, the vehicle make and model, and location.
Final Thoughts
Now that you know what the C0242 code means and how to fix it. I hope you can keep your car running smoothly.
Please share this information with your friends and family if you found it helpful. If you have any questions, feel free to comment below.
Good luck with your diagnosis!
Reference Sources
- Kelley Blue Book, Traction Control System: How It Works and When To Use It.
- YourMechanic, Bad Electronic Brake Control Module.
C0800 Code: Control Module Power Circuit Issues
C0800 Code: Control Module Power Circuit Issues
Encoutering the C0800 code and wondering what it actually means?
In simple terms, this code refers to a control module power circuit voltage issue. Don’t worry if you’re unfamiliar with technical jargon – that’s what we’re here for!
In this article, we’ll explore the meaning, severity, symptoms, causes, and diagnosis of the C0800 code.
So, let’s jump in!
C0800 Code: An Overview
The following points outline the key aspects of the C0800 code!
- Definition: Control Module Power Circuit
- Severity: Medium
- DIY Skill Level: Intermediate
- Continue To Drive?: Yes
- Estimated Repair Cost: $50 – $500
What Does The C0800 Code Mean?
The C0800 code is a diagnostic trouble code that indicates an issue with the control module power circuit. Though this is a generic code that can appear in any vehicle, it is most commonly triggered in GM models such as the Chevy (Equinox, Cruze, Silverado, Malibu) and GMC (Sierra and Terrain).
It’s worth noting that there are different variations of the C0800 code that provide additional information about the specific nature of the problem. For example:
- C0800 0D: Control Module Power Circuit High Resistance/ Device Power 1 Circuit High Resistance
- C0800 03: Control Module Power Circuit Low Voltage/ Device Power 1 Circuit Voltage Below Threshold
- C0800 5A: Control Module Not Plausible
- C0800 07: Control Module Power Circuit High Voltage/ Device Power 1 Circuit Voltage Above Threshold
- C0800 11: Device Power 1 Circuit High Input
- C0800 12: Control Module Power Circuit – Low Input
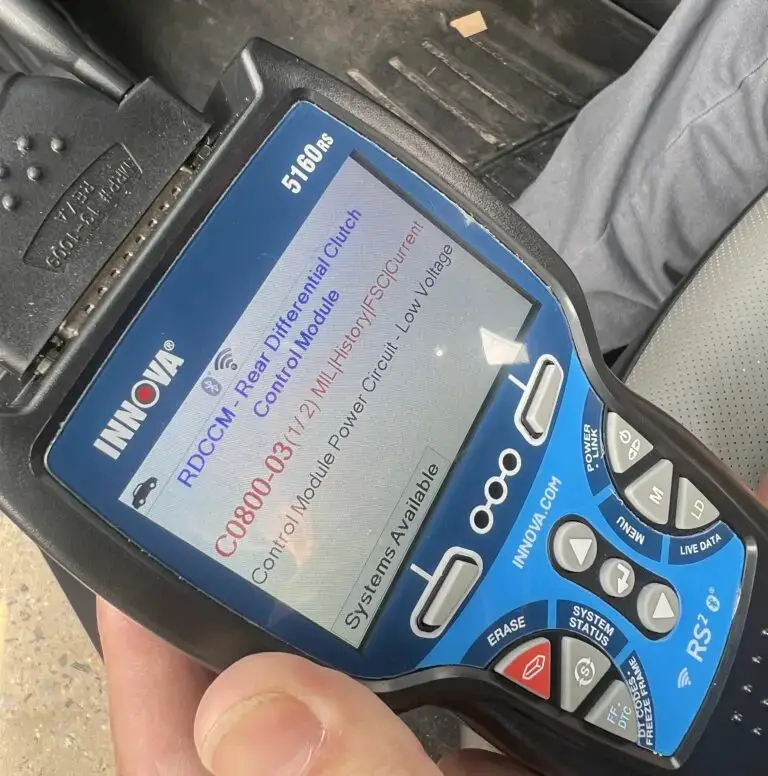
To understand the C0800 code better, let’s take a look at the systems and components involved. Within an automobile engine, there are various control modules responsible for different functions, such as the engine control module (ECM), body control module (BCM), and transmission control module (TCM). These modules work together to ensure the smooth operation of your vehicle.
The C0800 code is typically triggered when there is a problem with the power circuit supplying voltage to these control modules. It can be caused by a faulty wiring harness, a malfunctioning power relay, or a weak battery. When the voltage in the power circuit falls below or exceeds the predetermined threshold, this code is stored in the vehicle’s onboard computer.
Read more: GM OBD2 Codes List For FREE Download
How Serious Is The C0800 Code?
The severity level of the C0800 code can be classified as medium. While it indicates a problem in the control module power circuit, it is not an immediate cause for panic.
You can continue to drive your vehicle with this code present, but it is still important to address the underlying issue. Ignoring the C0800 code for an extended period may lead to further complications or potential damage to other vehicle components.
Read more: C0242 Code: Traction Control Malfunction in GM Vehicles
C0800 Code – Warning Signs To Watch Out For
The C0800 code typically presents with several noticeable symptoms, including:
- Illuminated dashboard warning lights: check engine light, ABS warning light and traction control light
- Service StabiliTrak message
- Loss of power or reduced engine performance
- Erratic behavior of vehicle systems
- Difficulty starting the vehicle
Exploring The Culprits Behind The Code C0800
To better understand the root causes of the C0800 code, consider the following possibilities:
- Faulty wiring or connectors
- Defective power relay
- Weak battery or poor electrical connection
- Issues with the control modules themselves
Note: It’s worth noting that there is a known issue with the E411 connector on the Equinox. It’s a common cause for this code on Equinox vehicles. Most of the time, it’s corroded and needs to be replaced.
Diagnosis And Repair: Step-by-Step Guide
Are you ready to diagnose and repair the C0800 code? Our comprehensive guide provides step-by-step instructions and valuable insights to deal with this code.
Essential Tools And Parts
- Multimeter
- Battery load tester
- Wiring diagram for the specific vehicle model
- Electrical contact cleaner
- Replacement wiring harness or connectors (if necessary)
Step-by-step Procedure
Step 1: Begin by checking the battery voltage and performing a load test. Consider replacing the battery if necessary.
Step 2: If the issue persists, check the voltage at the easiest accessible controller, such as the ABS module. Gradually move on to other controllers, checking for any voltage issues.
Step 3: Verify the wiring connections for any signs of corrosion or loose connections and clean them if necessary. Pay special attention to the E411 connector near the tank if you own an Equinox model. If a faulty wiring harness or connector is identified, replace it with the appropriate replacement part.
Step 4: If the wiring check reveals no issues, test the control module and consider any necessary repair or replacement.
Step 5: Clear the code and test drive your vehicle.
Note: Throughout the process, refer to the wiring diagram for the specific vehicle model to ensure accurate diagnosis and repair.
DIY Repair Level And Estimated Costs
The DIY repair level for diagnosing and fixing the C0800 code is moderate. While the initial steps, such as checking the battery voltage, can be done by most car owners, troubleshooting the wiring and connectors may require some technical knowledge and expertise.
If you’re uncertain about tackling the repair yourself, it is always recommended to seek assistance from an expert or a qualified mechanic. They have the necessary tools, experience, and knowledge to diagnose and fix the issue accurately.
The estimated cost for repairing the C0800 code can vary depending on the specific cause and the need for replacement parts. It is advisable to consult with a mechanic for an accurate assessment of the repair costs.
Explore estimated repair costs for C0800 code-related tasks in the table below.
| Repair Task | Estimated Cost |
| Professional diagnosis fee | $50 – $200 |
| Battery load test | $20 – $50 |
| Wiring repair | $100 – $300 |
| Module replacement | $200 – $1000 |
Final Thoughts
We understand car problems, like the C0800 code or any other OBD2 code, can be stressful. So, we want to ensure you have all the information you need to get your car fixed quickly and easily! If you’re uncomfortable working on your vehicle, I recommend taking it to a qualified mechanic. They’ll be able to diagnose the problem and fix it right away.
If you have any questions or insights, feel free to share them in the comments below.
Stay proactive in maintaining your vehicle and enjoy a smooth driving experience!
Related Technical Service Bulettins
- DTC B1325, B1330, B1420, B1424, B1517, C0800, C0895, C0899, C0900, C12E1, C12E2, P0560, P0562, or P0563 – Hybrid HP5.
- General Motors, 2020, PIT5739 TSB – All 2018 Chevrolet Equinox and GMC Terrain.
- General Motors, 2020, PIC5667 TSB – 2011 – 2012 Chevrolet Volt.
P25A2 Code: Expert Explanation And Recommendations
P25A2 Code: Expert Explanation And Recommendations
Have you seen the Malfunction Indicator Light (MIL) illuminated with code P25A2? This possibly indicates a problem with the Brake System Control Module (BSCM) or the brake system.
These are essential parts of your car, and a problem with them can be dangerous. Therefore, it is crucial to understand what the code P25A2 means and what you should do if you see it.
In this article, I’ll explain what the code means, discuss the possible causes, and share my advice on what you should do.
So, read on to learn more!
P25A2 Code: An Overview
The P25A2 code can be a bit confusing, but here’s a breakdown of it:
- Definition: Brake System Control Module Requested MIL Illumination
- Severity: Medium
- DIY Skill Level: Advanced
- Continue To Drive?: Yes
- Estimated Repair Cost: $50 – $200
What Does The P25A2 Code Mean?
The P25A2 code is a generic diagnostic trouble code (DTC) defined as “Brake System Control Module Requested MIL Illumination.” This code is not specific to any particular vehicle make or model, but it is commonly triggered in GM vehicles such as the Chevy Silverado, Volt, Corvette, and GMC Sierra.
This DTC suggests that there is a fault or malfunction detected within the brake system control module, which has triggered the module to request the illumination of the MIL. The brake system control module monitors and controls various aspects of the vehicle’s braking system, including ABS (Anti-lock Braking System) and traction control.
When a fault or malfunction is detected within the brake system, such as a sensor reading out of range or a valve not functioning as expected, the brake system control module may set the P25A2 code and request the illumination of the MIL.
The P25A2 code is often associated with other codes which further clarify the issue, such as:
- P0606: PCM / ECM Processor Fault
- C0021: Brake Booster Performance (Subfault)
- C05D2: Brake Master Cylinder Piston Excessive Travel Detected
- U0139: Lost Communication with Suspension Control Module “B”
How Serious Is The P25A2 Code?
When it comes to the severity level of the P25A2 code, it is generally considered medium. In general, the code doesn’t necessarily pose an immediate danger to your vehicle or a complete failure of the braking system.
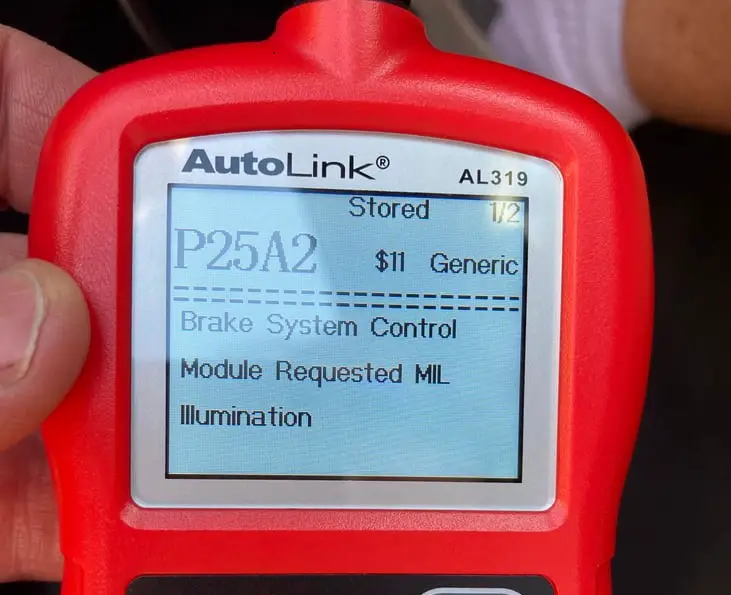
(Image credit: Corvette Forum)
Despite the code being present, it is generally safe to continue driving. However, to ensure the continued safe operation of your vehicle, having your car inspected and diagnosed by a qualified mechanic at your earliest convenience is recommended.
Read more: GM OBD2 Codes List For FREE Download [Generic + Manufacturer-specific]
Warning Signs Of The P25A2 Code
The P25A2 code may manifest through various symptoms, including:
- Illumination of the check engine light and/or ABS warning light
- Brake system performance issues
Possible Causes Of The P25A2 Code
The code P25A2 can be triggered by several potential causes, such as:
- Malfunctioning brake pedal position sensor
- Faulty wheel speed sensors
- Problem with the brake system wiring
- Wiring or connection issues within the BSCM
- BSCM’s software glitch
- Faulty BSCM
Read more: C0035 Code: Understanding Wheel Speed Sensor Issues
What to Do If You See The P25A2 Code?
As a mechanic, I strongly recommend that you seek professional help if you encounter the P25A2 code. Additionally, it is important to refrain from attempting to fix the code yourself, as it can be a complex situation, particularly for a DIY-er.
There are a few reasons why it is important to take your car to a qualified mechanic or ask for help from your nearest car dealer:
- The P25A2 code often appears associated with other codes, making it difficult to diagnose and fix on your own.
- There are many technical service bulletins (TSBs) related to this code, which your car may be covered by. For example, in 2020, GM had a TSB called PIT5735D to address the P25A2 code associated with U0422, U0420, U0151, and other complex U-codes. A mechanic can apply the TSB and recommend the best action to fix your car.
- The BSCM is a critical safety component, and it is important to have it repaired by a qualified mechanic with the proper tools and knowledge.
Additionally, some of the repairs that may be needed to fix the P25A2 code include:
- Updating the software
- Repair wiring issues
- Repairing or replacing a faulty braking-related components (wheel speed sensor, brake actuator, brake line, etc)
- Replace the BSCM
Final Thoughts
To wrap up, understanding the P25A2 code and its impact on your vehicle’s brake system is crucial for maintaining safety on the road. While it is a medium severity code, we recommend seeking professional assistance by taking your car to an authorized dealer or qualified mechanic. They have the expertise and resources to diagnose and address the issue.
We hope this article has helped you understand the P25A2 code. If you found this information helpful, please share it with others who may benefit. Feel free to leave a comment below to share your experiences or ask any questions.
Happy driving!
Reference Sources
How a Car Works, How the braking system works.
P051B Code: A Comprehensive Guide for Vehicle Owners
P051B Code: A Comprehensive Guide for Vehicle Owners
Welcome, vehicle owners! If you’ve encountered your vehicle’s P051B error code, you’ve arrived at the right place.
In this guide, we’ll explore the details of the P051B code, its meaning, severity, symptoms, causes, and the necessary diagnosis and repair steps. As experienced mechanics with a wealth of knowledge, we’re here to share our expertise and assist you in resolving this issue.
So, let’s dive in!
P051B Code: Quick Overview
Here is an overview of the P051B code. Take a look!
Definition: Crankcase Pressure Sensor Circuit Range/Performance
Severity: High
DIY Skill Level: Intermediate
Continue To Drive?: No
Estimated Repair Cost: $100 – $300
What Does The P051B Mean?
The P051B error code indicates a problem with the Crankcase Pressure Sensor Circuit Range/Performance. This code is commonly found in various car brands, including Ford equipped with EcoBoost engines, Dodge with Cummin engines, etc.
The Crankcase Pressure Sensor is an essential part of the vehicle’s emission control system. It works with the Positive Crankcase Ventilation (PCV) system, which manages the pressure and circulation of gases within the engine crankcase.Under normal operating conditions, the Crankcase Pressure Sensor monitors the pressure levels within the crankcase. If the sensor detects that the pressure deviates from the expected range, it sends a signal to the engine control module (ECM) or powertrain control module (PCM), triggering the P051B error code.
It’s worth noting that the P051B code is often associated with code P04DB, which indicates a problem with the Crankcase Ventilation System Disconnected. These codes are closely related, as a malfunction in the crankcase ventilation system can impact the sensor’s readings, leading to the P051B code being triggered.
Is it Safe to Continue Driving With The P051B?
The P051B code is considered to be of high severity level. Ignoring or continuing to drive with the P051B code can have severe consequences, including engine performance degradation, reduced fuel efficiency, and the risk of further damage to crucial engine components.
It is crucial to address this code promptly to prevent further complications and ensure your vehicle’s safe and optimal operation. We strongly advise against driving with the P051B code present and diagnosis and repair as soon as possible.
Signs of The P051B Code
The following are common symptoms associated with the P051B error code:
- Illuminated Malfunction Indicator Lamp (MIL) or Check Engine Light
- Reduced engine performance or power
- Engine misfires or rough idle
- Decreased fuel efficiency
What Triggers the P051B Code?
The P051B error code can be caused by various factors, including:
- Engine over-filled with oil
- Faulty or malfunctioning crankcase pressure sensor
- Dirty/bad positive crankcase ventilation valve
- Water intrusion in crankcase pressure sensor
- Issues with the wiring or connectors related to the sensor
- Crankcase ventilation system problems: broken hoses, blown valve cover gasket, failed oil fill cap, v.v
- PCM or ECM software or programming issues
How To Diagnose And Fix The P051B Code
In this section, we will provide you with the necessary tools and parts required for diagnosing and repairing the P051B error code. We will then guide you through a step-by-step procedure to address the issue effectively.
Essential Tools and Parts
- OBD-II scanner or code reader
- Basic hand tools (such as wrenches, sockets, and screwdrivers)
- Crankcase pressure sensor (if necessary)
- Positive crankcase ventilation valve
- Vacuum hose/connector
- Electrical connectors and wiring repair kit
Step-by-Step Procedure
- Retrieve Diagnostic Trouble Codes:
Connect an OBD-II scanner or code reader to retrieve the trouble codes and identify the P051B code.
- Check the engine oil:
Use the dipstick to check the engine oil. Make sure it’s not overfilled. Drain the excess oil if needed.
- Visual inspection of the Positive Crankcase Ventilation (PCV) System:
- Inspect the PCV valve, hoses, and connections for any signs of leaks, damage, or restrictions. Ensure that the PCV valve maintenance schedule has been followed.
- Verify that the correct PCV valve part number is being used.
- Check the cleanliness and correct routing of the fresh air tube and related hoses.
- If any concerns are found during the inspection, repair or replace the affected components.
- Check for Leaks:
- Inspect the oil cap, throttle body, PCV hose, vacuum lines and the air intake system for any leaks or damages.
- Repair or replace the faulty parts if needed.
- Inspect the wiring and connectors related to the crankcase pressure sensor:
- Inspect the wiring and connectors related to the crankcase pressure sensor for any visible damage, loose connections, or corrosion.
- If wiring issues are found, repair or replace the damaged wiring and ensure proper connections.
- Test the Crankcase Pressure Sensor:
- Use a multimeter to test the crankcase pressure sensor. Ensure to consult the manufacturer’s specifications for testing procedures.
- If the reading is out of range, replace it with a new one and make sure proper installation.
- Clear code and test drive:
Clear the error codes using the OBD-II scanner and test the vehicle to verify if the P051B code reoccurs.
Note: It is recommended to consult the vehicle’s service manual or seek professional guidance for specific instructions and testing procedures tailored to your vehicle’s make and model.
DIY Repair Level And Estimated Costs
The level of DIYer skill required to address the P051B error code can vary from immediate to advanced. It is important to consider your mechanical skills and experience when deciding whether to tackle the diagnosis and repair yourself.
While some individuals may feel confident in performing the diagnosis and repair themselves, others may prefer to seek assistance from a professional mechanic. It is important to assess your capabilities and comfort level before proceeding with DIY repairs.
Below is a table of estimated costs for repairing the P051B error code:
| Repair Task | Estimated Cost Range |
| Crankcase Pressure Sensor Replacement | $50 – $200 |
| Wiring Repair | $50 – $200 |
| Vacuum Leak Repair | $100 – $300 |
| Professional Diagnostic Fee | $75 – $150 |
Please note that these estimated costs are intended to provide a general idea and can vary depending on the vehicle make and model, location, and labor rates. It’s always recommended to consult local mechanics or obtain quotes from automotive repair shops to get a more accurate estimate tailored to your situation.
Final Thoughts
Now, you have a comprehensive understanding of the P051B error code and how to address it. By recognizing the symptoms, understanding the causes, and following the step-by-step repair procedure, you are equipped to tackle this issue confidently. Remember, it is crucial to address the P051B code promptly to prevent further complications and ensure the safe operation of your vehicle.
If you found this guide helpful, feel free to share it with other car enthusiasts who may benefit from this knowledge. We also encourage you to leave your comments or questions below. Your feedback is valuable, and we’re here to provide further assistance or clarify any doubts you may have.
Keep your vehicle running smoothly and stay informed about other car-related topics. Safe travels!
Reference:
Howstuffworks – How Does a Positive Crankcase Ventilation (PCV) System Work?