
You want to determine if your O2 sensor is working well or is faulty but don’t understand its live data?
If yes, this article is for you.
I’ll show you EXACTLY how to interpret the O2 sensor live data to identify if the values are higher or lower than normal.
In today’s guide, you’re going to learn:
Let’s get started!
How To Read O2 Sensor Live Data
The best thing to test the O2 sensor is using a scanner with the “Data Stream” function. This allows you to see how fast the voltages will go up and down.
By checking the responsiveness of the O2 sensor to the changes in the air and fuel mixture, you can know if the Oxygen sensor is functioning normally.
Now, warm your car up by raising the engine speed to 2,000 RPM for about 15 seconds.
Once the O2 sensor reaches its operating temperature of 600ºF and generates a voltage signal, then it’s time to find out…
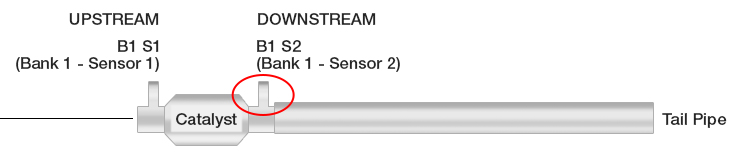
How To Know If The Upstream Oxygen Sensor Is Bad
The upstream oxygen sensor, also called O2 sensor 1 or front O2 sensor, is located before the catalytic converter.

It provides information about the air-fuel ratio in the exhaust. Then, the computer can decide to add more fuel or take it away to ensure that your car runs as it should.
Sensor 1 is supposed to fluctuate 1 cycle a second between 0.1V and 0.9V. The voltage signal should also go higher than 0.75V and lower than 0.25V.
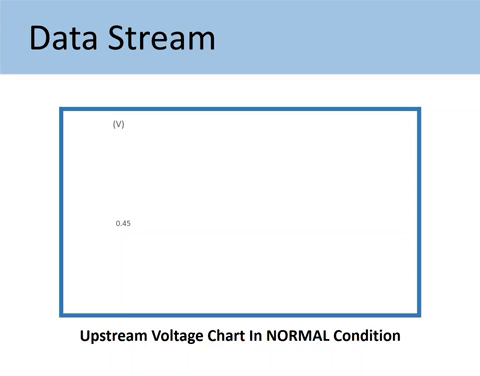
Note: One cycle is made when the O2 sensor signal crosses the 0.45V point approximately 3 times (3 cross counts).
Then How do you know if the Upstream Oxygen Sensor is BAD?
Case #1: When the O2 sensor signal stuck at 0.45V
As mentioned above, the voltage output by Upstream should fluctuate across the 0.45V value. The 0.45V mark is called a bias voltage.
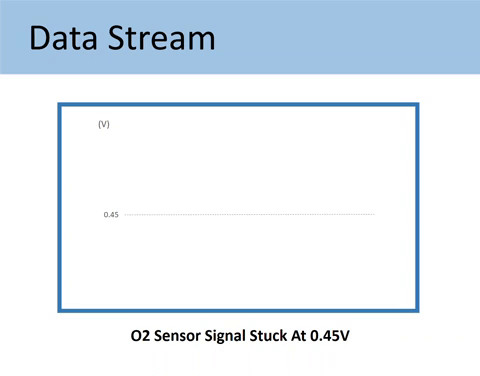
Being stuck at the bias voltage (0.45V) means you have encountered one of the following situations:
- The sensors have failed.
- There is a wiring problem, such as a shorted O2 signal wire.
- The faulty O2 signal ground.
NOTE:
On later model Jeep/Chrysler, constant reading of around 2V or 4V (not 0.45V) indicates a bad O2 sensor or an open circuit.
Case #2: When the voltage signal represents a LEAN condition
If the Upstream is stuck in the low voltage from 0.1V to 0.45V, you would have the lean running condition.

Lean condition happens when a car has too much air. Then it causes jerking or hesitation in speeding up.
Quick question: Having an O2 sensor reading lean means you have a bad O2 sensor, right?
No, O2 sensors rarely cause “lean” conditions. The culprit is almost always something else, usually a fuel delivery issue or a vacuum leak.
Therefore, don’t assume that just replacing a new O2 sensor will repair the issue. There are many causes; they are:
- Vacuum leak at the throttle body (the common reason)
- Dirty MAF sensor
- Old O2 sensor
- Exhaust leak
- Weak fuel pump
- Dirty fuel injection
- Restricted fuel line
Vacuum lines should be secured. The fuel pump and sensors should be checked.
ALL THESE THINGS above need to be addressed. And oxygen sensor codes won’t keep coming back anymore.
Case #3: When the voltage signal represents a RICH condition
If the fuel mixture is burning rich, less oxygen will be in the exhaust.
In this case, the oxygen sensor generates 0.45V-0.9V, and your Upstream runs RICH.
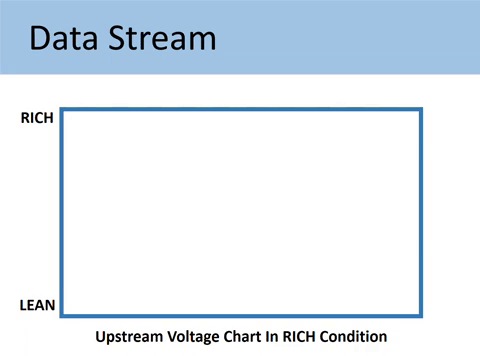
What makes the O2 sensor read Rich?
Exhaust restriction can be the most common cause of a RICH condition. The other possible causes are:
- Bad or dirty MAF sensor
- Worn piston rings
- Leaking fuel injector
- Bad fuel pressure regulator
- EVAP system faulty
- High fuel pressure
WARNING:
Trying to diagnose the reasons causing lean or rich conditions is always complicated. And it is beyond the scope of this paper as well.
But I want to recommend an in-depth video examining and interpreting Fuel Trim data.
With that, you can find out your answers.
How To Know If The Downstream Oxygen Sensor Is Bad
Downstream is Sensor 2, located after the catalytic converter. It is also commonly referred to as a post-cat O2 sensor or rear O2 sensor.
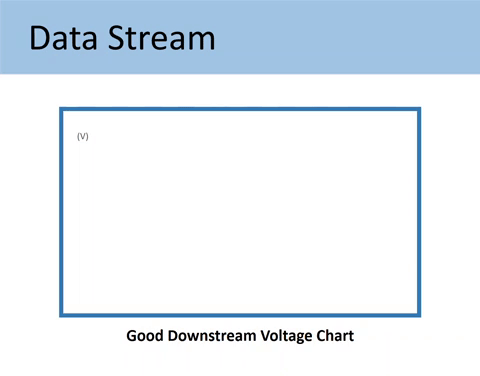
Downstream may have some minor fluctuations, but it should constantly indicate rich or low oxygen content. Its voltage is supposed to stay around 0.5 volts and not alternate too low or too high.
Here’s what the Downstream O2 sensor signals should look like.
If the Downstream (Sensor 2) goes up and down as in the image below, it is proof that the catalytic converter is not grabbing oxygen and doing the proper chemistry.
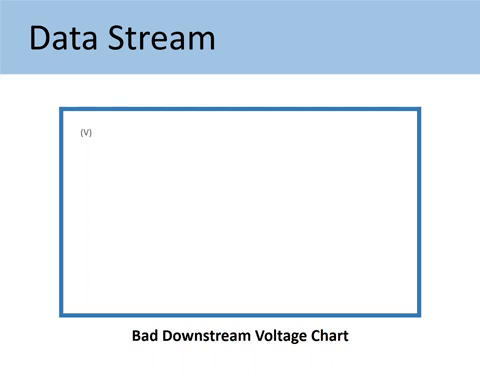
Here’s the comparison of the GOOD vs. BAD downstream O2 sensor voltage chart.

Now,
What should you do if the downstream O2 sensor is bad?
An unnormal downstream voltage chart could be a symptom of a large range of issues. But you can try some useful tips below to eliminate the code:
- First, clean your MAF and check your air filter as well as vacuum leaks.
- Then, check the electrical connectors.
- Finally, look at your spark plugs to ensure it’s running in a proper range.
IMPORTANT:
Do not replace the Downstream sensor without analyzing the main culprit causing the issue.
This is because only the Upstream sensors control fuel economy. Downstream ones just tell the computer how the converters are working.
However,
Testing the O2 sensor by reading LIVE DATA isn’t as easy as it sounds.
Is there another way?
Yes, you can check the O2 sensor with the “READ CODE” function on your scan tool.
Scroll down to see more!
How To Test An O2 Sensor By Reading Codes On Scanner
Prepare an OBD2 scan tool, and here’s how to do it:
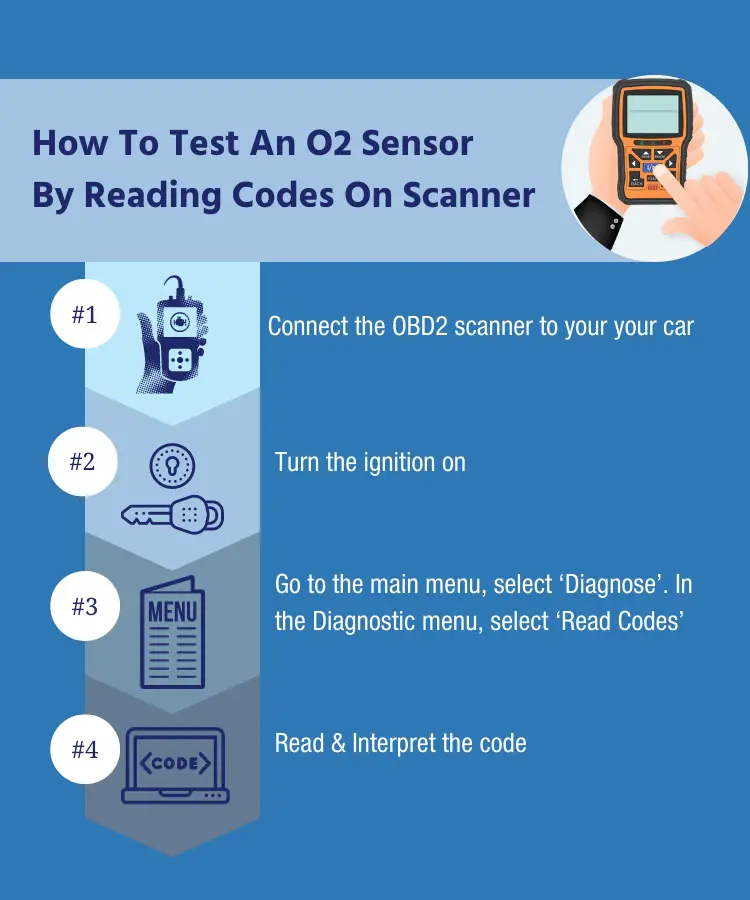
Step #1: Connect The OBD2 Scanner To Your Car
Insert the OBD2 scanner’s connector to your vehicle’s diagnostic link connector (DLC). The DLC has 16 pins and is shaped almost like a triangle.

Step #2: Turn The Ignition On
Insert the key and turn your car to the on position. You don’t have to start the car’s engine.
Now, the scanner can communicate with your vehicle’s onboard system.
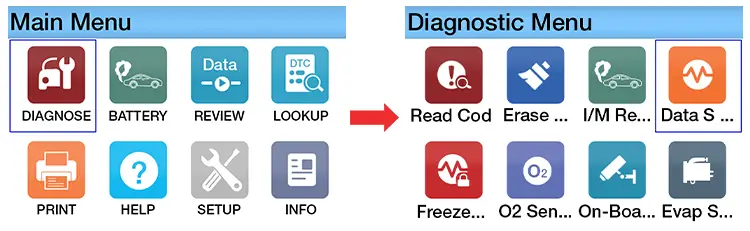
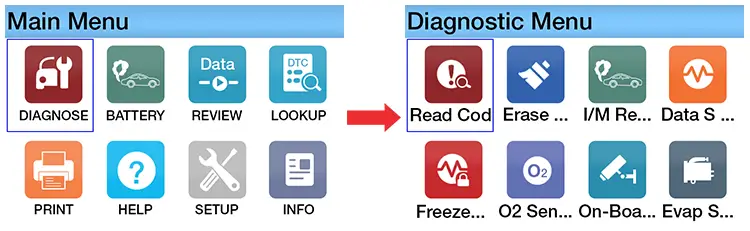
Step #3: Select “Read codes”
Go to the “Main Menu” and select “Diagnose”. In the Diagnostic Menu, tap on “Read Codes” icon.
Step #4: Read & Interpret The Code
Read code is the first step in your diagnosis of the problem.
The screen will tell you whether there is any signal of a bad O2 sensor? Which issue? In which sensor?
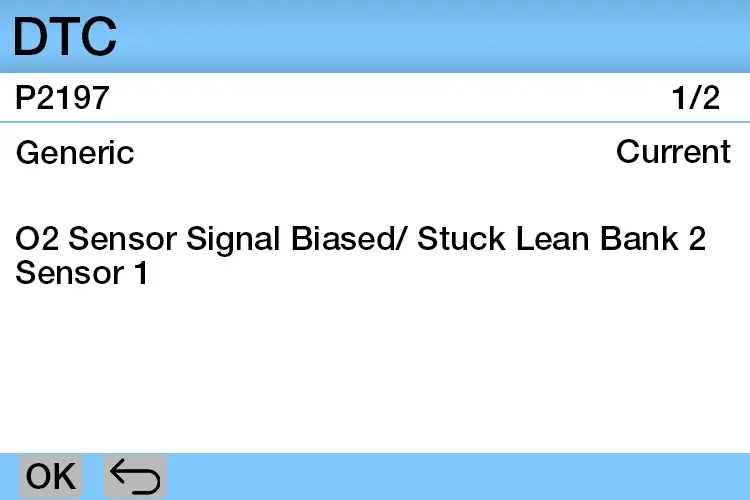
Some common trouble codes that point to an O2 sensor include: P0130, P0135, P0131, P0171, P0174, P0175
But you have to know that:
O2 sensor trouble codes don’t indicate that the O2 sensors are faulty.
To know exactly if the O2 sensor is bad and needs replacing or not, use the DTC Look-up Library of your scan tool or go to OBD2 Codes Lookup.
Then, search the codes you have on the “Search Box”.
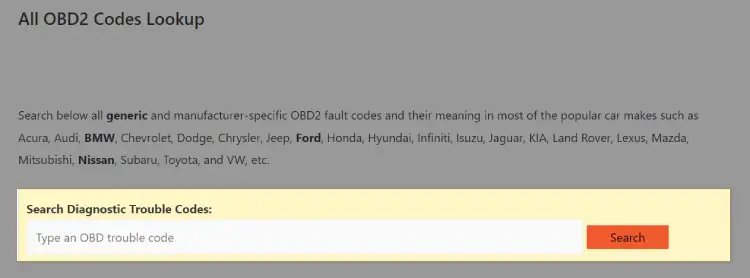
You will find the Meaning, Symptoms, Causes, and Diagnostic Steps of the codes you have.
Conclusion
That’s it for my guide to testing the O2 sensor with an OBD2 scan tool using live data.
Is there any problem when reading the O2 sensor live data?
Let me know by leaving a quick comment below.
Learn more: