
The air in the brake system can cause the brake pedals to feel a bit loose and spongy, which puts you and your car’s safety in jeopardy. Hence you should not delay looking for a solution.
It is essential to remove the trapped air from the brake system to ensure it works smoothly.
This guide will provide you with tips on how to bleed brakes.
How to bleed brakes?
There are five ways of bleeding brakes.
- The pump and hold method.
- Vacuum method.
- Pressure method.
- Gravity bleeding.
- Reverse method.
Let’s look at some of the most common methods used today to bleed the brakes.
How to bleed brakes by yourself manually?

Credit: pxhere.com
Preparation:
Before starting the process, make sure you gather these tools:
- Jack stand.
- 4-way lug wrench.
- Bleeder wrench.
- Transparent tube.
- Empty bottle with a hole on top.
Here’s the simple process:
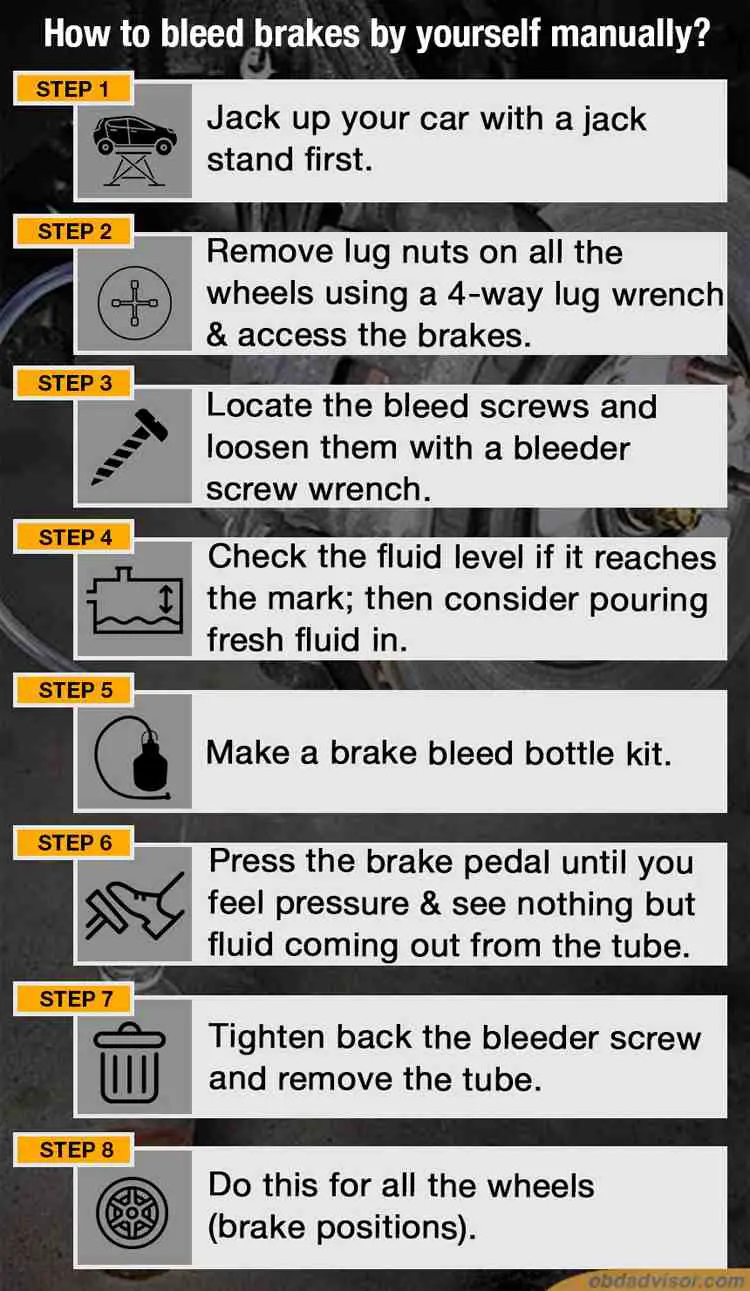
Step 1
Jack up your car with a jack stand first.
Step 2
Use a 4-way lug wrench to remove lug nuts on all the wheels to take them out to access the brakes behind every wheel.
Step 3
After removing the wheels, locate the bleed screws which are on the top of the caliper. Loosen them with a bleeder screw wrench. You may need to spray penetrating oil if the screws are too tight.
Step 4
When the bleeding screws come loose, you will get access to the main cylinder. Check the fluid level; if it is less than the point marked, pour fresh fluid in to reach the mark.
Step 5
What you will need now is a brake bleed bottle kit. It’s relatively easy to make one. Here’s what you need to do:
- Take a plastic bottle that has a large lid on the top.
- Grab a transparent tube that is long enough; it should fit on the bleeder screw and go all the way into the container.
- Make a hole on the lid of the bottle. Make sure it is the size so that the tube can be inserted into the container.
- Now, attach one end of the tube to the bleeder screw and put the opposite end into the bottle.
- Now, make another hole next to the one you made to put the tube into the bottle. This smaller hole is to remove the air from the fluid.
- You need to attach a tight sealing on the tube attached to the bleeder screw, which helps ensure the air doesn’t pass back into the system when you press the brakes.
- You must keep the bottle above the caliper level, and the master cylinder must not be unscrewed.
Step 6
Keeping the car engine turned off, walk to the brake pedal and press it several times. Keep pressing it until you feel pressure on the pedal. Every time you press the pedal, air, and fluid pass into the bottle.
Do it several times and to the point until you feel that the pressure required to press the pedal has increased slightly, which indicates that air bubbles have passed from the system into the bottle.
Check the tube now. You will see fluid with air bubbles. Keep repeating this process until you see nothing but fluid coming out from the tube.
Step 7
Tighten back the bleeder screw and remove the tube.
Step 8
Do this for all the wheels (brake positions).
How to bleed brakes with two people?
Bleeding the brakes might seem like a daunting task, but it isn’t if you know the right steps and you have a helping hand, such as a friend to help you out.
While you can try to do it on your own, we suggest that you seek help from a friend as it will allow you to save time and ensure the job gets done correctly.
So, without much ado, let’s learn how to bleed brakes with a friend:
Preparation:
It would help if you made specific preparations before bleeding the brakes:
1. Open the hood and remove the black cap on the top of the master cylinder.
2. With the help of a turkey baster, suck the fluid present inside the reservoir and pour in a separate jar or bottle.
3. Take a lint-free rag and clean the boundaries of the reservoir.
4. Add new oil into the reservoir.
5. Put the cap back on.
Things you need:
- Jack stand.
- 4-way lug wrench.
- Bleeder wrench.
- Flexible hose.
- Empty bottle with a hole on top.
Step 1
Elevate your car using a jack stand. You can also use cinder blocks if you don’t have a jack. However, a jack is more secure.
Step 2
Now, take a 4-way lug wrench, remove the leg nuts one by one, and take the wheel out. Do this with all four wheels.
Step 3
Once the wheels are out, locate the caliper, and on top of it, you’ll see the bleed screws. Unscrew to temporarily open a closed hydraulic system to remove air bubbles from the system.
Pour a little penetrating oil on the screws and remove them carefully as they can snap off. Use a bleeder wrench to unscrew them.
Remember that you need to undo them very carefully because if they break then, you’d be needing professional help.
Step 4
After you have loosened the bleeding screws, you gain access to the master cylinder.
Check the fluid level; if it seems lower than the marked point, add fresh fluid to the point that it covers the mark.
You can connect a flexible hose to transfer the fluid easily.
Make sure that the fluid you are using is compatible with your car. Also, the master cylinder must remain unscrewed.
It’s also vital to bleed all the brakes in the right sequence. The brake, which is the furthest from the master cylinder, needs to be bled first. Still, have a look at the factory manual for more guidance.
Step 5
Now, take a transparent tube that has two open ends. Place one end over the bleeding screw and the other inside a container, transferring the air from the system into the container.
Make sure to place the container slightly above the caliper to ensure the air transfers efficiently.
Step 6
Once done, ask your friend to keep their foot on the brake pedal and press it several times until there’s pressure on the pedal. However, the engine must be kept switched off.
Step 7
Ask the person to keep the pedal pressed and not lose the pressure. Meanwhile, open the bleeder screws just a little until you see the fluid passing through the tube, which will eliminate any remaining air bubbles present in the system.
Note: As the fluid is transferred, the pedal will automatically begin to drop down slowly. Ask your friend to let you know when it starts to drop
Step 8
Close the bleeder screw once the pedal completely drops and touches the surface. You must not release the foot until the screws are tightened. Otherwise, the air bubbles might go back in.
Quickly, go to the hood and check if the reservoir fluid level is right; if it isn’t, add brake fluid.
Step 9
Repeat steps 6, 7, and 8 about four to five times and stop when you see no more air bubbles in the passage tube.
Step 10
Now, repeat steps 6 to 9 for all the remaining brake positions (3). Once done, re-attach the wheels, unjack the car, and you have successfully bled the brakes.
Note: While your friend applies pressure on the pedal, look into the master cylinder and observe if the brake fluid erupts.
If it does, then it means that the air bubbles have not been removed. Keep repeating the process until there is no eruption in the cylinder.
Also, you must tighten the bleeder screws with brute force.
How to gravity bleed brakes?
This method takes a lot of time and involves the efforts of a single person only. It will take at least 4 hours to bleed all four brakes.
Preparation
Since this process can be messy as you’ll be draining oil for a few hours, it is a wise choice to put a large pan under the draining spot so that the floor doesn’t get messy.
Things you need:
- Jack stand.
- 4-way lug wrench.
- Bleeder wrench.

Step 1
Use a jack to elevate your car.
Step 2
With the help of a 4-way lug wrench, remove lug nuts on all the wheels. It will give you access to the bleeders.
Step 3
Once the wheels have been removed, find the bleeder screws on the top of the caliper. With a bleeder screwdriver or wrench, loosen the screws.
Step 4
Once the bleeding screws are loosened, remove the cap on the top of the master cylinder. The fluid will gradually begin to come out of the bleeding screw that you loosened, and so will the air.
Come back after an hour, and you’ll find a pool of fluid on the ground. You may also opt to place a container underneath the screw, so the fluid doesn’t drop on the ground.
Step 5
Do this with all the brakes and bleed them.
Step 6
Tighten the screws once you have removed the fluid, and attach back the wheels.
How to bleed brakes with ABS?
Credit: commons.wikimedia.org
Preparation:
Get these things first before starting the process:
- Jack stand.
- 4-way lug wrench.
- Bleeder wrench.
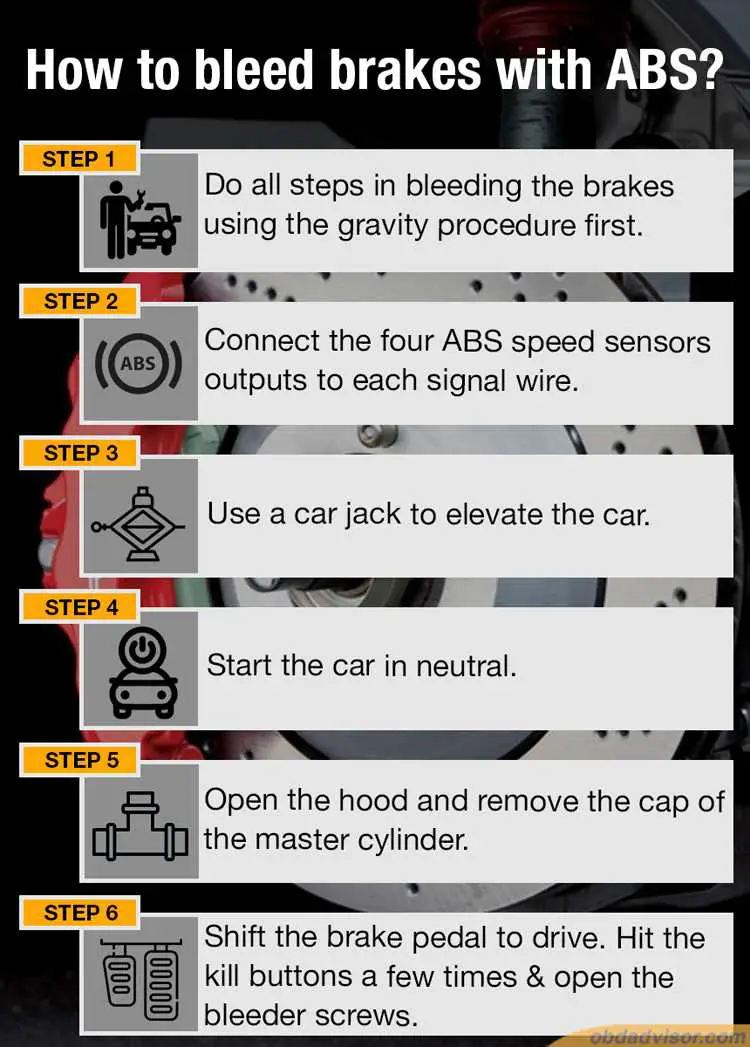
Step 1
It involves bleeding the brakes using the gravity procedure first.
Step 2
In the next step, connect the four ABS speed sensors outputs to each signal wire.
Step 3
Use a car jack to elevate the car.
Step 4
Start the car in neutral.
Step 5
Open the hood and remove the cap of the master cylinder.
Step 6
Now, do not press the brake pedal. Instead, shift to drive (do not accelerate).
Hit the kill buttons on the sensors a few times and open the bleeder screws after removing the wheels, which will remove the trapped air from the abs.
How to automatically bleed ABS brakes yourself with a scan tool?
By using a scanner that offers ABS Bleeding, you can bleed your brakes automatically and easily.
How to bleed brakes with a vacuum pump?
This requires a brake bleeding vacuum pump kit, which you can buy for as low as $30 from the market. It looks like a squirt gun and has one end. Its job is to suck out the fluid along with the air.
Preparation:
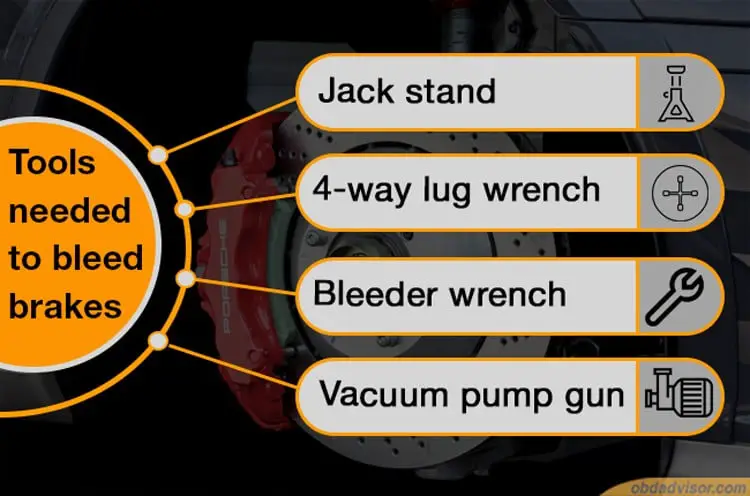
For this process, you’ll need:
- Jack stand.
- 4-way lug wrench.
- Bleeder wrench.
- Vacuum pump gun.
Step 1
Elevate the car using a car jack.
Step 2
Remove the four wheels one by one using a lug nut wrench.
Step 3
Remove the wheels to expose the bleeder screws. Now, attach the open end to the bleeder screw after loosening it.
The other end of the gun has a tube going into a container where the fluid will collect.
Make 5-6 pumps from the gun, which will suck up the fluid along with the air from the brake system and transfer it into the container attached to the vacuum pump/squirt gun.
This is how all the air will be removed, and you can refill the master reservoir with fresh fluid.
Step 4
Detach the vacuum from the bleeder screw and tighten it again.
Repeat the process for all wheels and when done, attach the wheels back again.
Is it better to bleed brakes with the car on or off?
If you replaced the brake pads and opened the lines, then it is a must for you to know how to bleed brakes. Because when you open the lines, a considerate amount of air passes into the system and forms air bubbles. Therefore, you must perform the brake bleeding process by reading how to bleed brakes. You won’t be needing to bleed the brakes if you changed the pads and didn’t touch the brake lines. This approach ensures your car’s brake performance isn’t hindered even if you bleed the brakes after pad replacement.
What does it cost to bleed brakes?
If you get your car’s brakes bled by a mechanic, then it can cost you between $80 to $150, and the labor costs might charge you more ($60 additional). Knowing how to bleed brakes can help you save this much amount of money.
It won’t cost you a penny if you have the tools available (lug nut wrench, brake bleeder screwdriver or wrench, plastic bottle, plastic tube).
You may opt to prepare a DIY brake bleeding kit or buy a vacuum pump kit from the market for as low as $30 only. It will help you know how to bleed brakes without any trouble.
What happens when you don’t bleed your brakes?
We often overlook the importance of brake bleeding, which can turn out to be very costly. If your car brakes feel spongy, then there might be air trapped in the system.
It’s important to know how brakes work to understand the braking system. Most cars have hydraulic brakes. When you press the brake pedal, it causes a thick fluid called “the brake fluid” to compress. As a result, the brakes are applied.
However, the mechanism doesn’t correctly work when there’s air in the system. The pressure ends up compressing the air instead of the fluid. Hence no proper brakes are applied.
Moreover, there’s a small and soft spring in the brake fluid column, which can get weary due to the presence of air bubbles in the brake system. It starts with a single bubble, which soon turns into a chain of bubbles.
This reduces the amount of pressure applied, and as a result, the braking system doesn’t work properly and may even fail. This is the reason why brake bleeding is essential.
Air can get trapped due to many reasons such as a leak, improper brake bleeding, issues with the pistons, a popped-up seal, or poor usage of brakes leading to them getting worn out.
No matter what the reason is, it’s important to know how to bleed brakes so that you can do it on your own.
How often should you bleed your brakes?
Auto experts recommend bleeding the brakes after every 2 to 3 years. Moreover, we also recommend bleeding the brakes when you have the brake pads changed because it might allow air bubbles to travel into the system, which helps ensure the system works well.
The bottom line
We hope this how to bleed brakes guide would make it easy for you to bleed brakes independently. Knowing how to bleed brakes will not only help you save money but also ensure the brakes work fine without any trouble.